Last updated on October 23rd, 2024 at 06:25 pm
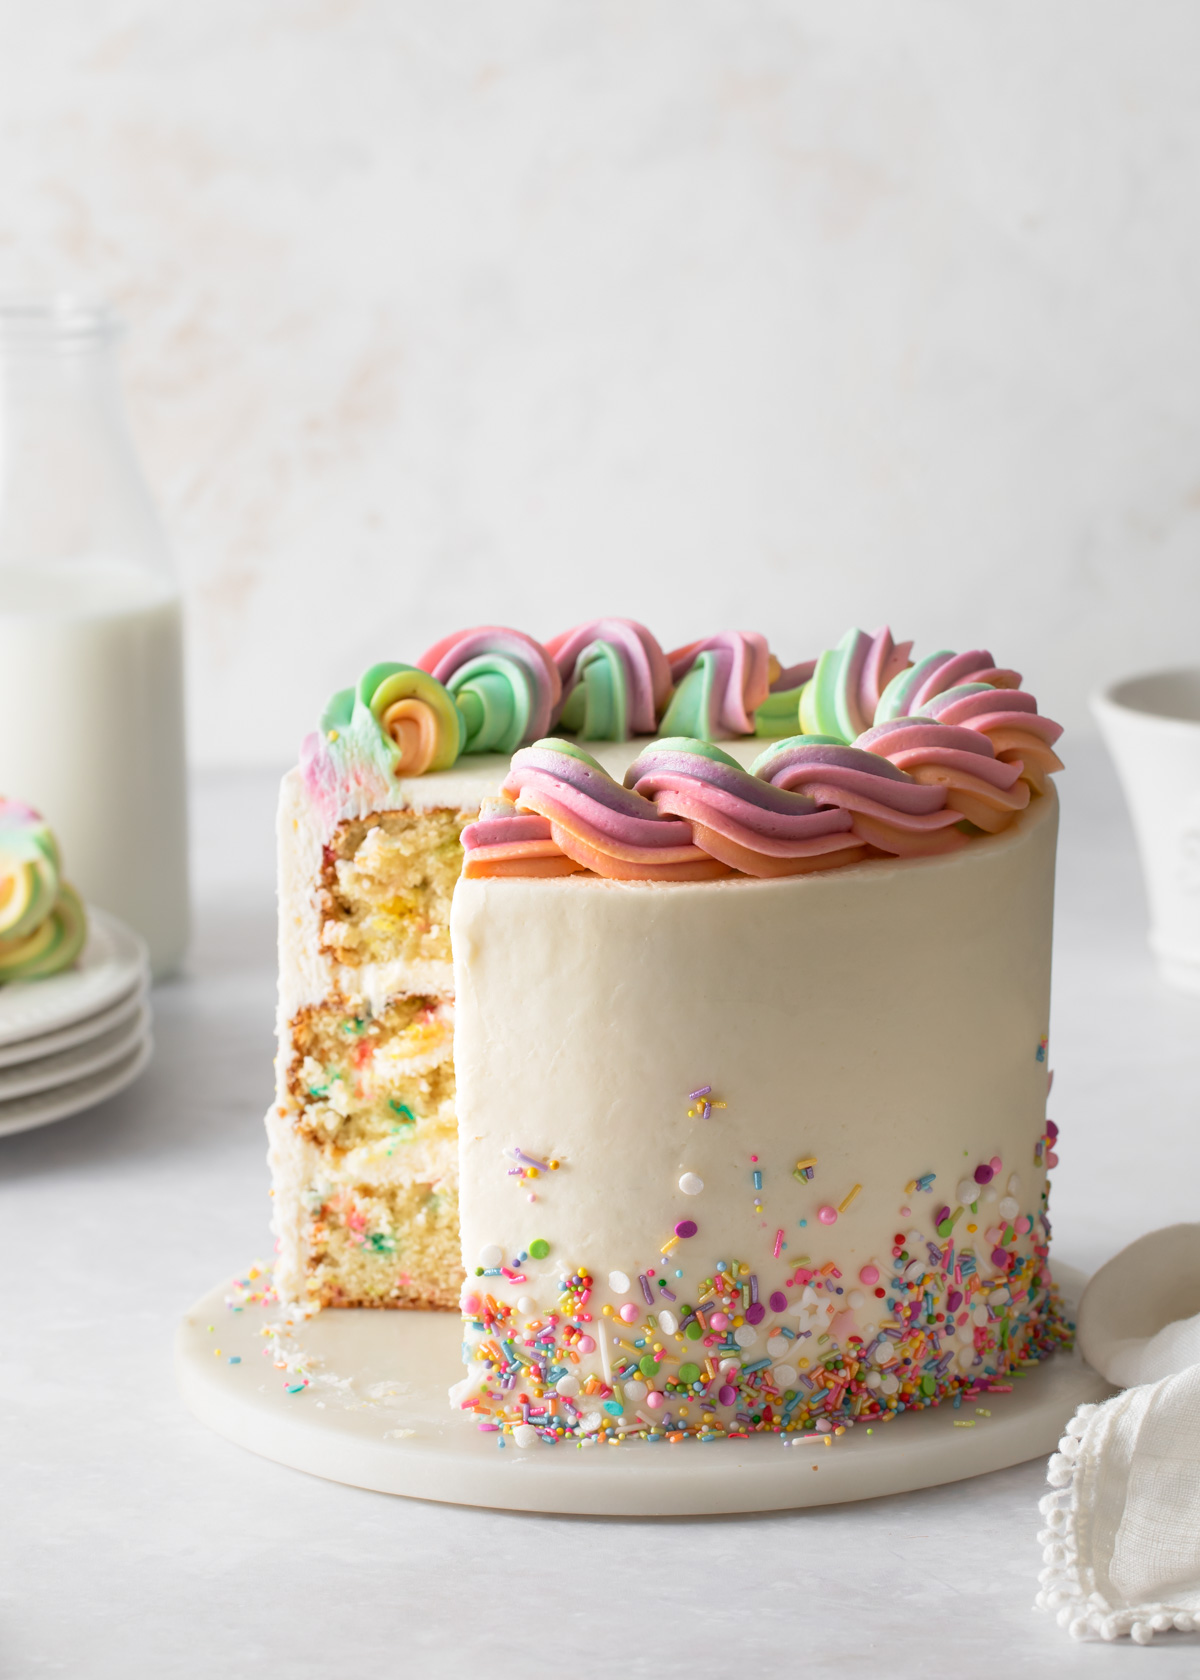
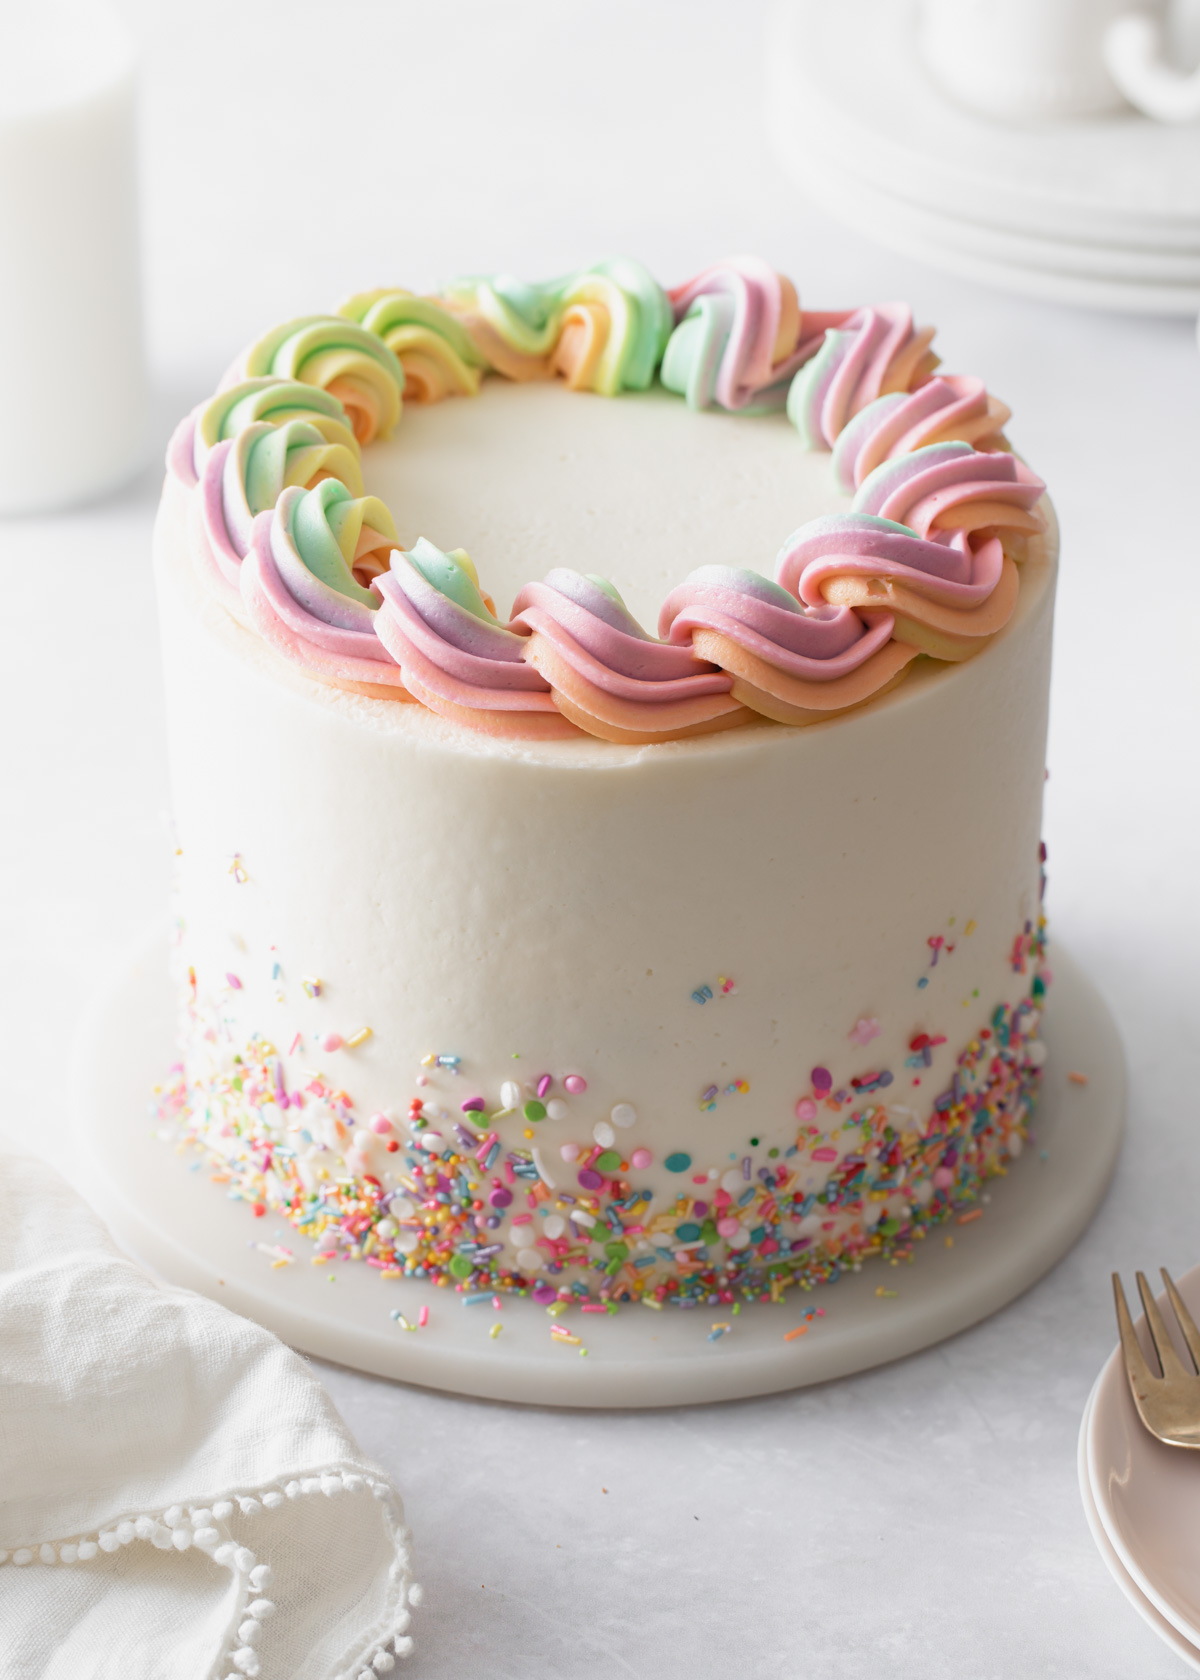
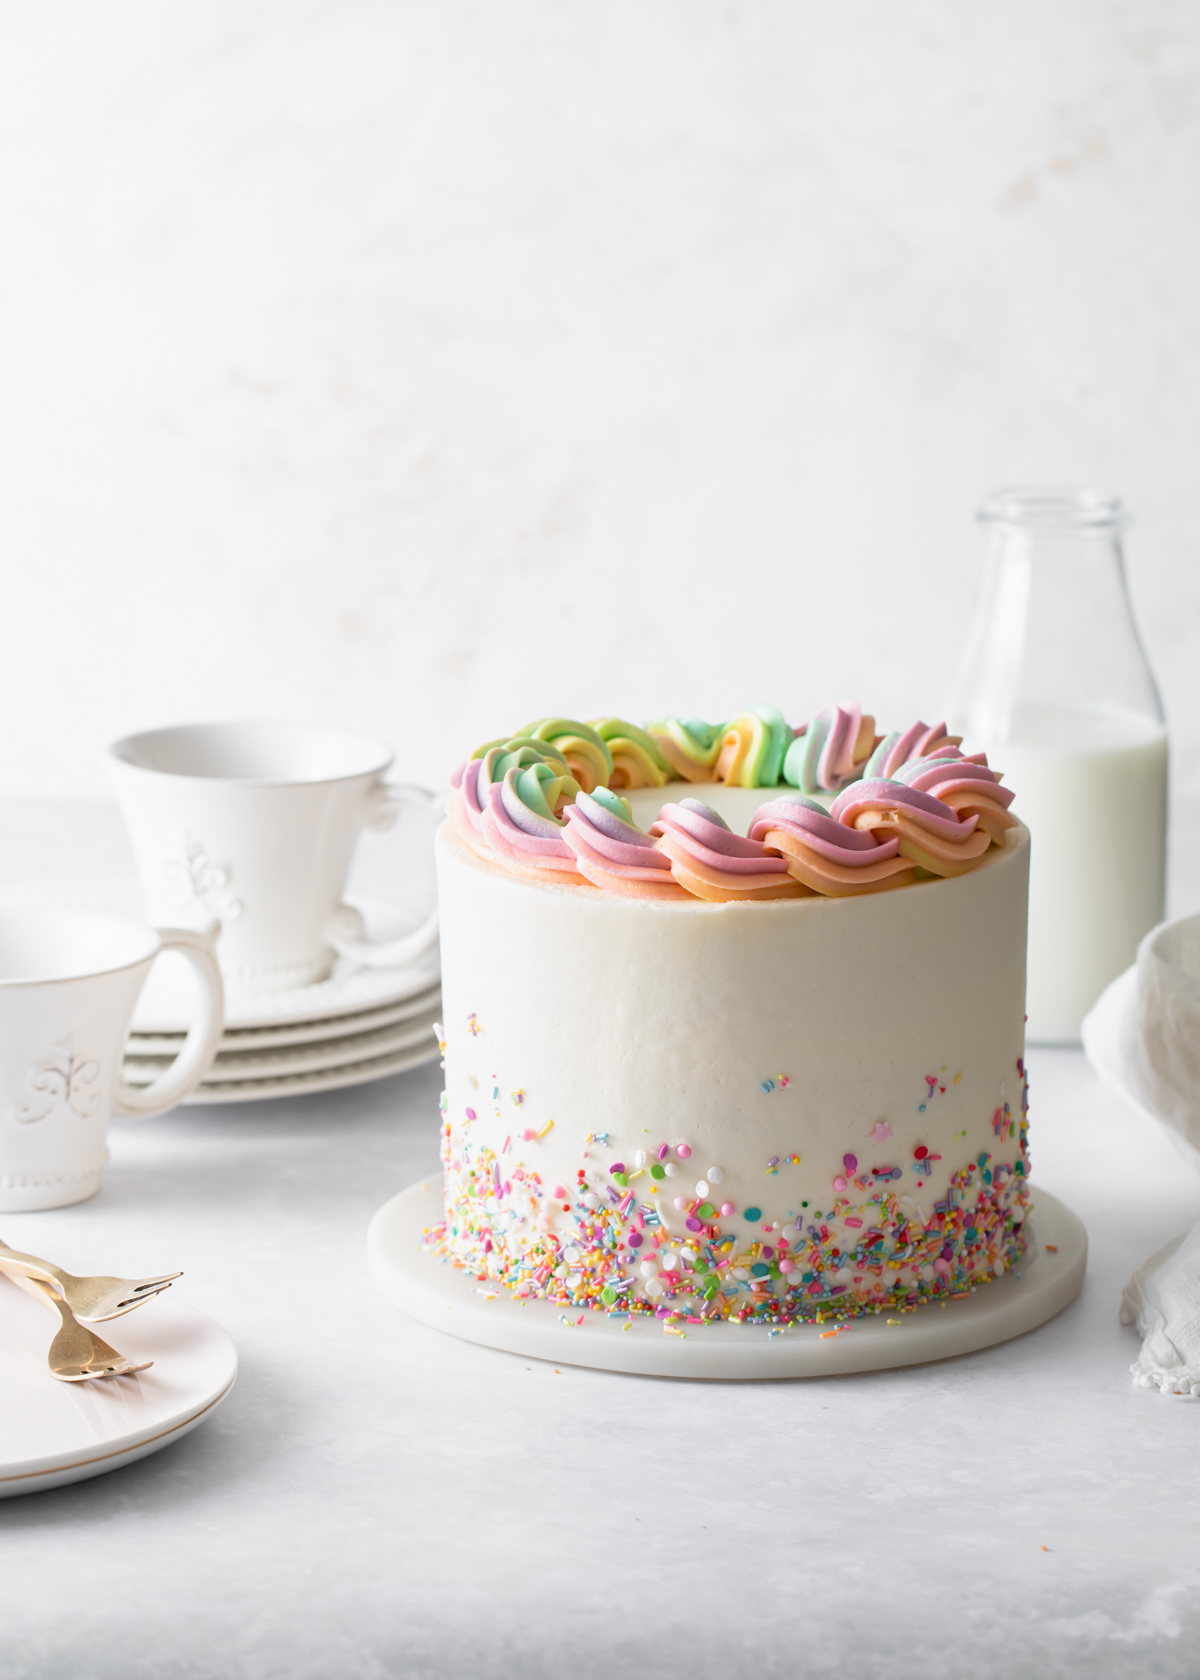
Make your own homemade Funfetti cake with this Rainbow Sprinkle Cake Recipe! Want to relive the boxed-cake memories of your childhood but from scratch? This recipe is based off my Best Butter Cake but with added sprinkles, Whipped Vanilla Buttercream, and rainbow swirls.
Jump to:
- The Best Homemade Sprinkle Cake
- Tasting Notes
- Whipped Buttercream Frosting
- Ingredients in Rainbow Sprinkle Cake
- Tools and Equipment
- Steps for Making a Rainbow Sprinkle Cake
- Substitutions
- Recipe FAQ
- Serving and Storage
- How to Pipe a Rainbow Border
- Types of Rainbow Sprinkles
- Layer Cake 101
- Join the Style Sweet Bake Club!
- Recipe
The Best Homemade Sprinkle Cake
Why make a rainbow cake recipe from scratch when you can buy the boxed stuff at the store? Freshness, flavor, and superior texture - of course!
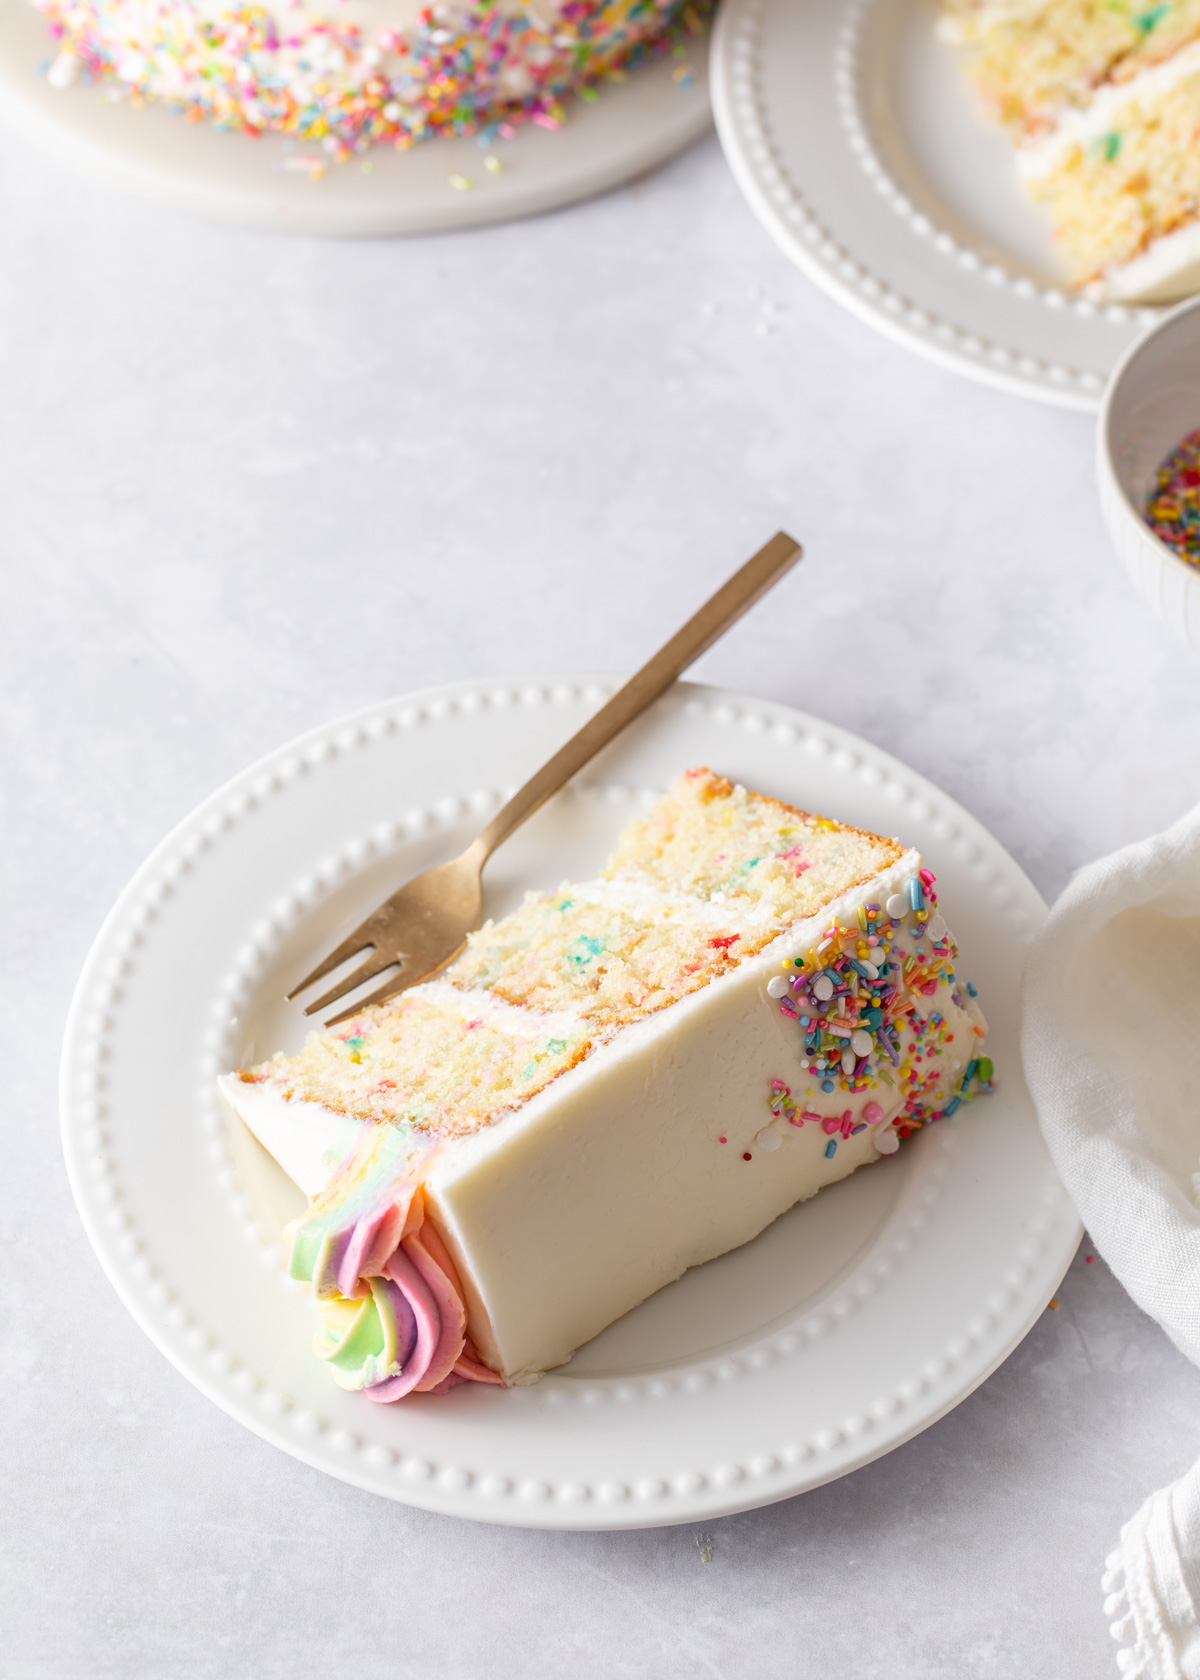
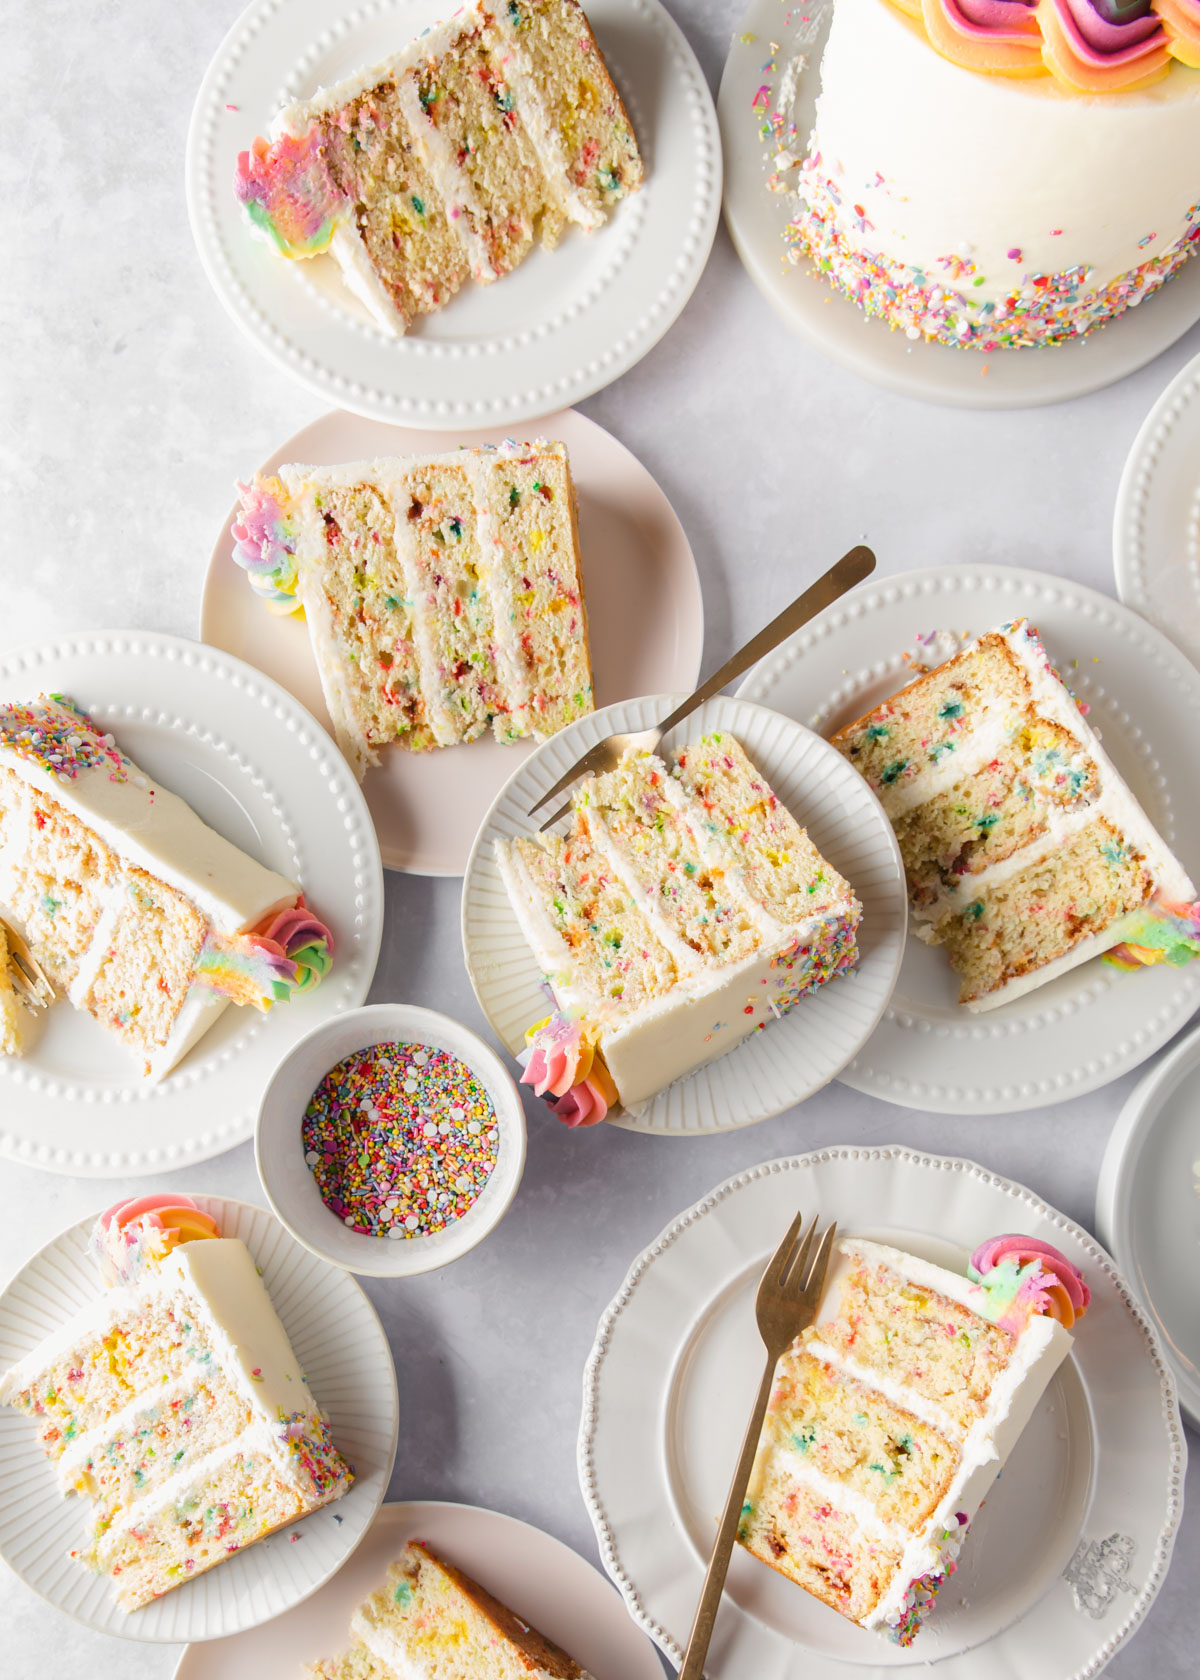
With a fluffy crumb that’s powered by the creaming method and moistness credited to a combination of milk and sour cream, this rainbow polka-dotted cake is buttery and tender yet study enough to suspend the sprinkles within the layers.
The rainbow buttercream border is enough to get anyone exciting about this ultimate party cake.
Tasting Notes
Boxed-cake purists might want to reach for clear, imitation vanilla. While pure vanilla extract is always endorsed here on Style Sweet, if there was a time and place for the clear stuff - it’s here. Mmmm - the taste of nostalgia.
This frosting it whipped ultra light and creamy with the use of heavy cream. If you can spare it, use vanilla bean paste in the buttercream for an extra flavor boost.
Whipped Buttercream Frosting
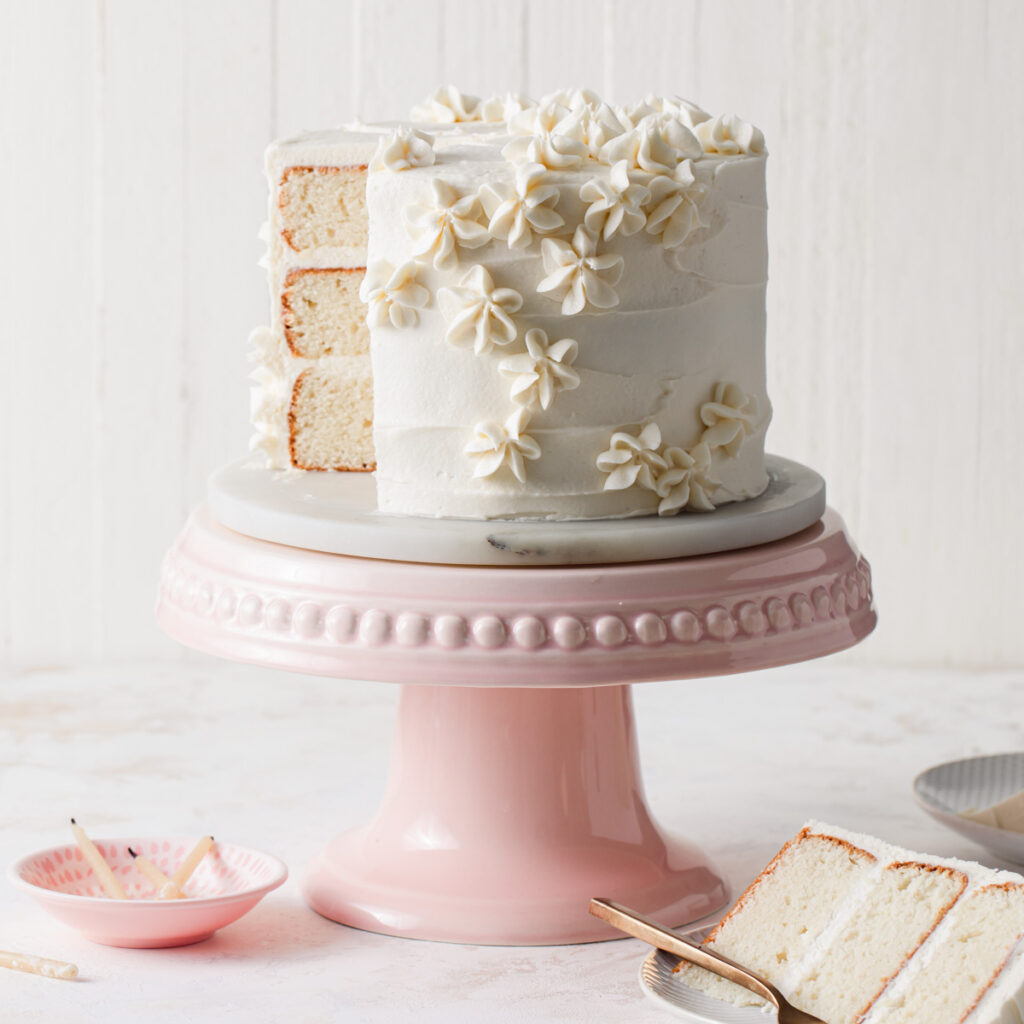
This cake is iced in light and fluffy frosting. It is an American-style buttercream, but not at sweet as your typical frosting.
Learn more about how to properly whip your buttercream here!
Ingredients in Rainbow Sprinkle Cake
Here is a quick glance at some of the ingredients needed beyond basic pantry staples. Find a complete list with quantities in the full recipe to follow.
- All-purpose flour
- Cake flour
- Unsalted butter
- Granulated sugar
- Vanilla bean paste or extract
- Eggs
- Whole milk
- Sour Cream
- Rainbow sprinkles
- Confectioners' sugar
- Heavy cream
Tools and Equipment
These are the primary tools and cake decorating supplies you will need to bake this cake:
- Stand or hand mixer
- Three, 6-inch cake pans
- Offset spatula
- Icing smoother
- Piping bag
- Star piping tip (1M)
- Gel food coloring
- Rotating cake stand
- General kitchen tools (measuring cups, spoons, spatula, etc).
Steps for Making a Rainbow Sprinkle Cake
- Make the cake batter
- Fold in the sprinkles
- Bake the cake
- Make the frosting
- Ice the cake
- Decorate!
Substitutions
Don't have all of the ingredients? Here's what to do:
- Sour Cream - you can replace the sour cream and milk for equal parts buttermilk
- Heavy Cream - you can replace the heavy cream with milk in the frosting, but it won't be as light and fluffy.
- Cake Flour - you may use 1 cup all-purpose flour plus 3 tablespoons corn starch in place of cake flour.
Recipe FAQ
Yes! You can freeze unfrosted cake layers. Wait until the cakes have completely cooled before wrapping well in plastic. If desired, wrap in a layer of foil or pop the cakes into a zip-top freezer bag. Freeze for up to 3 months. Thaw in the refrigerator overnight.
Yes! Bake as two layer and adjust the baking time accordingly. Make sure to only fill the pans ⅔ of the way full.
Use quins (flat, sequin-like) or rod-shaped sprinkles, not nonpareils.
Serving and Storage
Serve the cake at room temperature. Store the cake at a moderate room temperature overnight (preferably in a cake box or under a glass cake dome).
Wrap leftovers loosely in plastic and store in the refrigerator for up to 4 days.
Freeze unfrosted layers wrapped well in plastic for up to 3 months.
How to Pipe a Rainbow Border
Before getting started, review how to smoothly frost a cake
For the rainbow spiral border, separate buttercream into 6 bowls. Tint each bowl with gel food coloring - one for each color of the rainbow.
Place a piece of plastic wrap on your work surface. Spread or pipe the tinted buttercream in rows on top of the plastic, parallel to the long side, each color right next to the other.
Lift one long side of the plastic wrap and gently pull towards the other side so that the rows of buttercream roll onto themselves to form a log. Twist the ends of the plastic wrap.
Fit a large piping bag with a star tip (Wilton 1M is used here ). Cut off one of the twisted ends of the plastic wrap and place that end into the piping bag.
Hold the piping bag at a 45° angle and apply even pressure. Pipe a rope border by creating a continuous coil around the top of the cake.
Types of Rainbow Sprinkles
Quins - These types of sprinkles are flat, colorful, and come in a variety of shapes. They are most recognizable as being round, flat, and sequin-like (possible where they got the name?) They don’t keep their shape when baked, but their colors suspend beautifully when folded in a cake batter.
Sprinkles - These rod-shaped variety are typically multi-colored or chocolate. Think of the sprinkles you spoon over frozen yogurt. They also bake up well in any funfetti-like recipe. Add these at the very end of mixing and fold gently to keep the colors from bleeding and turning the batter blue/grey.
Nonpareils - These super tiny, multi-colored sugar balls are also known as Hundreds and Thousands (what is feels like when you accidentally spill them on your kitchen floor). Unlike the previous two variations, I don’t typically recommend nonpareils for baking within a batter. However, they are great for adding to your own sprinkle mix for decorating purposes.
Please note that sprinkles do expire and can turn rancid. I highly suggest making sure they are fresh before tossing them into the batter.
There is a significant enough of sprinkles in the batter that their flavor while come through in the finished cake. If you don’t like that taste of your sprinkles, then try a different brand or type.
Layer Cake 101
New to cake decorating? Start here:
Easy Textured Buttercream Cakes
How to Make Beautiful Layer Cakes
Buy my books! Layered and Icing on the Cake
Join the Style Sweet Bake Club!
Get exclusive recipes and articles sent straight to your inbox. Become a subscriber today! Click to join.
More Cakes to Bake
Please leave a star review if you loved this recipe! Make sure to share your recipes and tag me on Instagram @stylesweetdaily.
Recipe
Rainbow Sprinkle Cake
Ingredients
For the Sprinkle Cake
- 1 cup + 3 tablespoon (150g) all-purpose flour
- 1 cup + 3 tablespoon (150g) cake flour
- 2 ¼ teas baking powder
- ¾ tea salt
- ¾ cup unsalted butter, softened
- 1 ½ cup granulated sugar
- 2 tea vanilla bean paste or extract
- 3 large eggs
- ¾ cup (190ml) whole milk
- ⅓ cup (78ml) sour cream
- 1 cup rainbow sprinkles
For the Vanilla Buttercream
- 1 ½ cups (340g) unsalted butter, softened
- 4 to 5 cups confectioners' sugar
- 3 to 5 tablespoon heavy cream
- 1 teas vanilla bean paste or extract
- ½ cup rainbow sprinkles
Instructions
To Make the Sprinkle Cake
- Preheat the oven to 350°F (175°C). Grease and flour three 6-inch cake pans.
- Sift together the flours, baking powder, and salt. Set aside.
- In the bowl of a stand mixer fitted with the paddle attachment, beat the butter on medium speed until smooth. Add the sugar and mix medium until light and fluffy, 3 to 5 minutes. Stop the mixer and scrape down the bowl.
- Turn the mixer to medium-low and add the vanilla. Add the eggs, one at a time, mixing until each is incorporated before adding in the next. Mix until combined. Stop the mixer and scrape down the bowl.
- Stir the milk and sour cream together. Turn the mixer to low and add the flour mixture in three batches, alternating with the milk mixture, beginning and ending with the flour mixture. Just as the last streaks of flour are combined, stop the mixer and fold in the sprinkles.
- Evenly divide the batter among the prepares pans. Bake for 26 to 30 minutes, or until a toothpick inserted into the center of the cakes come out clean or with moist crumbs attached. Let the cakes cool on a wire rack for 10 minutes before removing them from their pans. Allow to continue to cool completely frosting the cakes.
To Make the Vanilla Buttercream
- Using a stand (or hand) mixer fitted with the paddle attachment, beat butter on medium-low speed until smooth and creamy, 1 minute.
- With the mixer on low speed, gradually add all but 1 cup confectioners’ sugar, 3 tablespoons of cream, and vanilla - scraping the bowl occasionally. Mix until blended.
- Beat at medium-high speed 3 to 5 minutes, until buttercream is light, airy, and nearly white. If needed, add the additional sugar or cream until desired consistency is achieved. The buttercream should spread smoothly without tearing the crumb of the cake but thick enough that it holds shape when piped and spread between the layers.
To Assemble
- Place one layer of cake on a cake board or serving dish. Spread on about ¾ cup of the Whipped Vanilla Buttercream with an offset spatula until smooth. Top with the next layer of cake and repeat. Place the last layer on top of the cake. Crumb coat the cake with a thin layer of buttercream then refrigerate the cake for 15 minutes.
- Reserve about 1 to 1 ½ cups buttercream and set aside. Once chilled, smoothly frost the cake with the remaining buttercream. Using a spoon, scoop and add the sprinkles around the bottom of the cake. Use the back of the spoon or a small offset spatula to gently press them into the buttercream. Use a clean finger tip to fill in any holes or to add sporadic sprinkles on the sides.
Notes
Erin Abbamondi
What sprinkles did you use for this?
Laura Kinney
OMG my daughter loved this cake! She said it was the best birthday cake she's ever had.
Dizzee
Beautiful cake
Lily G
So cute and colorful! Easy to follow instructions too
Chelsea L
My daughter asked me to bake this for her birthday and she loved it! All her friends ate every last bite!!!
Paula
I actually use this recipe for my go to vanilla cake. I use brown vanilla and no sprinkles and it's great!
stylesweet
Oh that sounds so good too! Thank you!
Paula
I love this recipe and use it for a great vanilla cake! I read that it can also be made in 2 9" round pans. I want to make it into 2 9x13 rectangles for a double layer sheet cake. Is this possible with this recipe and can you advise on how many times I'd need to make it for one layer? I'm aiming for layers that are about 1 1/2" tall at least. Thank you!
T
There’s a picture that is attached to this recipe showing piped rainbow circles along the border on the top. Do you have instructions on how to do that?
stylesweet
Hi there! I don't have any step-by-step photos for this part, but you can find written instructions in the post for how I made the border. Look under "How to Pipe a Rainbow Border." Happy Baking!
Paula
I love this recipe and use it for different size cakes. Will this recipe also work for cupcakes?
Paula
Hello. I use this recipe as my go to for vanilla cake. Can you tell me if this recipe will also work for cupcakes? Thank you.