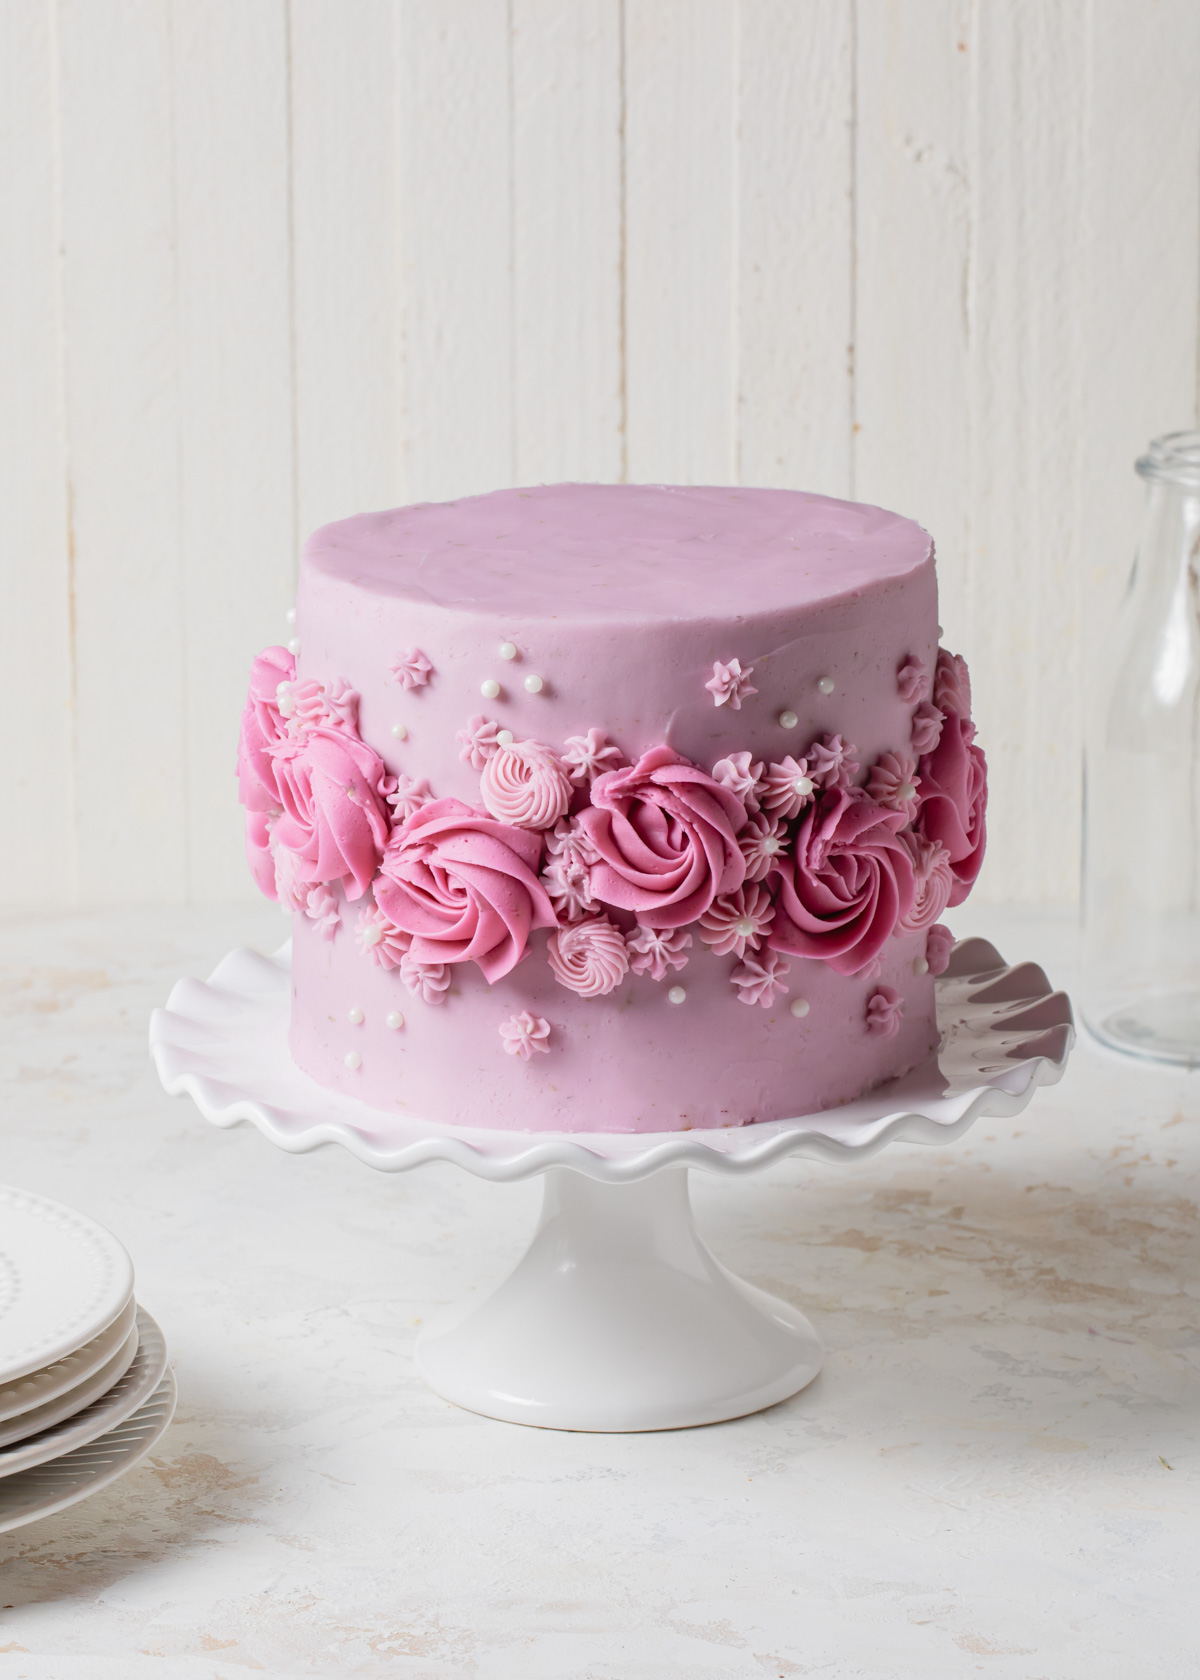
This Lemon Lavender Cake is the perfect balance between sweet, tart, and floral flavors. Cloaked in lavender buttercream and paired with creamy lemon filling, this lightly floral, ultra chic cake is perfect for any spring or summer celebration.
How to Make a Lavender and Lemon Cake
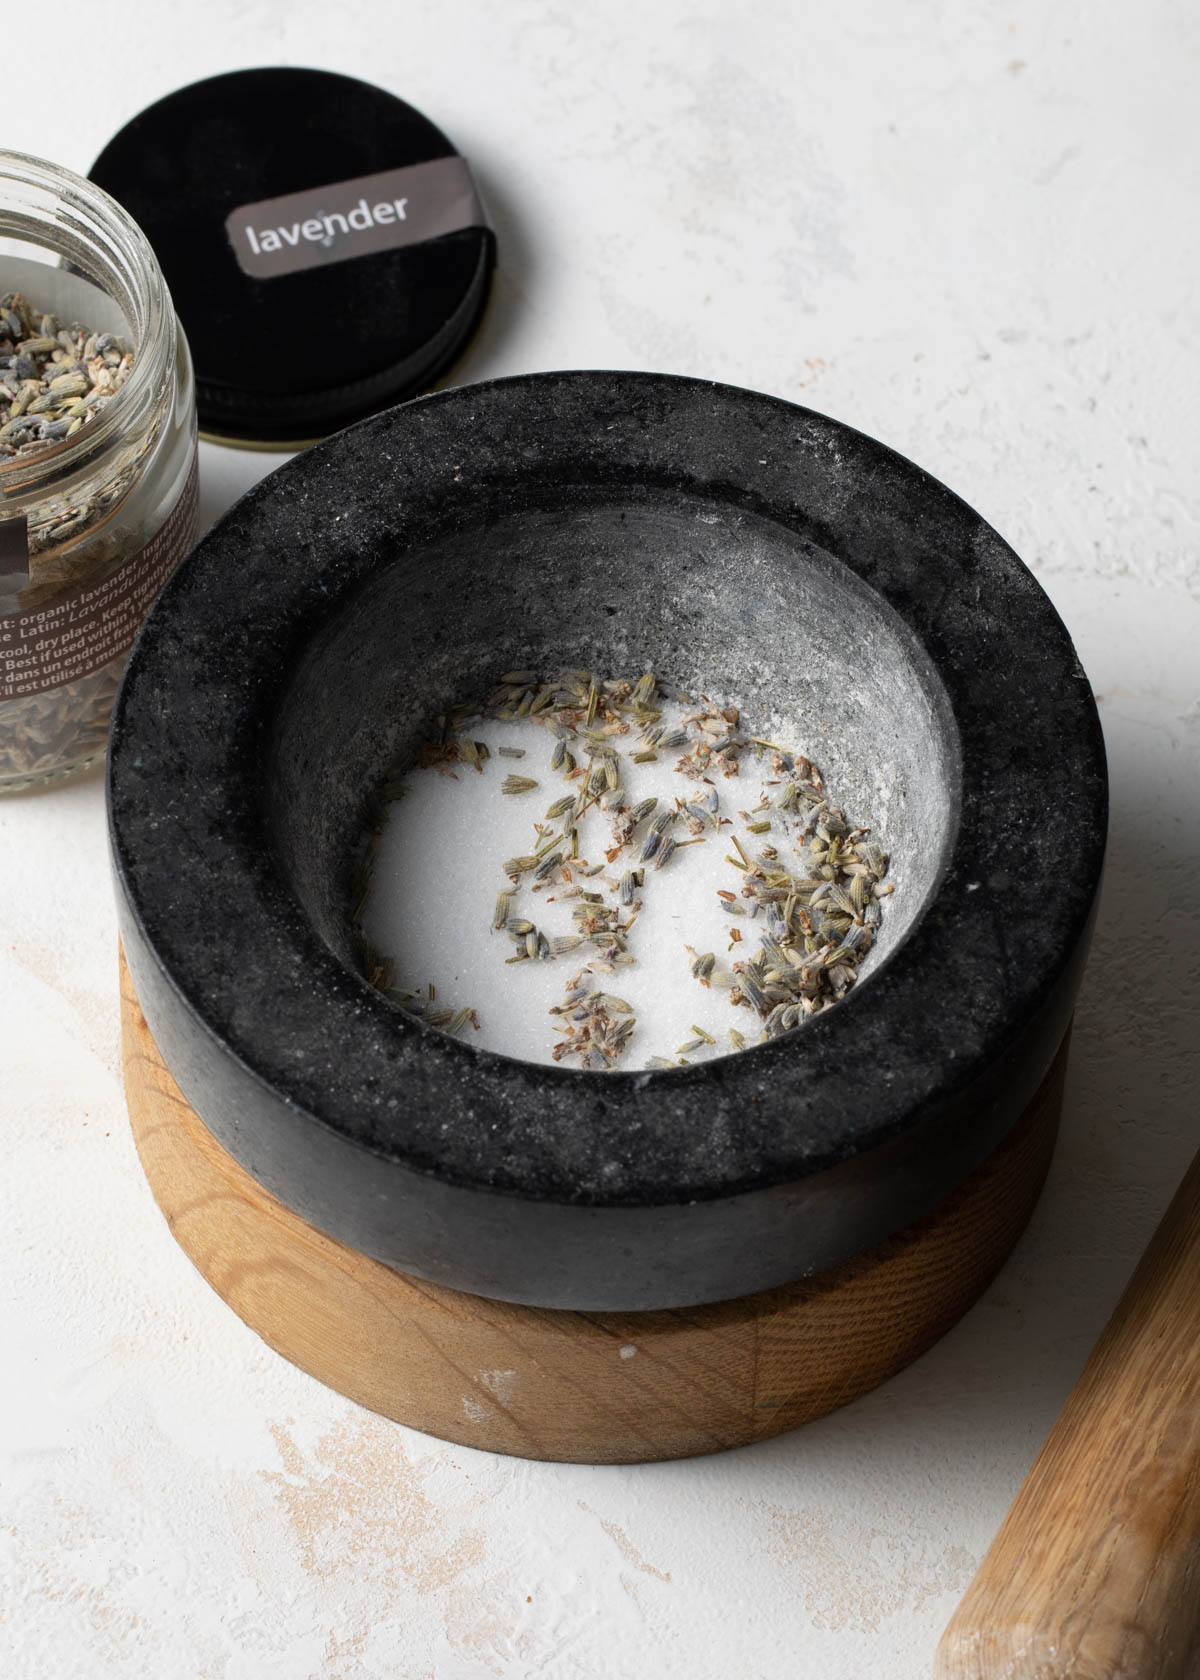
- Grind the dried lavender - use a mortar and pestle, mini food processor, or spice grinder
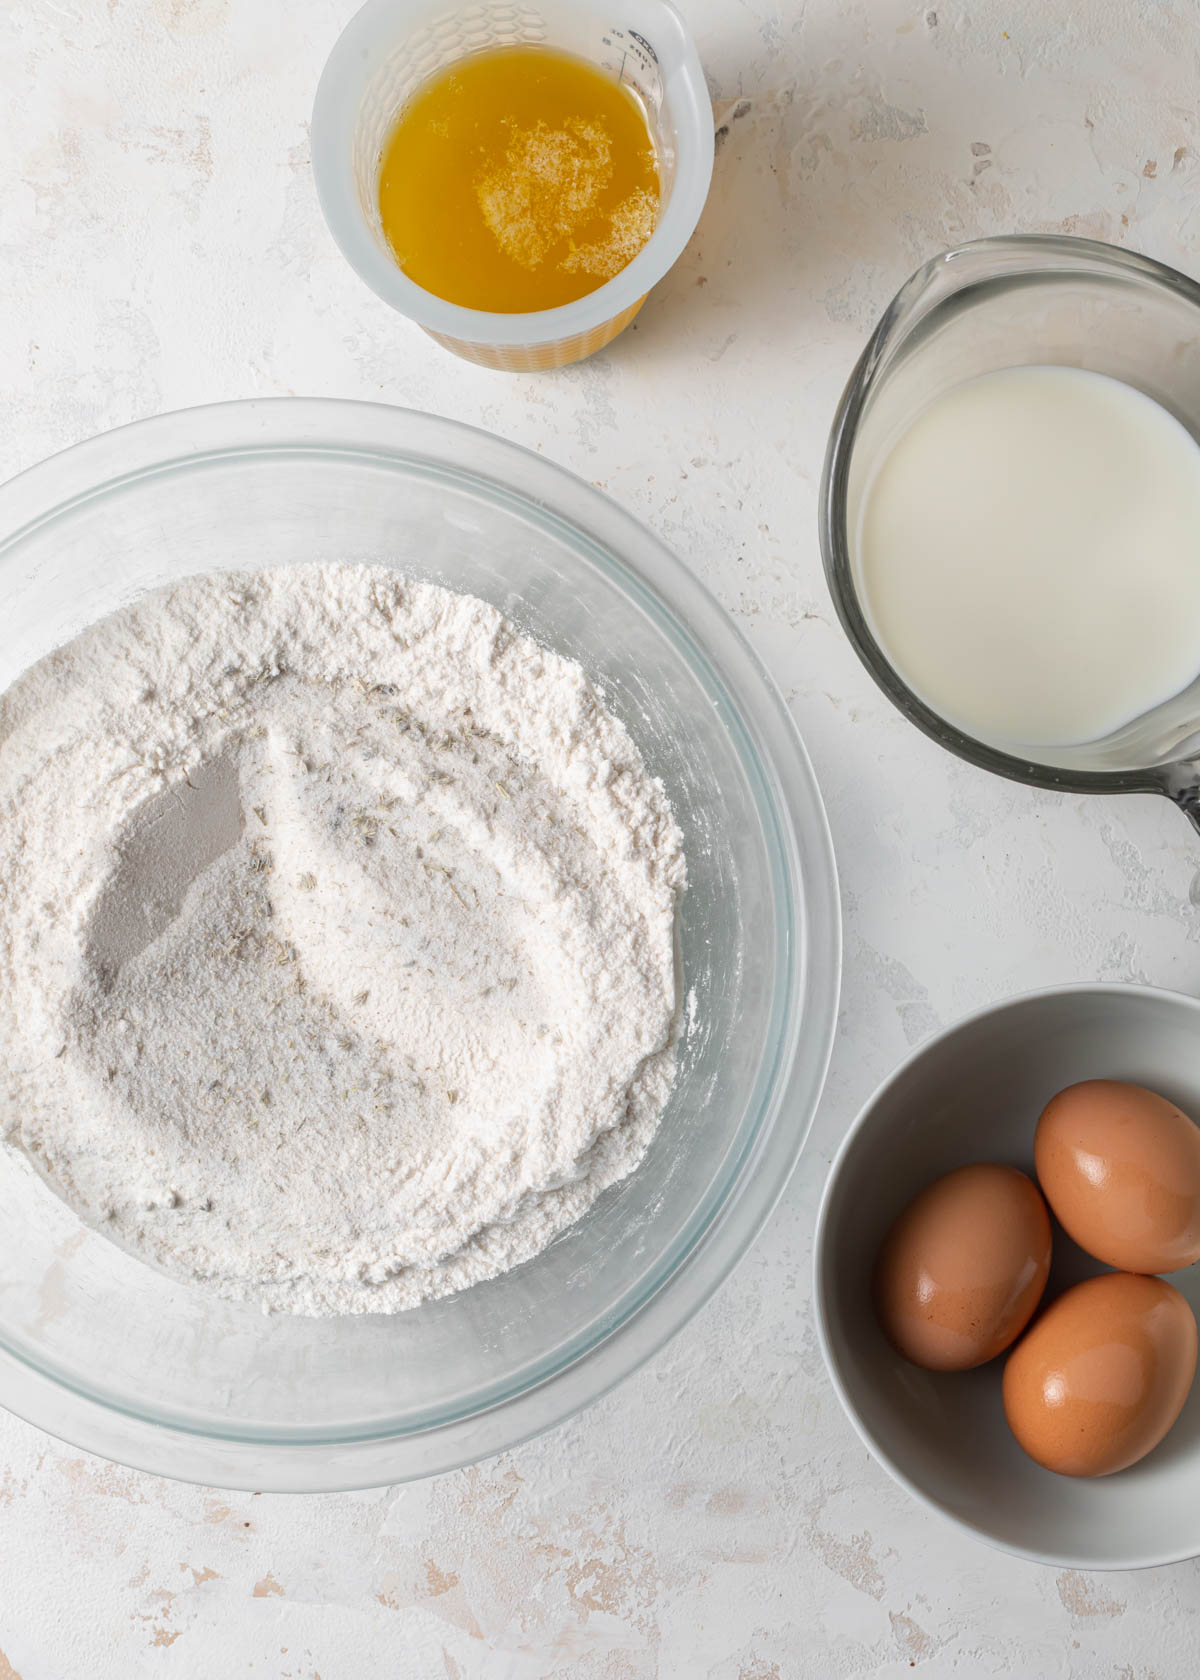
- Make the cake batter - this easy cake batter can be stirred together by hand or with an electric mixer. Combine the dry ingredients and sugar (with the lavender) in a large bowl. Whisk together all of the wet ingredients - milk, eggs, vanilla, melted butter, and oil. Pour the wet into the dry and mix until smooth.
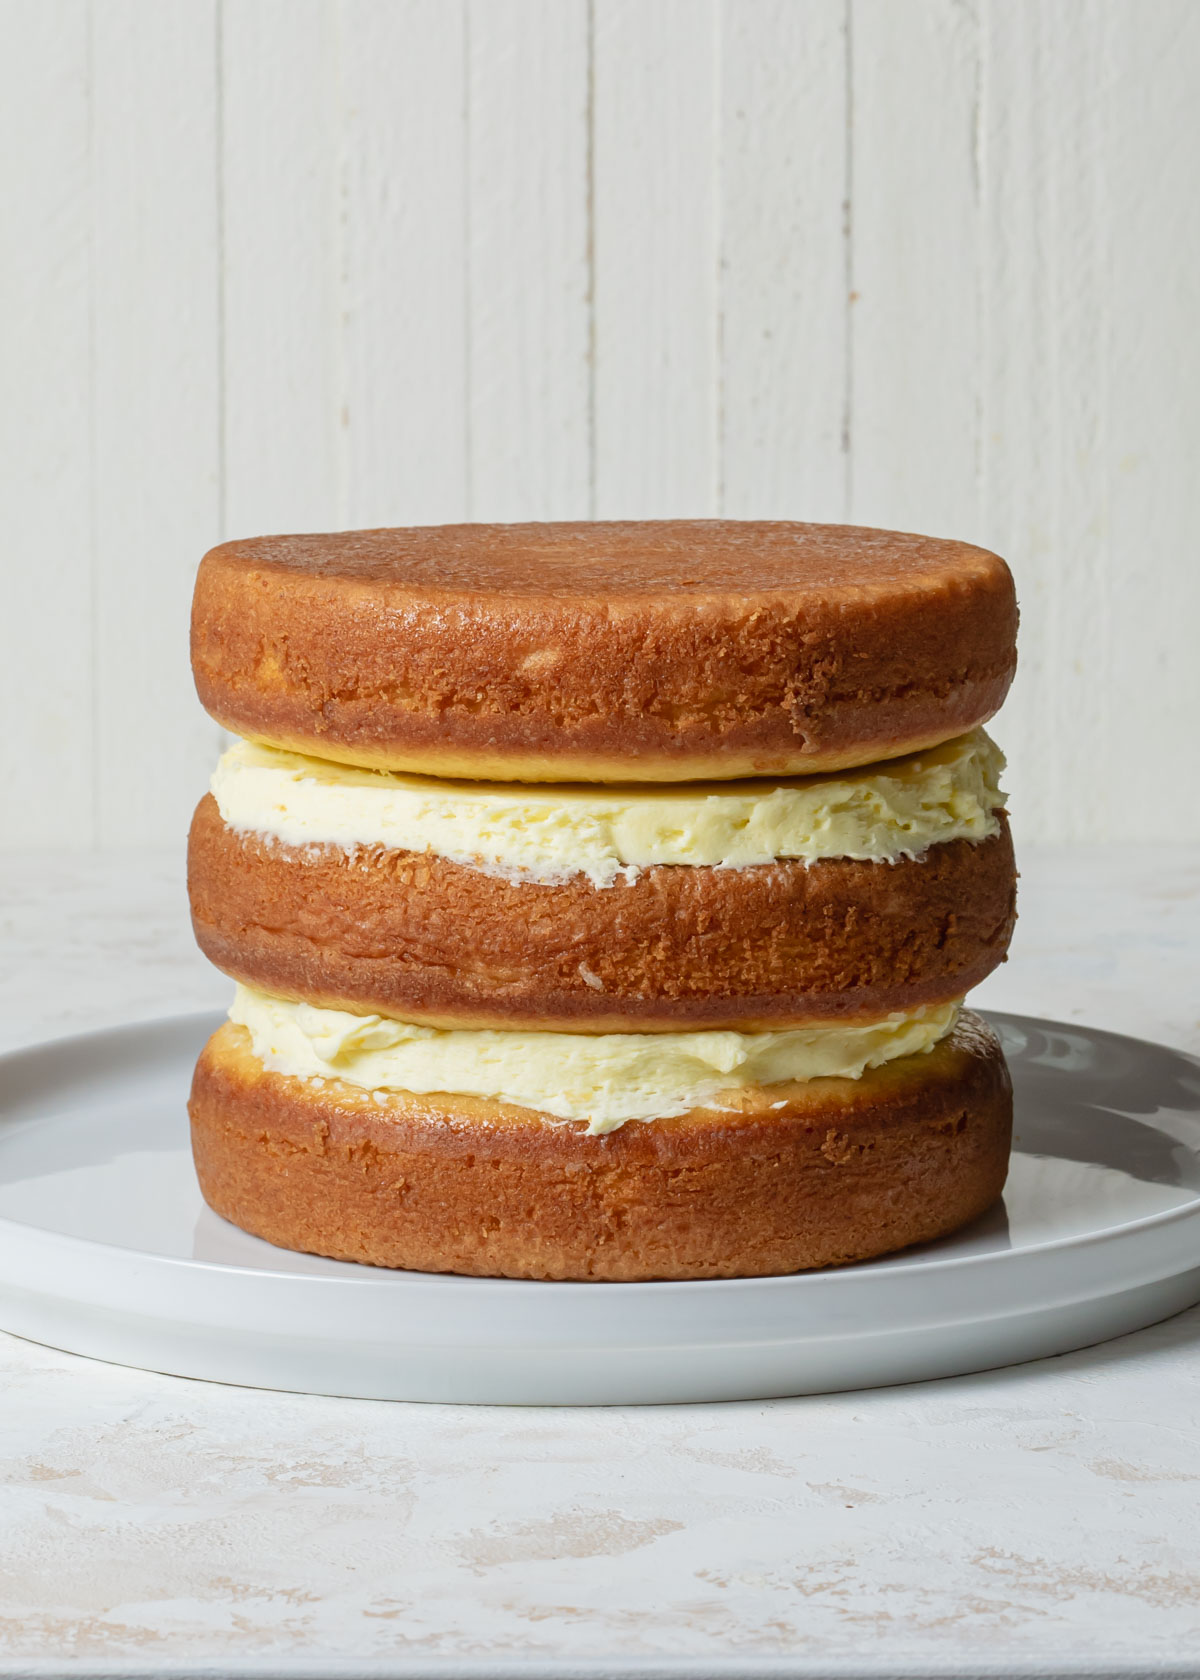
- Bake the cake - bake the cake in three, 6-inch cake pans.
- Make the lavender buttercream - Again, grind the lavender with the sugar before mixing into the whipped buttercream. Mix thoroughly until light and fluffy.
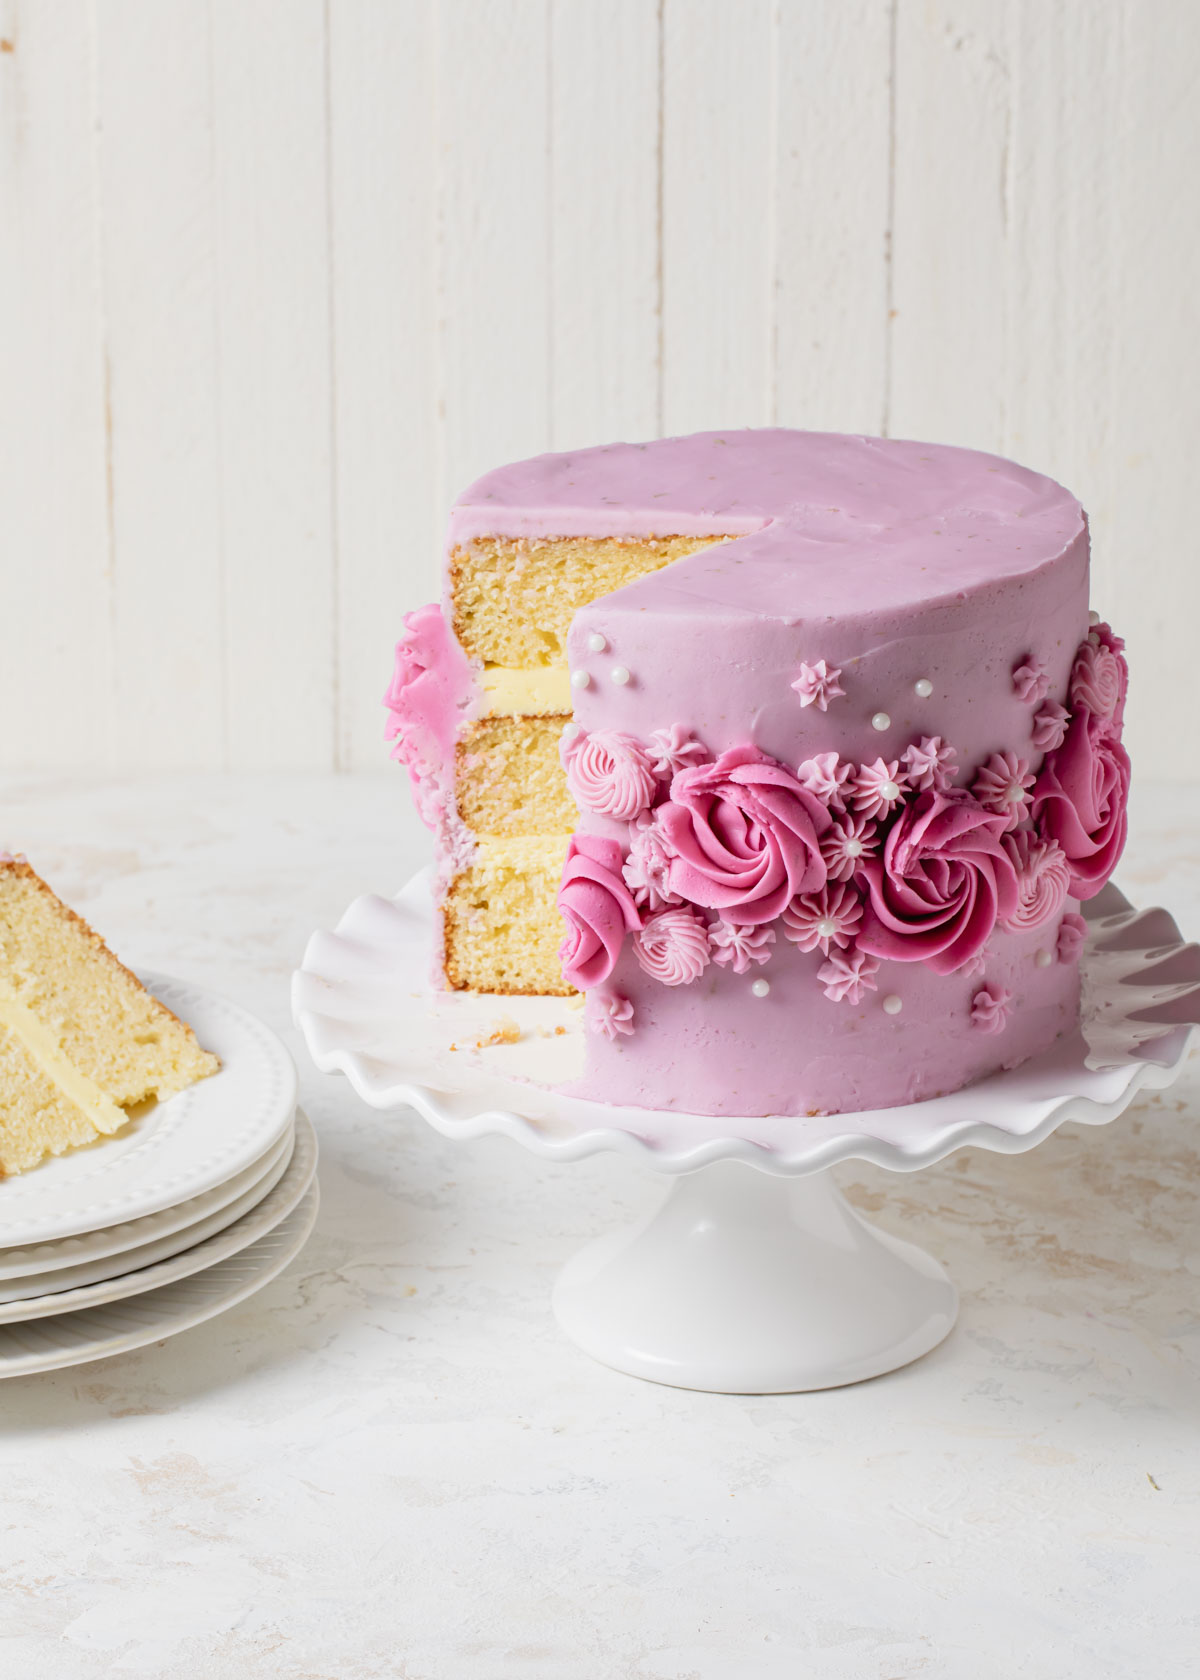
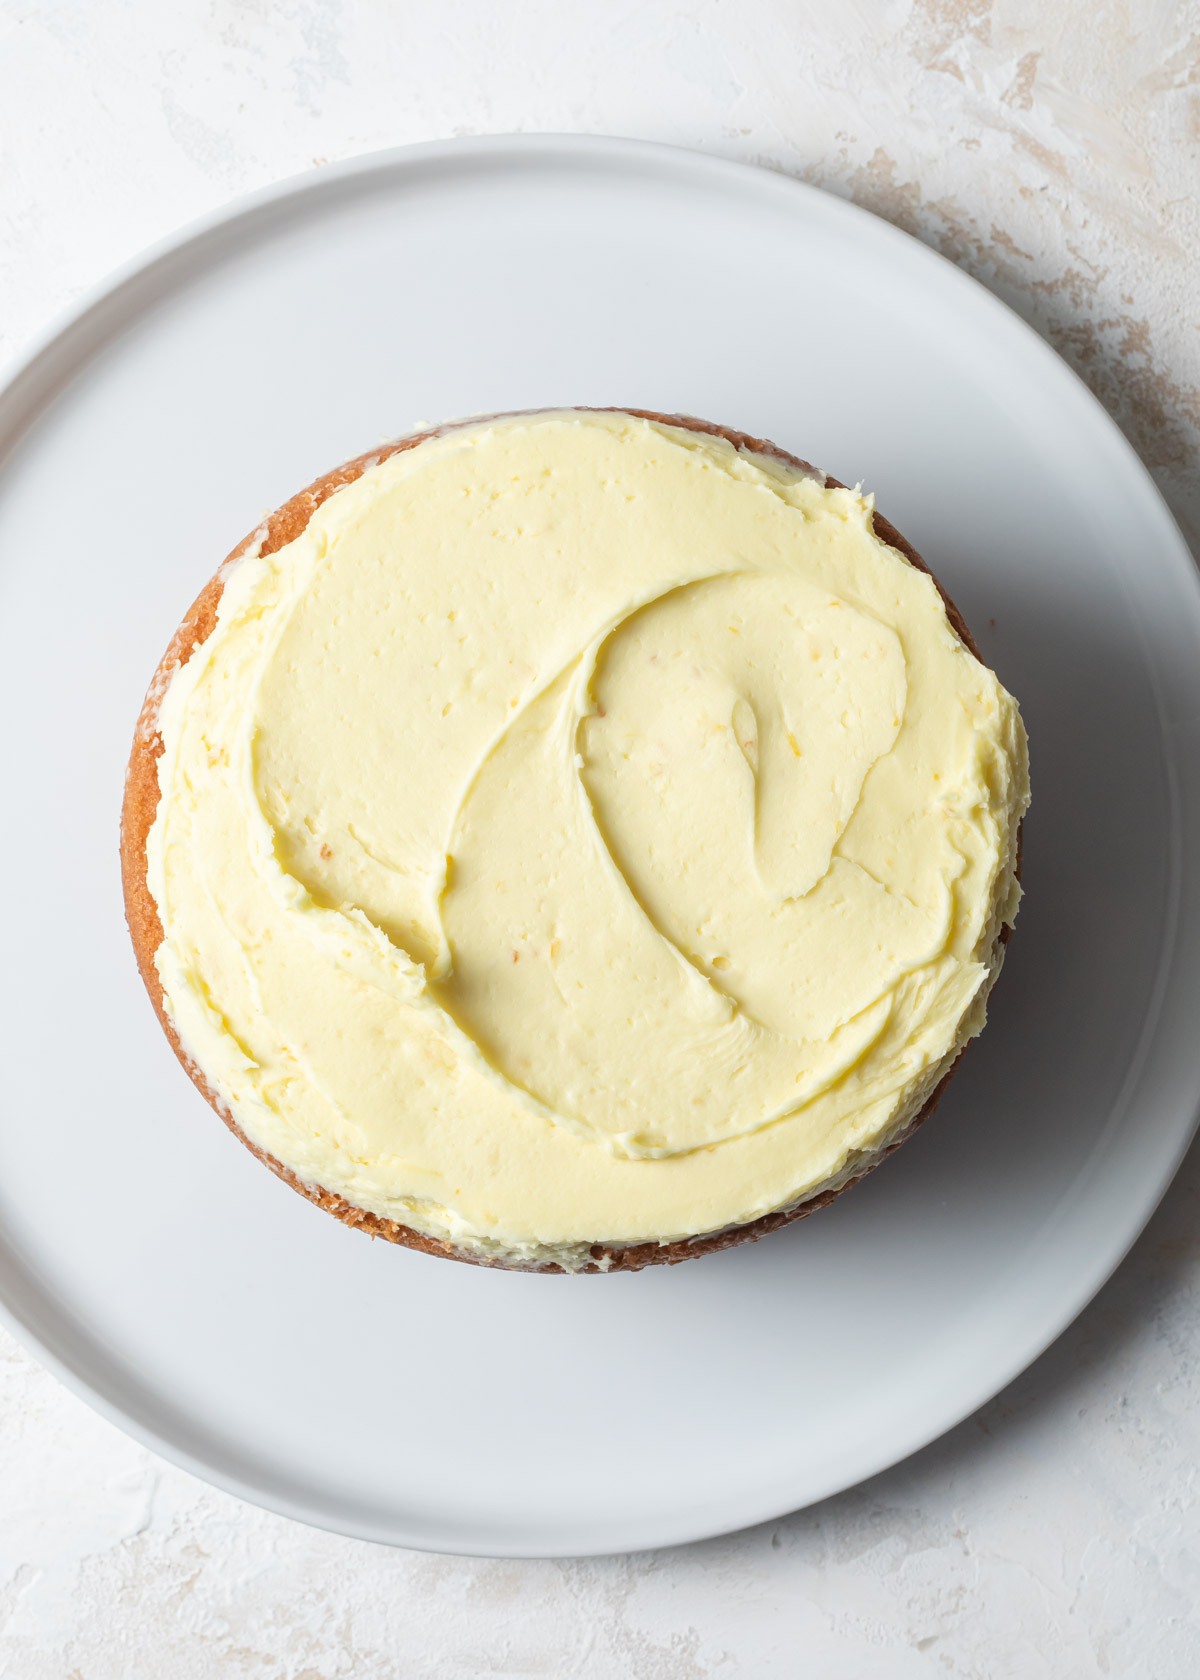
- Make the lemon filling - similar to the whipped lavender buttercream, make a lemon version with lemon zest and fresh lemon juice.
- Finally, Assemble the cake - use the lemon cream for filling and and the lavender buttercream to ice the cake. Decorate as desired.
- Sift out the large lavender pieces with a fine mesh strainer or sieve before making the buttercream for a totally smooth icing.
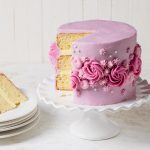
Lavender Buttercream Flower Cake
My favorite buttercream flowers are easy to make and can be piped directly on the cake. I used the same piping tips and techniques from this buttercream flower cake, but piped the flowers around the sides of the cake instead of on top.
For the large fuchsia rosettes, use a 1M star tip to pipe tight spirals on the the sides of the cake. Leave a little room in between rosettes and don't pipe in an exact straight line.
For the light purple rosettes and stars, I used piping tips #32 and #18 to fill in the gaps between the large rosettes. Use these tips to pipe mini spirals or stars. Add sugar pearl or sprinkles to finish.
Lavender Cake Recipe FAQs
Lavender cake has a sweet, delicate floral taste. It can be overpowering so make sure to use lavender in moderation or else it will taste like perfume.
Use dried culinary lavender for baking and cooking with lavender. Not all lavender is safe to eat, so instead of picking buds from your garden, use lavender labeled for culinary use only.
You can bake this cake in two, 8 or 9-inch pans. Do not fill more than ¾ of the way full.
Baking with Lavender
Infusing aromatic, crushed lavender into the batter elevates this basic vanilla cake without making it taste like perfume or soapy. When used in large amounts, the lavender flavor is quite strong. It is important to get the balance just right.
Often times we infuse or steep flavorings like herbs or spices by heating with a liquid. This usually looks like steeping cinnamon in the milk used for a cake or melting butter with tea before adding to a cookie recipe.
For this lavender cake recipe, we grind a small amount of dried culinary lavender with the granulated sugar. I recommend grinding the lavender with granulated sugar using a mortar and pestle. The abrasive sugar quickly helps break down the lavender.
You may also use a mini food processor or a spice grinder to grind the dried lavender.
What Type of Lavender to Use
I love using flowers in baking but not all lavender is safe to eat. Use dried culinary lavender for baking and cooking with lavender.
Instead of picking buds from your garden, use lavender labeled for culinary use only.
Look for culinary lavender in the spice section of large grocery store, speciality markets, or online.
Ingredients in Lavender Cake
- All-purpose flour - if using measuring cups, make sure to fluff up the flour then spoon and level. 1 cup of flour weighs 125 grams.
- Granulated sugar
- Large eggs
- Milk
- Unsalted butter - melted and cooled
- Neutral oil - like avocado oil or vegetable oil
- Dried culinary lavender - look for this in the spice sections of large or specialty grocery stores
Tools and Equipment
This lavender cake recipe is similar to my one-bowl vanilla cake. It can be made by hand or with a mixer. I prefer a large mixing bowl and hand mixer for a super quick batter. You will also need:
- Mini food processor, spice grinder, or mortar and pestle
- Three, 6-inch cake pans
- Electric mixer (optional for cake but needed for the buttercream)
- Cake decorating tools (offset spatula, rotating cake stand, frosting smoother, piping bag and tips)
- General cooking tools (rubber spatulas, measuring spoons, etc.)
Bake Like a Pro
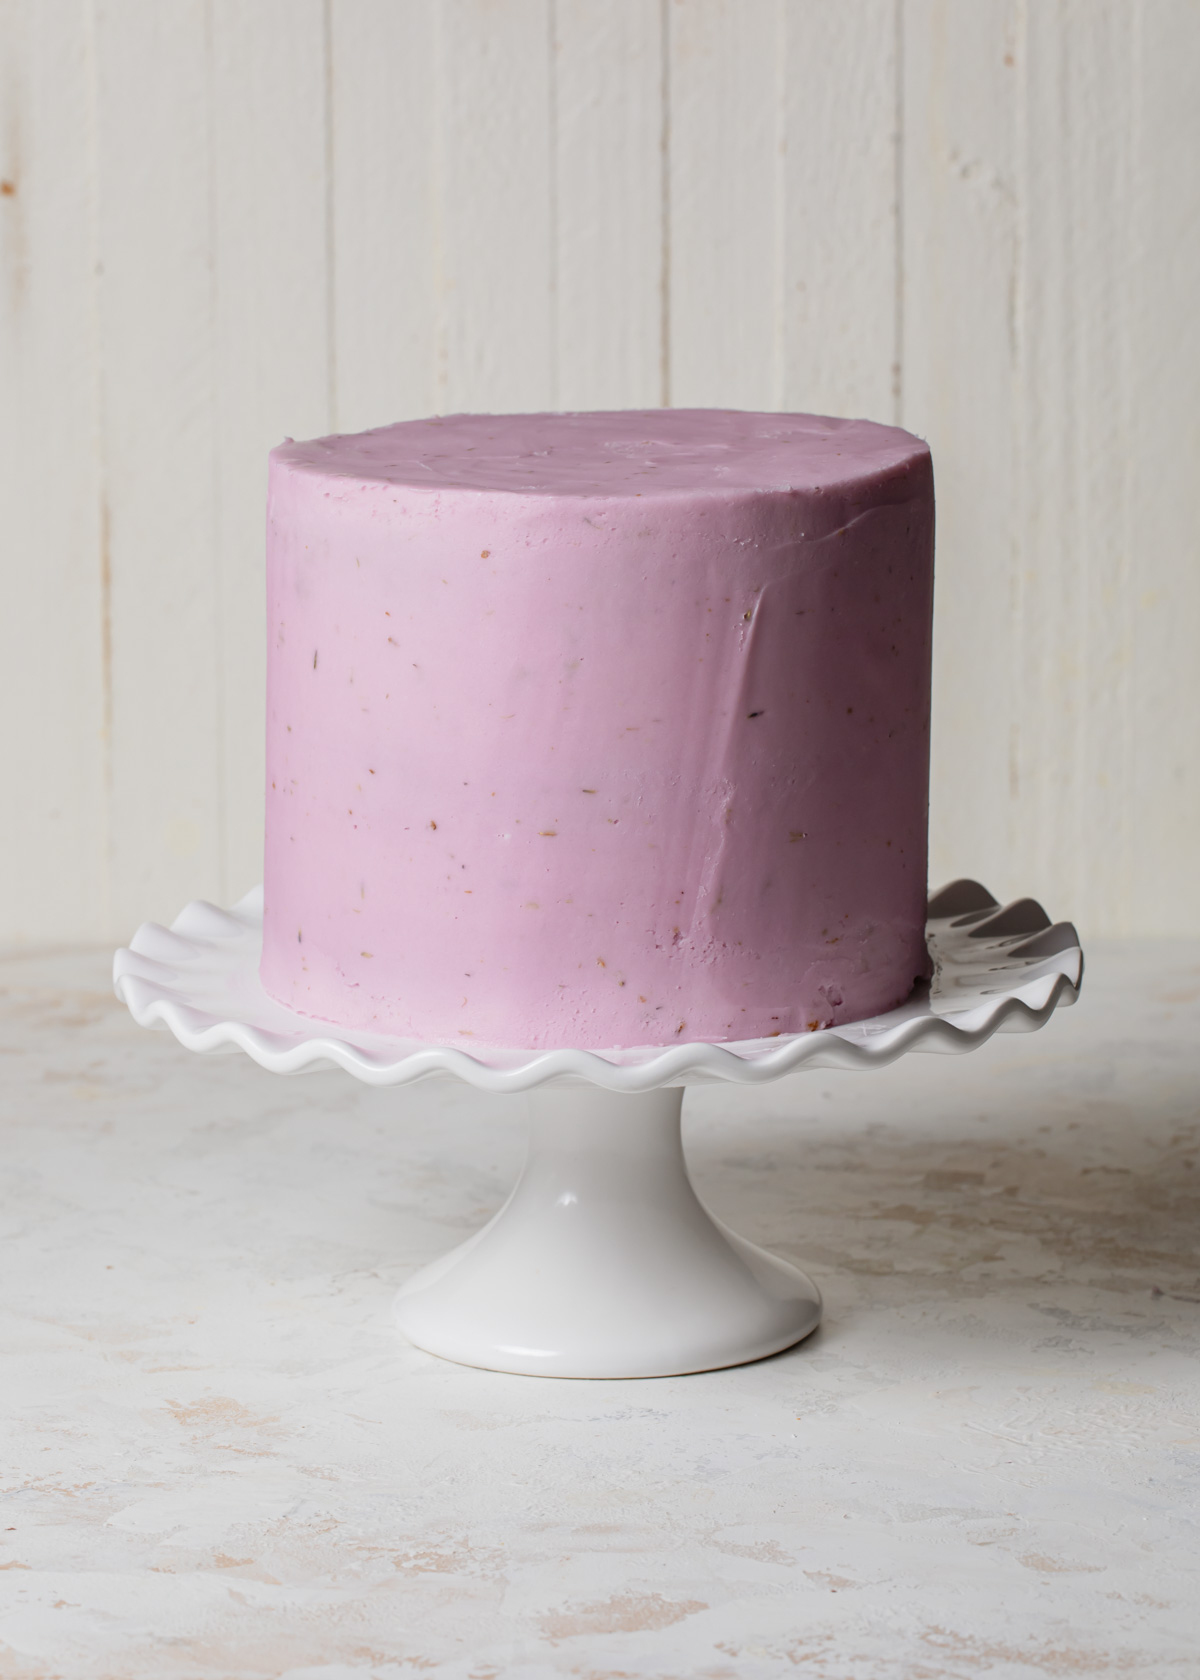
For a smooth, professional looking cake, don't forget the crumb coat. After filling, spread a thin layer of buttercream all over the stacked and filled cake. This layer of icing doesn’t have to be perfect.
The idea is to lock in any loose crumbs and prevent them from mixing into the final coat of frosting. Chill the crumb-coated cake for about 15 minutes before adding the outer layer of frosting.
This small celebration cake is made up of three layers of moist and fluffy lavender cake. Lemon filling brightens up the cake with its zesty flavor. At first bite, you'll find that the tart citrus pairs perfectly with floral lavender.
You would never believe that something this beautiful would be so easy to make. It is basically the easiest cake batter to make next to boxed cake mix. You can mix it by hand or with an electric mixer.
Dried culinary lavender is used two ways - in the cake batter and in the lavender buttercream frosting. The delicate taste from using dried lavender buds blends beautifully into the creamy frosting.
Storage
Serve the lemon lavender cake at room temperature. It can be stored in a cake box over night in a cool room. Keep leftovers wrapped in plastic in the refrigerator for up to 4 days.
To freeze the cake layers, wait until they are completely cool then wrap well in plastic wrap. Freeze in the freezer for up to 3 months. Thaw frozen cake layers in the refrigerator overnight before use.
Variations
Blackberry Lavender Cake - lavender and blackberry go so well together. Replace the lemon cream filling with blackberry jam for a fruity variation.
Vanilla Lavender Cake - Skip the lemon all together and fill the cake with vanilla whipped buttercream frosting.
Lavender Lemon Curd Cake - Replace the lemon cream filling with tangy lemon curd. Keep in mind that the cake will need to be refrigerated. And don't forget to pipe a buttercream dam around the edges to keep the filling inside!
Layer Cake 101
New to cake decorating? Start here:
Easy Textured Buttercream Cakes
How to Make Beautiful Layer Cakes
Buy my books! Layered and Icing on the Cake
Recipe
Lemon Lavender Cake
Ingredients
Lavender Cake
- ½ teaspoon dried culinary lavender
- 1 ½ cups (300g) granulated sugar divided
- 2 ¼ cups (280g) all-purpose flour
- 2 ½ teaspoon baking powder
- ½ teaspoon salt
- 1 cup (240ml) whole milk
- 3 large eggs
- ½ cup (117g) unsalted butter melted
- ¼ cup canola or avocado oil
- 1 teaspoon pure vanilla extract
Lemon Cream Filling
- ½ cup unsalted butter softened
- 2 cups powdered sugar sifted as needed
- 1 lemon, zested
- 1 tablespoon lemon juice
- 1 tbsp milk
Lavender Buttercream
- ½ to 1 teaspoon dried culinary lavender buds
- 3 cups powdered sugar sifted as needed
- ¾ cup unsalted butter softened
- 2 to 3 tablespoon milk or cream
- 1 teaspoon vanilla extract
- gel food coloring optional
Instructions
Lavender Cake
- Preheat the oven to 350°F. Grease three 6-inch cake pans and line the bottoms with parchment paper. Set aside.
- Along with ¼ cup of sugar, grind the lavender until small pieces using a spice grinder, mini food processor, or mortar and pestle.
- In a large mixing bowl, whisk together the lavender sugar, flour, remaining plain sugar, baking powder, and salt.
- In a separate bowl or large measuring cup, whisk together the milk and eggs. Pour in the butter, oil, and vanilla.
- Using a hand mixer or whisk, blend the wet ingredients into the dry ingredients. Finish by folding together with a rubber spatula until smooth.
- Pour the mixture into the prepared pans. Bake for 25 to 30 minutes or until a toothpick inserted comes out clean or with a few moist crumbs. Completely cool the cake before frosting.
Lemon Cream Filling
- Using a stand mixer fitted with the paddle attachment or a hand mixer, mix the butter until soft and creamy.
- Add the powdered sugar, lemon zest, lemon juice, and milk. Mix on low speed until combined.
- Once the sugar mixes in and won't fly out everywhere, turn the mixer speed up to medium-high speed. Mix until light and fluffy, about 3 minutes. Add more milk as needed. Tint yellow, if desired.
Lavender Buttercream
- Grind the lavender with 1 cup powdered sugar in a mini food processor. Sift out any large pieces of dried lavender using a mesh sieve, if desired. Alternatively, grind the lavender in a spice grinder or use a mortar and pestle.
- Using a stand mixer fitted with the paddle attachment or a hand mixer, mix the butter until soft and creamy.
- Add the lavender sugar along with the remaining powdered sugar, 2 tablespoons of milk and vanilla. Mix on low speed until combined.
- Once the sugar mixes in and won't fly out everywhere, turn the mixer speed up to medium-high speed. Mix until light and fluffy, about 3 minutes. Add more milk as needed.
- If you want to make it lavender in color, add small amounts of gel food coloring until desired color is achieved.
Assembly
- Place one layer of cake on a cake board or serving dish. Scoop half of the lemon cream on top and smooth out with an offset spatula.
- Add the next layer of cake and repeat.
- Place the final cake on top and gently press down to secure. Use the lavender buttercream to crumb coat the cake by spreading a thin layer on the sides and top of the cake. Chill the cake in the refrigerator for 15 minutes.
- After the crumb coat layer is firm to the touch, smoothly frost the cake with the lavender buttercream.
- Tint the leftover lavender buttercream with pink and purple gel food coloring to make various shades of lavender.
- Use a large star tip 1M to pipe rosettes around the sides of the cake.
- Use smaller star piping tips to fill in the gaps with smaller rosettes and kisses. Finish with sugar pearls.
Callie
I adore this cake! I skipped the piping on the sides, but just did a regular star border. The flavors are super good and perfect for spring.
Isla Collins
What an adorable cake!