Last updated on November 16th, 2025 at 10:16 pm
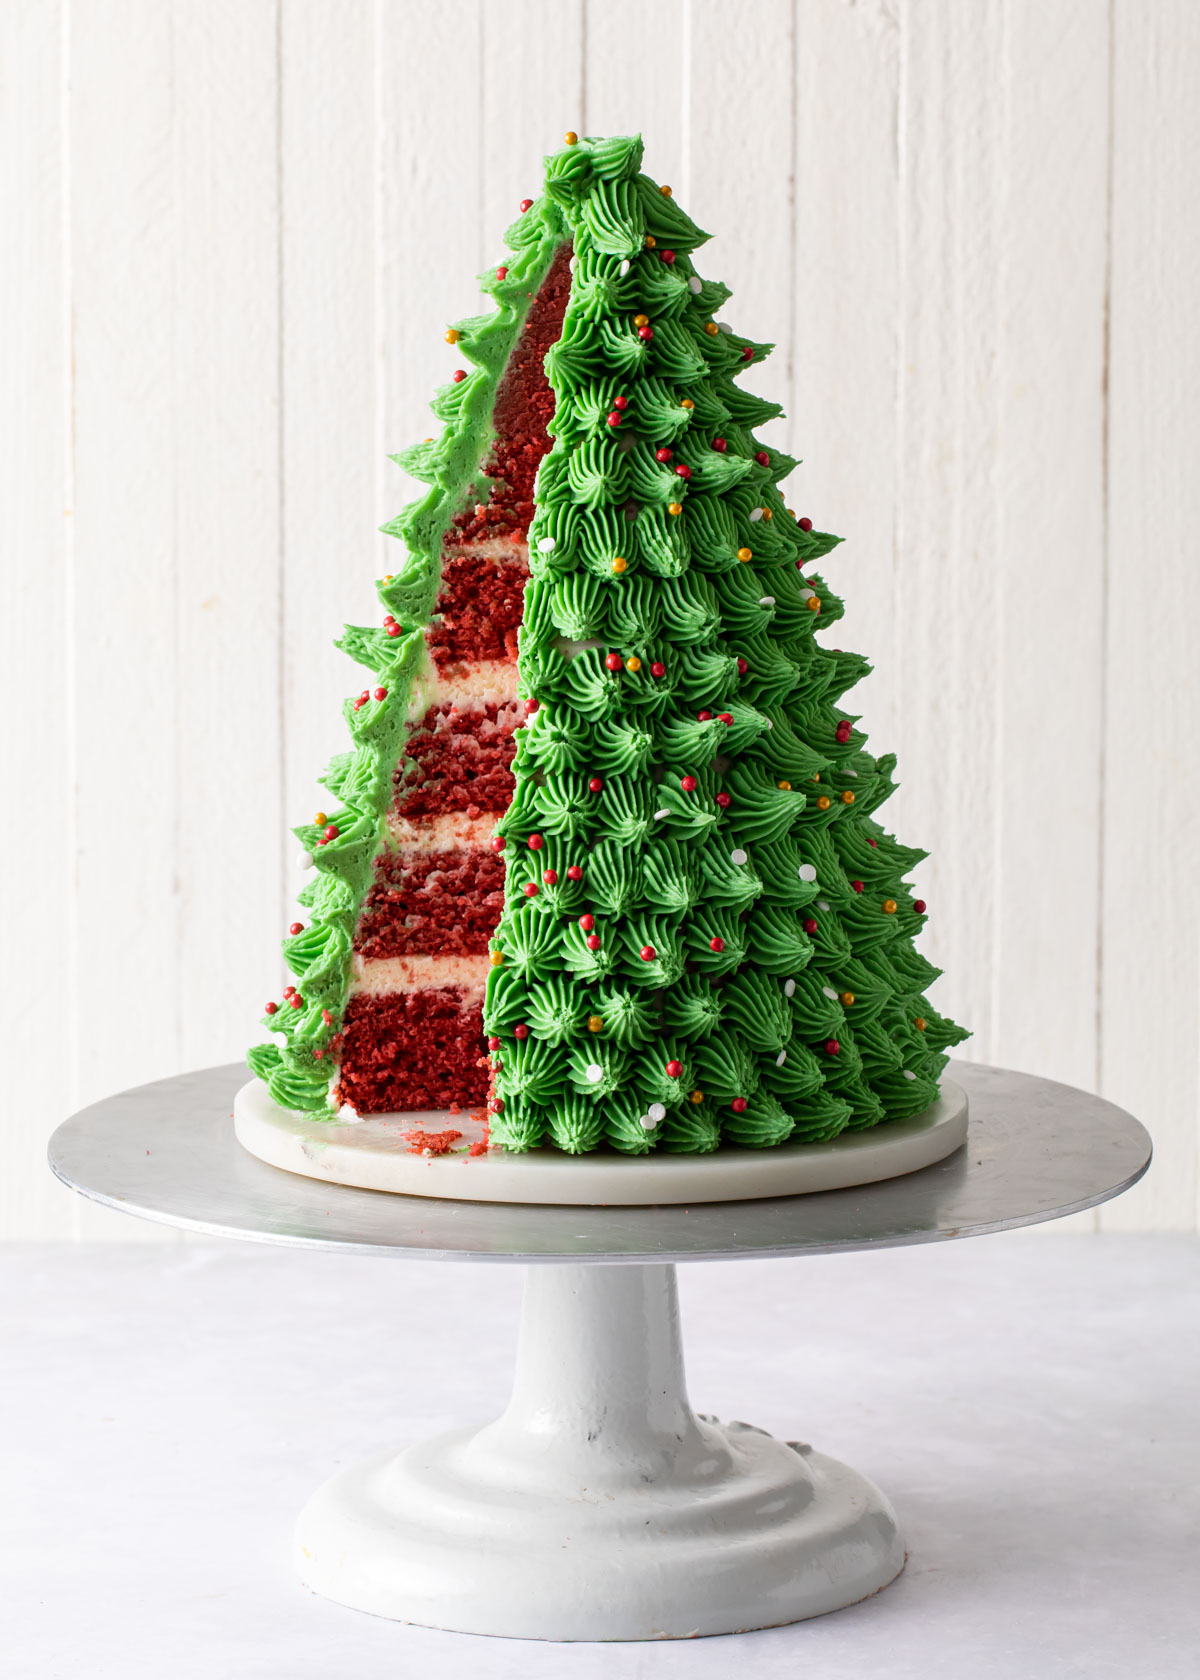
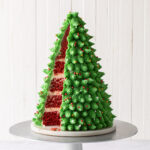
Make this show-stopping, Red Velvet 3D Christmas Tree Cake for the holidays! A little bit of carving, boughs of buttercream with a star piping tip, and a handful of magic brings this tree cake to life in no time.
Not only does it look fantastic and festive, the red velvet cake is moist with hints of cocoa. I was just as eager to eat a slice as were my children; it's that good!
Jump to:
Instructions
- Bake the cakes - You will be to make three, 6-inch cakes and one small loaf cake.
- Trim the baked cake - Cut out two, 4-inch cakes from the loaf. A large cookie or biscuit works well if you have ones. Trim one of the 6-inch cakes so that it is 5-inches in diameter.
- Make the Buttercream
- Begin stacking the cake layers - Add about ½-inch of buttercream between each layer.
- Chill - After you stack all the cake rounds, chill the cake in the refrigerator for at least 15 minutes. This will help with the carving.
- Carve the Cake - Use a serrated knife to start shaping and carving the cake into a cone. Angle the knife up the side and trim. Save the trimmings.
- Make the Top of the Tree - Use some of the cake trimming mixed with a bit of buttercream to make a cone that forms the top of the tree.
- Crumb Coat - Once you have your tree shape, cover the cake in a thin layer of buttercream.
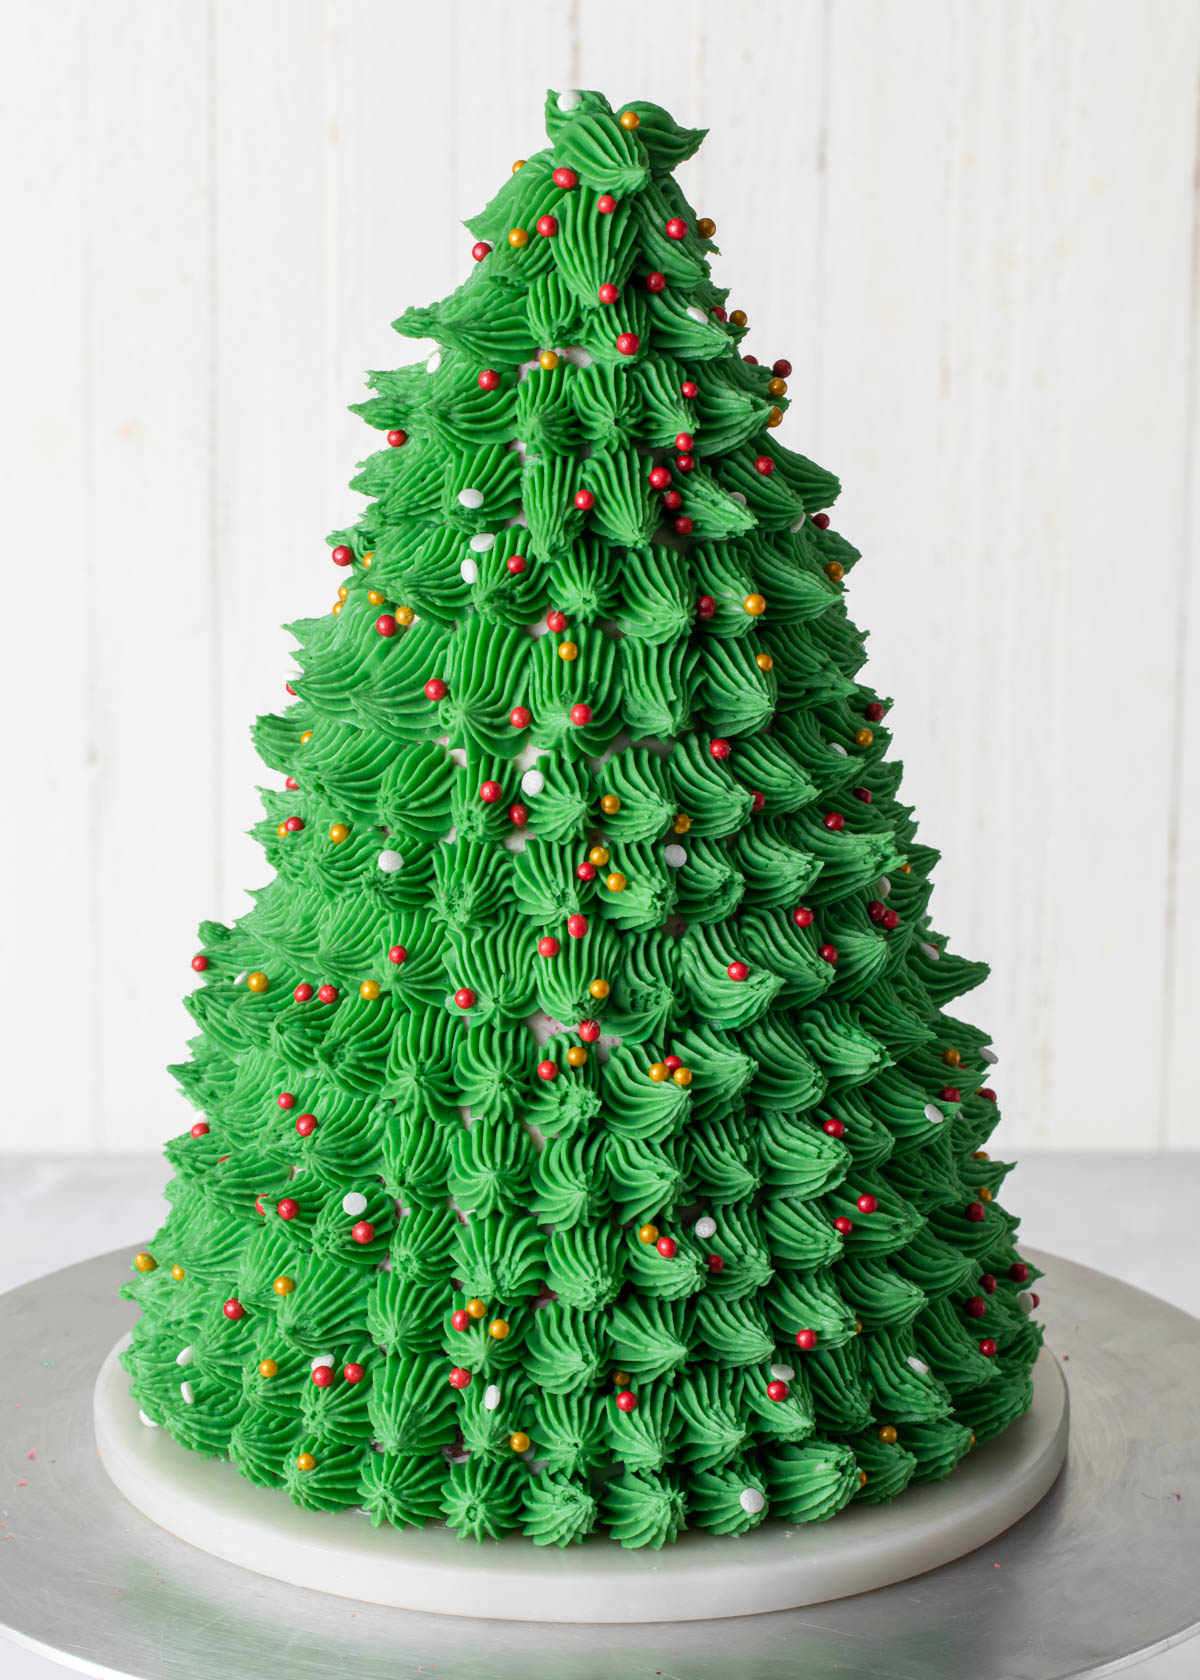
- Decorate! Tint the buttercream green. Use a star tip (I used Wilton 4B) and pipe shells around the tree. Start at the bottom and work your way around and up the tree. Add sprinkles as you go. Once the buttercream dries, they won't stick very well.
How to Make a 3D Christmas Tree Cake
See the recipe card for full cake baking instructions.
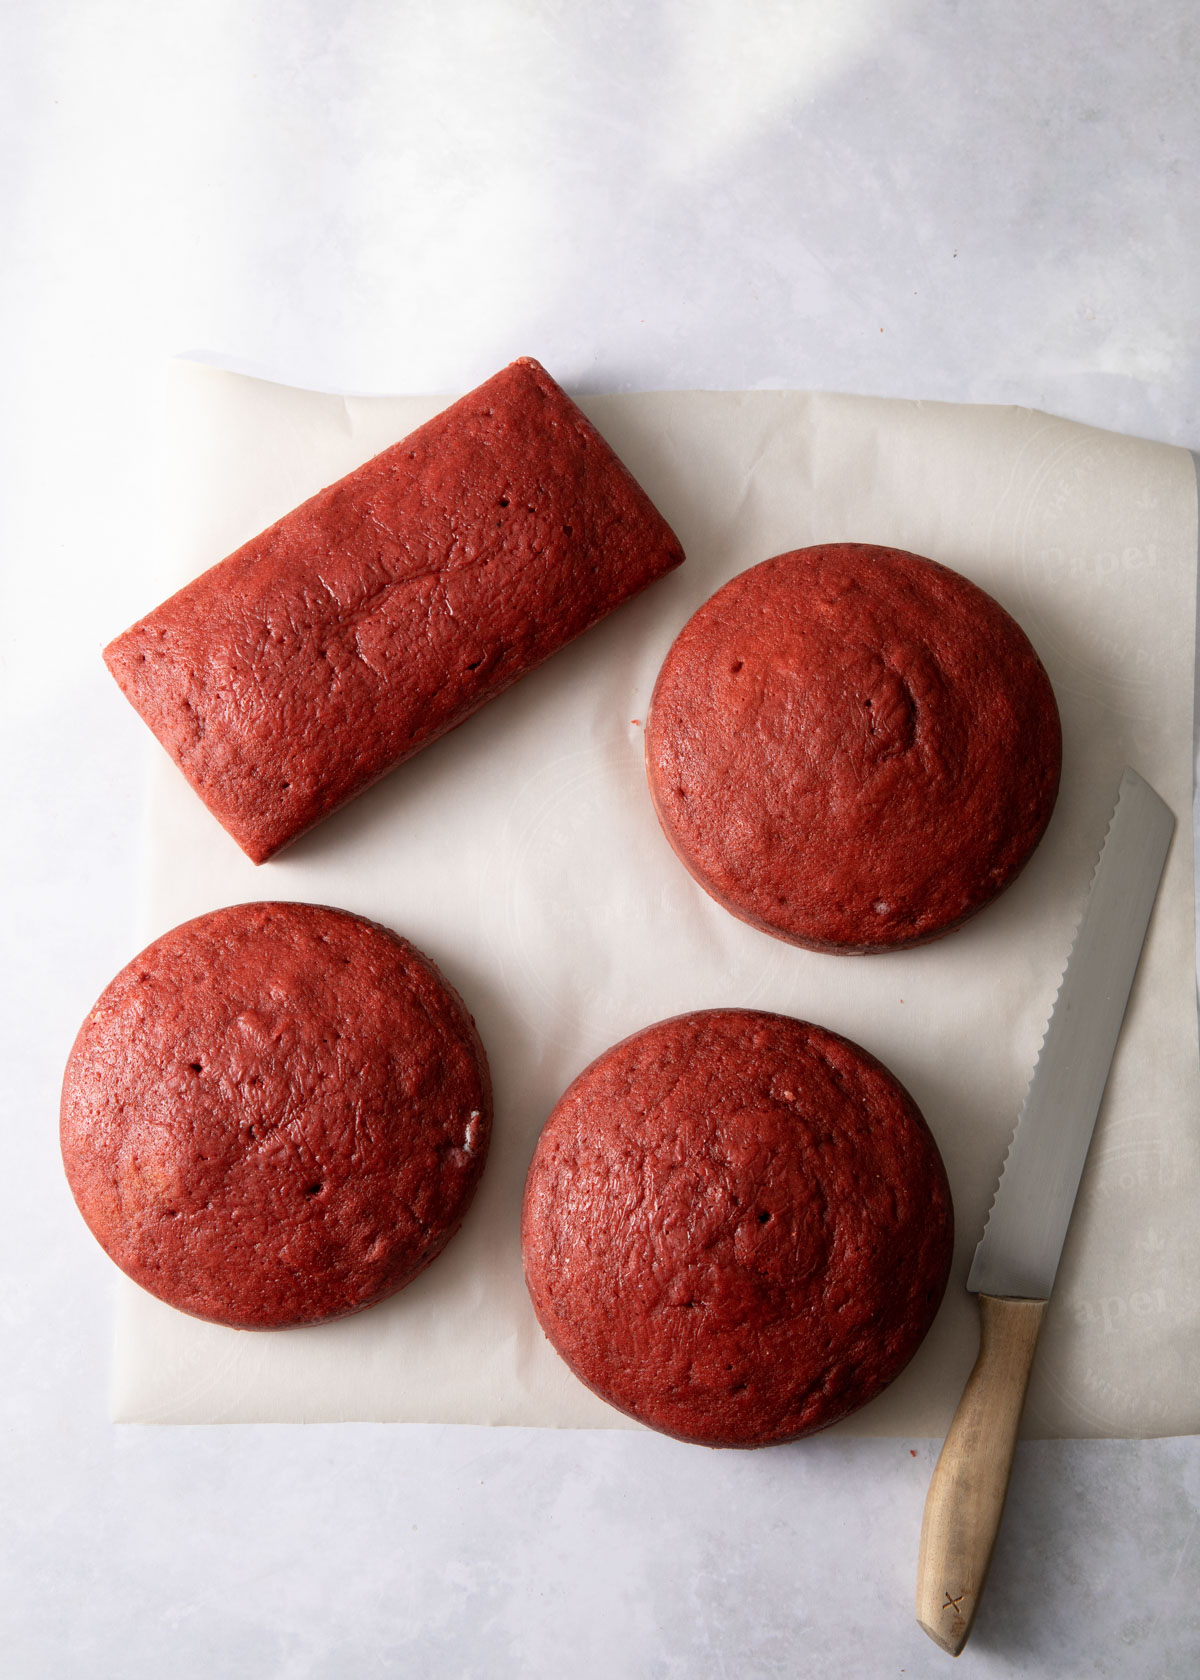
Bake the red velvet cake layers according to the recipe card.
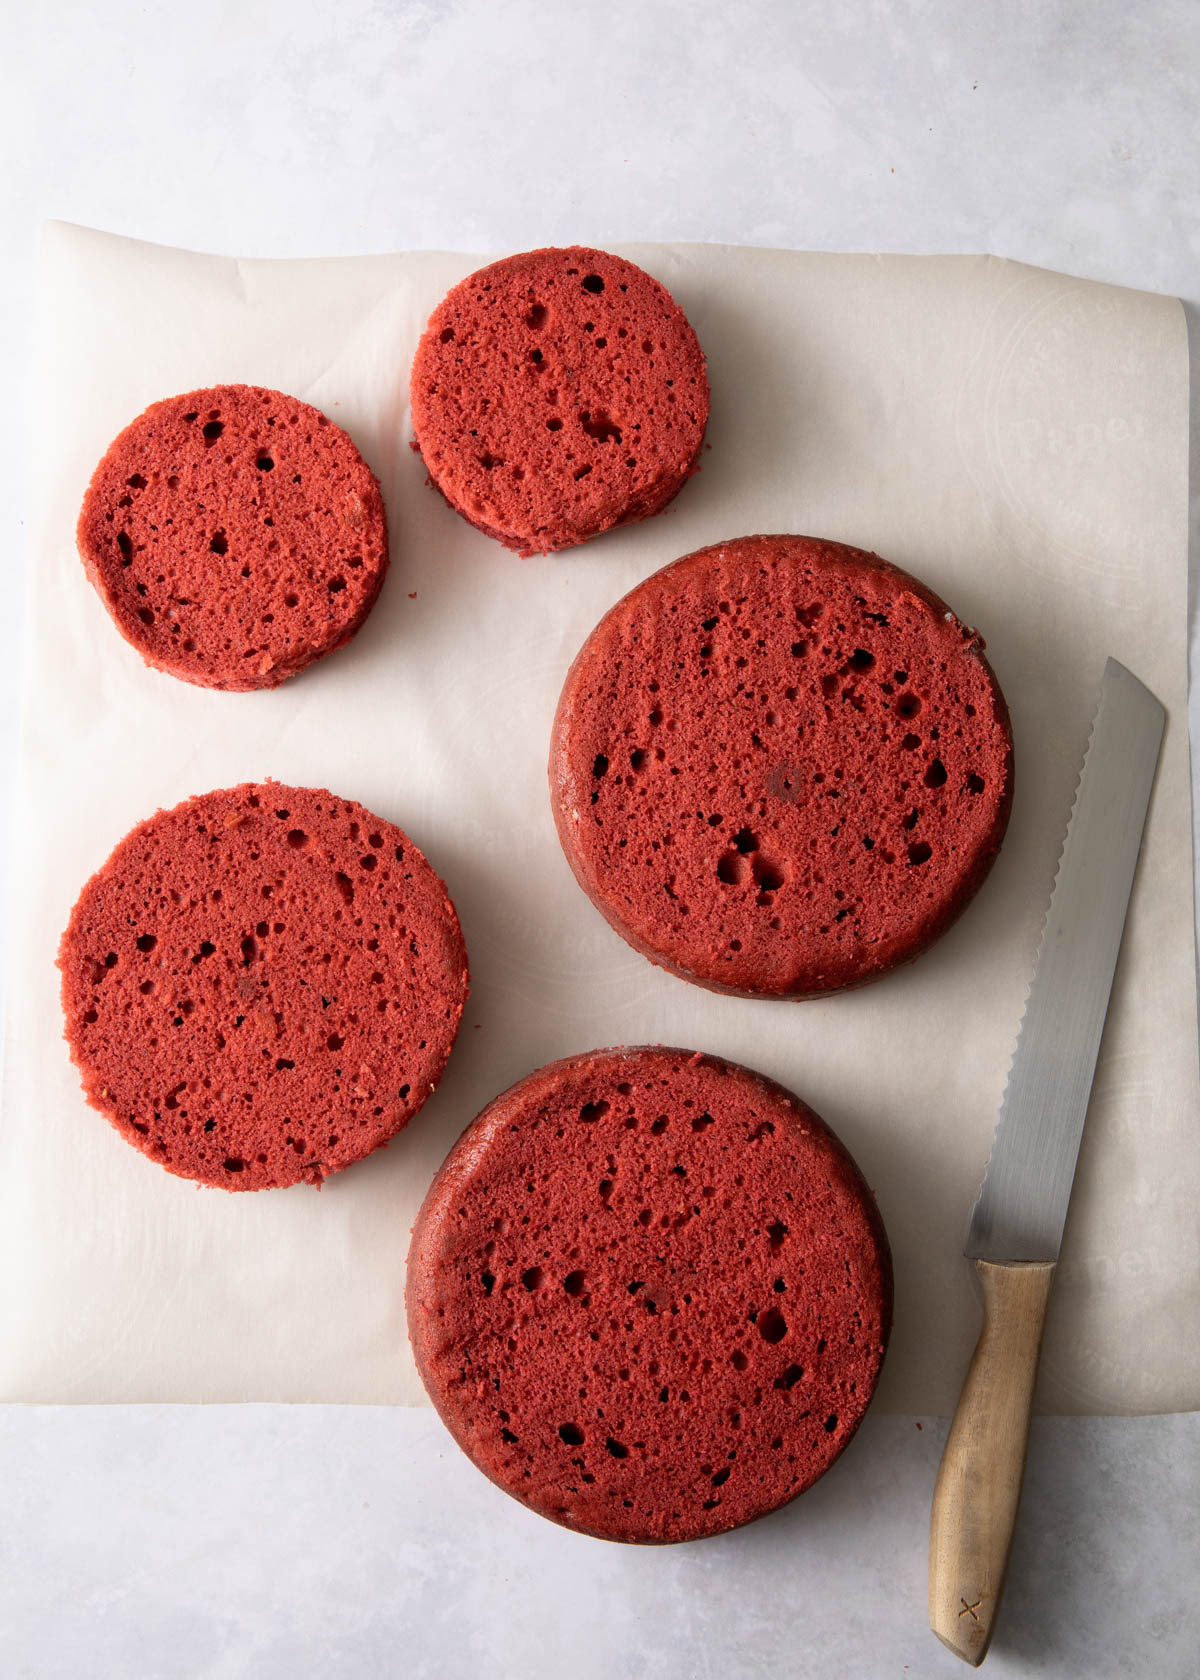
Trim the round cakes until flat. Cut out two, 4-inch cakes from the loaf. Trim one of the 6-inch cakes so that it is 5-inches in diameter.
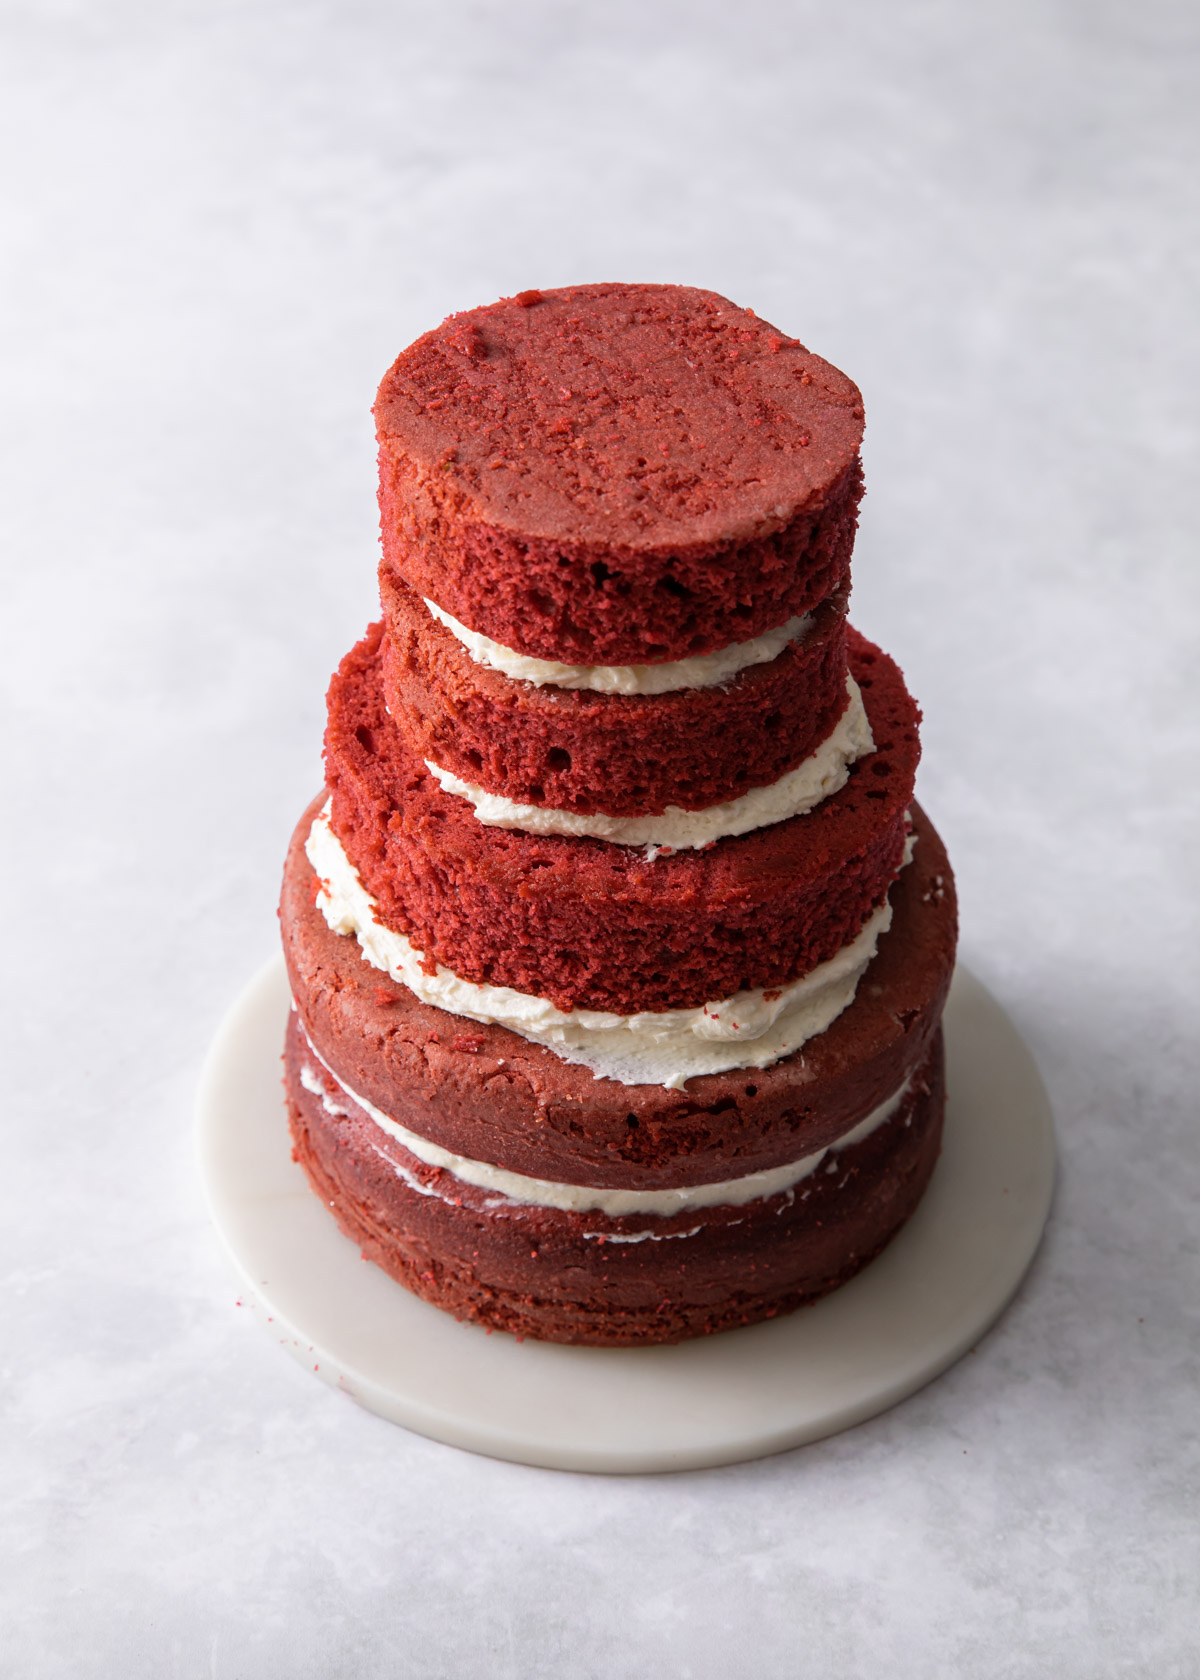
Stack the cake layers with buttercream frosting in between.
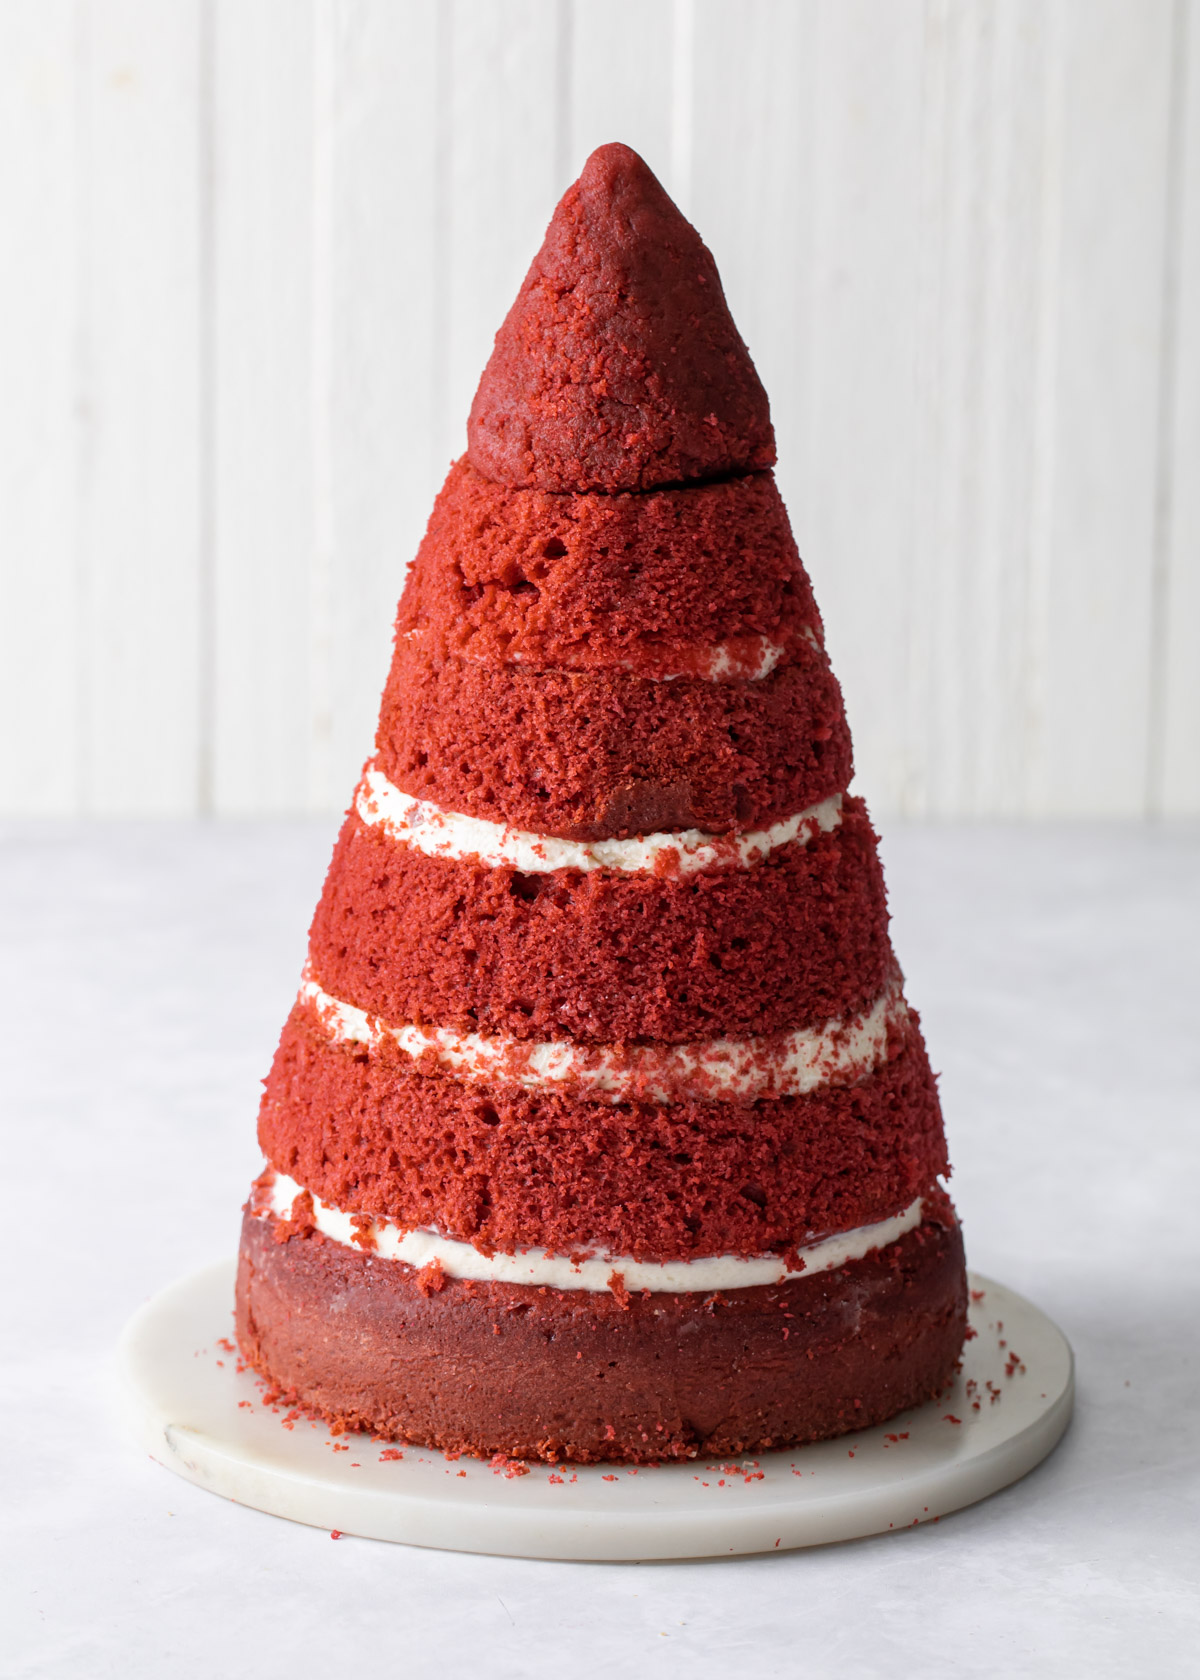
Use a serrated knife to carve the stacked cake into the shape of a Christmas tree. Save the scraps to mix with buttercream to from a cone for the top of the tree.
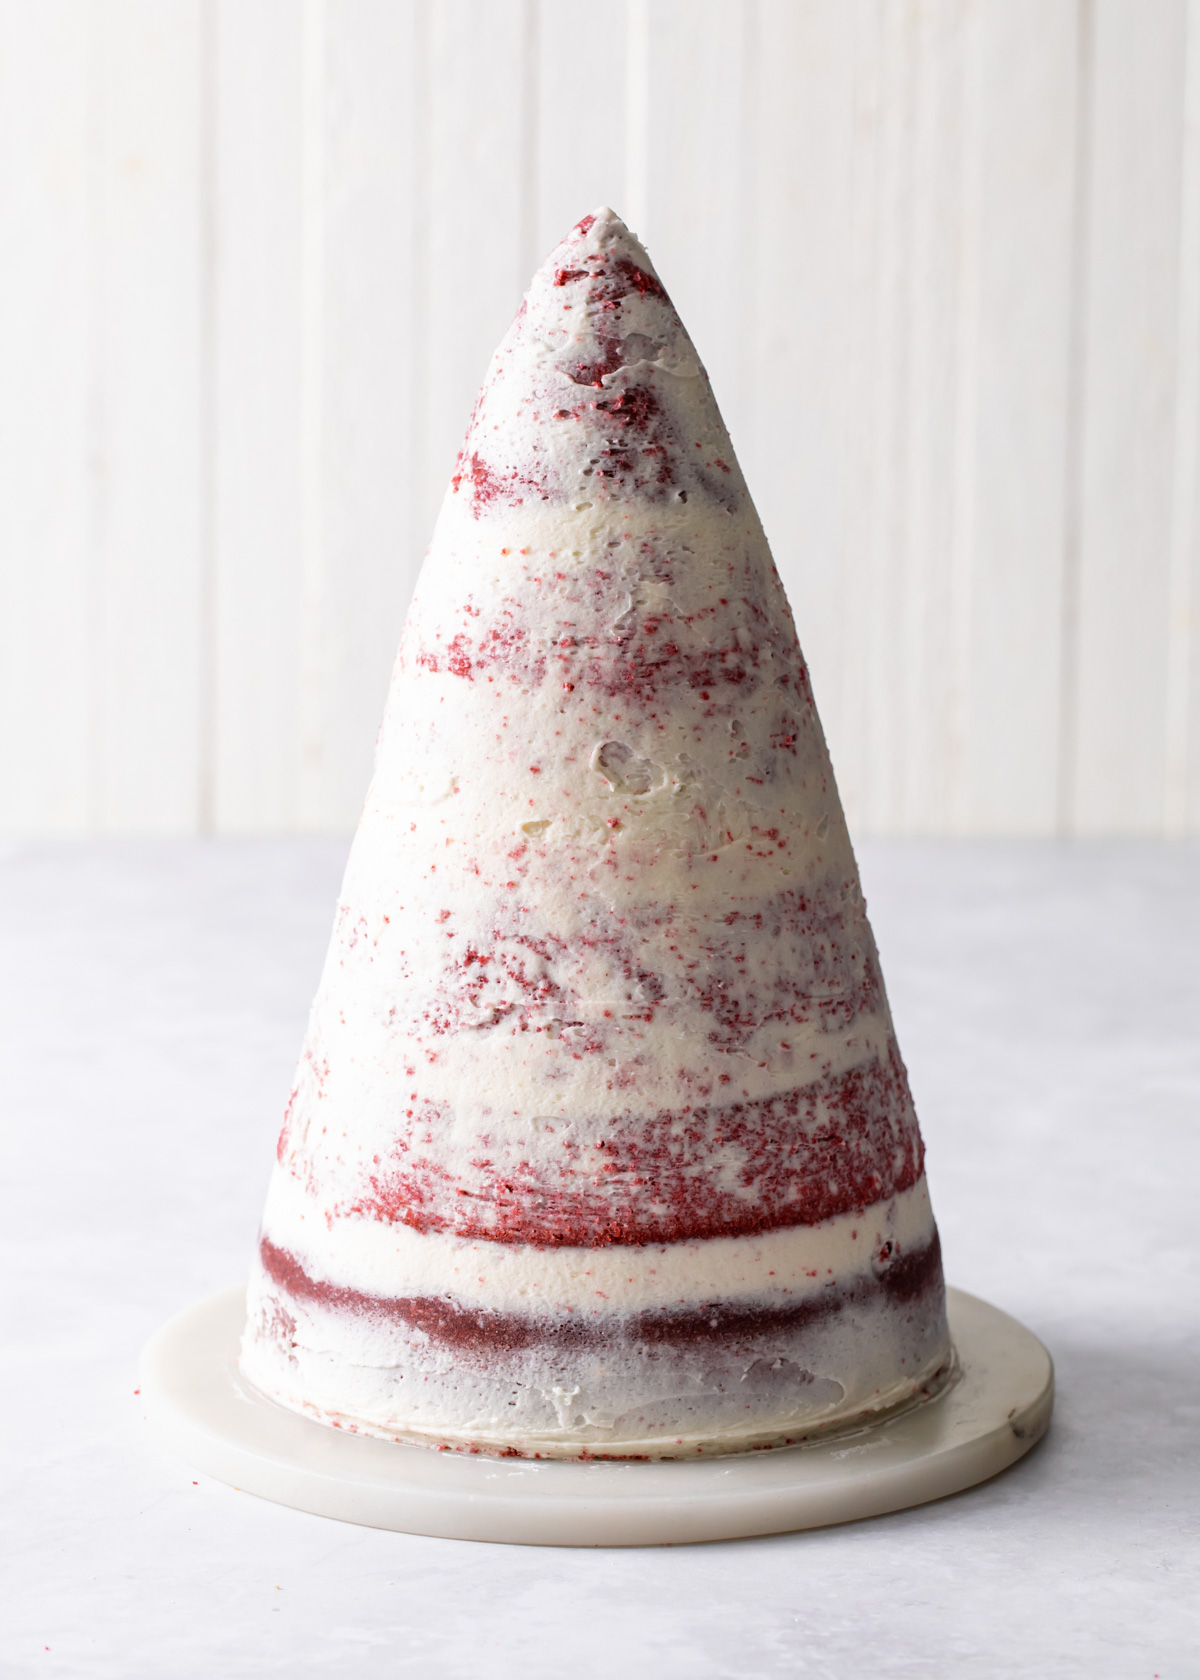
Crumb coat the carved cake by icing it in a thin layer of buttercream.
Baker's Notes
- If you are finding it difficult to carve the cake, try chilling the stacked cake. A chilled cake should yield less crumbs and the filling will be more stable.
- When filling the cake with buttercream, you do not need to go all the way to the edges of the cake. Since the cakes are stacked in a cone shape and the edges trimmed, you don't want to waste buttercream that will be cut off.
- The buttercream should be soft enough to easily squeeze out of the piping bag without straining your hand. If it is too think, try adding a splash more of milk or massage the piping bag to warm it up.
- On the flip-side, chill the buttercream for a few minutes as a time if it gets too warm in the piping bag.
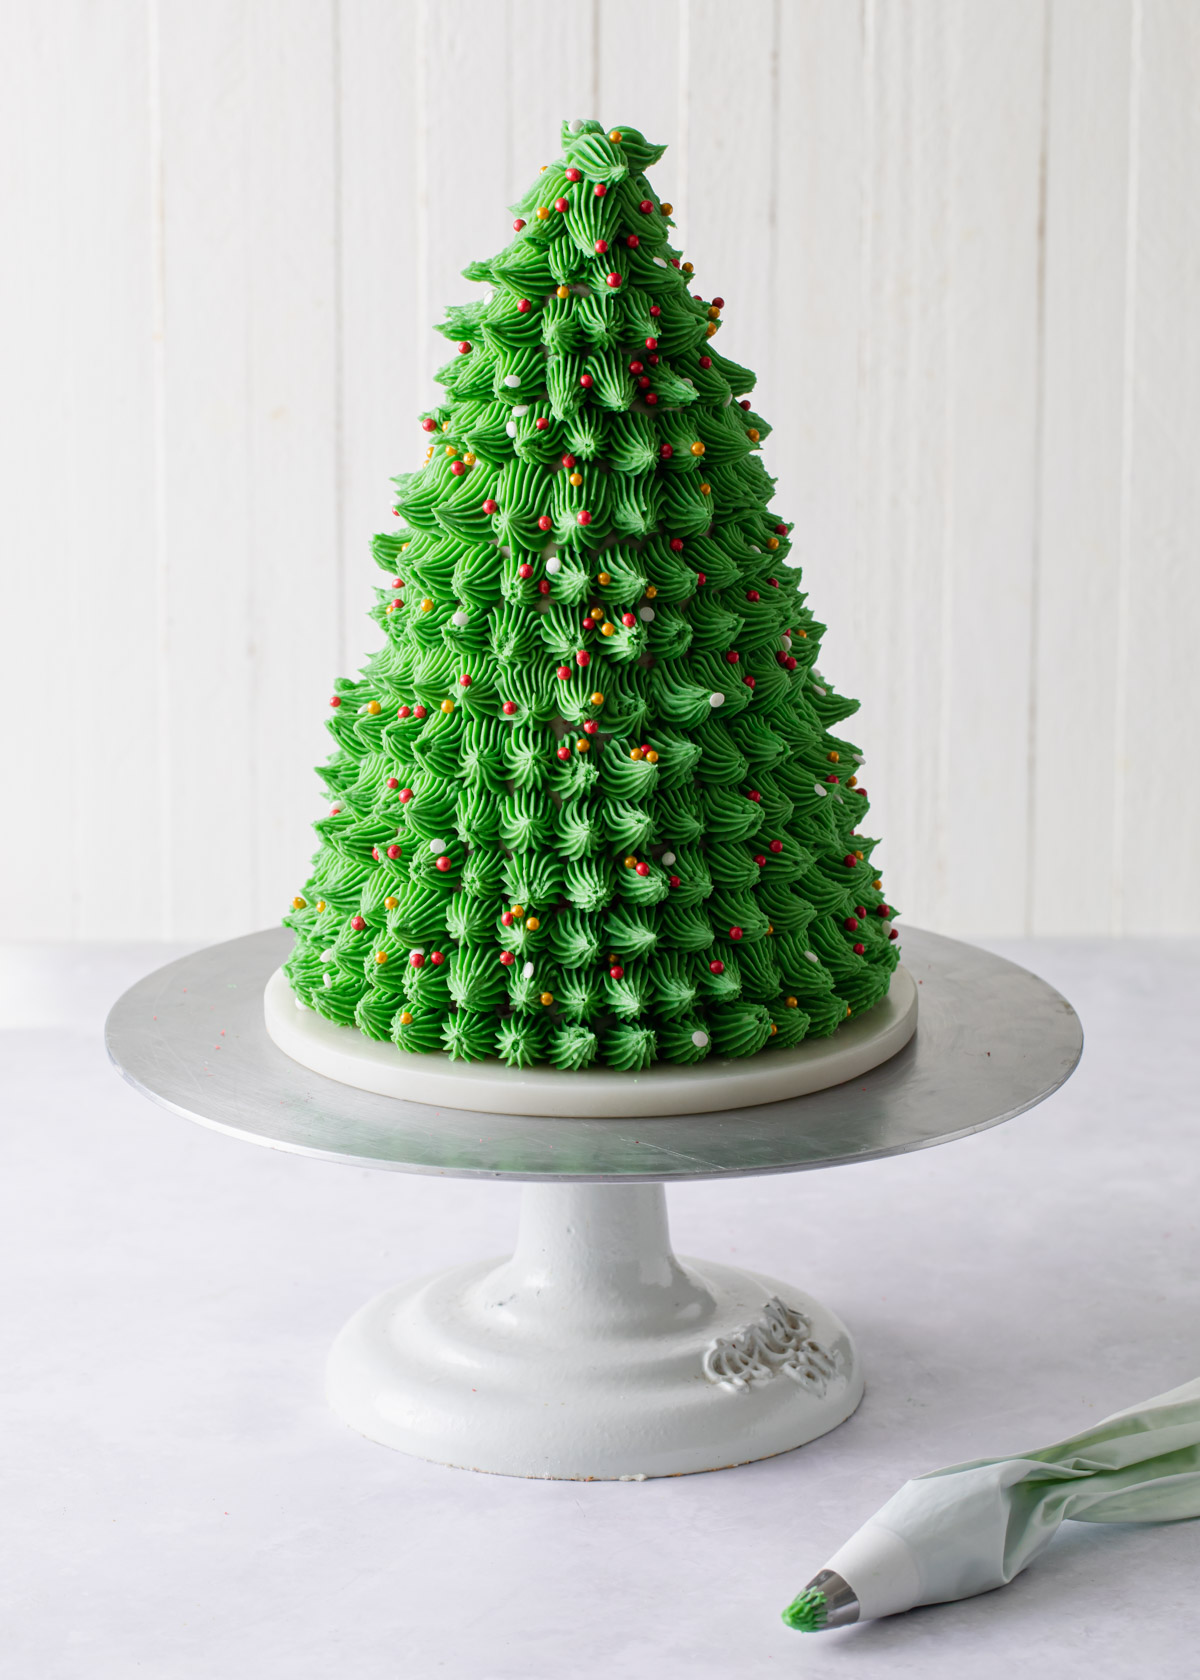
How to Decorate a 3D Christmas Tree Cake
Decorating the cake was relatively simple. After filling and crumb coating the cake, tint the buttercream green.
For the tree, fill a piping bag fitted with a star tip (I used Wilton 4B) and pipe shells around the tree.
Start at the bottom and work your way around and up the tree.
Be sure to add the sprinkles as you go so that they stick to the buttercream before it begins to crust. And if all else fails, literally throw the sprinkles to the side of the cake (instead of from the top where they can sometimes bounce off everywhere).
Red Velvet Cake Ingredients
Here is a quick glance at some of the ingredients needed beyond basic pantry staples. Find a complete list with quantities in the full recipe to follow.
- Eggs
- Buttermilk
- Natural Unsweetened Cocoa Powder
- All-purspose Flour
- White or Apple Cider Vinegar
- Confectioners' Sugar
- Unsalted Butter
- Avocado or Canola Oil
- Granulated Sugar
Tools and Equipment for a Christmas Tree Cake
These are the primary tools you will need to bake this cake. I've listed my recommended cake decorating equipment too.
- 6-inch Cake Pans, with sides at least 2-inch high
- 9 X 5-inch Loaf Pan
- Large Mixing Bowl
- Whisk
- Rubber Spatula
- Hand or Stand Mixer
- Rotating Cake Stand
- Offset Spatula
- Serrated Knife
- Piping Bag
- Gel food coloring
- Star 4B Piping Tip
- General Kitchen Tools (measuring spoons, cups, etc).
Layer Cake 101
New to cake decorating? Start here:
Easy Textured Buttercream Cakes
How to Make Beautiful Layer Cakes
Buy my books! Layered and Icing on the Cake
Serving and Storage
Serve the cake a room temperature. It may be stored at room temperature (preferable in a box or cake container) overnight.
Store leftovers, loosely covered in the plastic wrap, in the refrigerator for up to 3 to 4 days. Allow cake to come to room temperature before serving.
You can freeze the baked, cooled, and unfrosted cake layers. Wrap well in plastic and store in the freezer for up to 3 months. Thaw the cake layers in the refrigerator overnight before use.
Recipe FAQs
You don't have to, but the cake will not have a very strong red color. The natural cocoa may give it a hint of red.
No. This recipe is developed with natural cocoa that reacts with the baking soda, buttermilk, and vinegar.
This cake is made with an American-style buttercream. You could try a meringue-style buttercream, but I do not recommend cream cheese frosting.
Variations
Want to switch up the cake flavors? You can! Instead of red velvet cake, consider a different sponge cake that is sturdy enough for layering and carving, like:
- Vanilla Bean Cake
- Moist Chocolate Cake
- Pumpkin Cake - multiply this recipe by 1.5 to make enough batter for this design.
I do not recommend using cream cheese frosting as it is not stable enough to carve and has a harder time holding its shape when piped.
If you love a show-stopping cake, try my Red Velvet Bundt Cake!
Join the Style Sweet Bake Club!
Get exclusive recipes and articles sent straight to your inbox. Become a subscriber today! Click to join.
More Festive Cakes to Bake:
Pumpkin Cake with Maple Cream Cheese Frosting
Vanilla Cranberry Christmas Tree Cake
Please leave a star review if you loved this recipe! Make sure to share your recipes and tag me on Instagram @stylesweetdaily.
Recipe
Red Velvet 3D Christmas Tree
Ingredients
For the Red Velvet Cake
- 3 ¼ cups all-purpose flour
- 1 ¼ teaspoons baking soda
- ½ teaspoons salt
- 2 tablespoons unsweetened natural cocoa powder
- ¾ cup unsalted butter softened
- 2 cups granulated sugar
- ¼ cup canola or avocado oil
- 3 large eggs
- 2 teaspoons vanilla extract
- 1 tablespoon red food coloring optional
- 1 ¼ cup buttermilk
- 1 tablespoon white or apple cider vinegar
For the Whipped Vanilla Buttercream
- 2 cups unsalted butter softened
- 5 to 6 cups confectioners' sugar
- 2 teaspoons pure vanilla extract
- 3 to 4 tablespoons milk
Instructions
To Make the Red Velvet Cake
- Pre-heat oven to 350 degrees. Grease and flour three 6-inch round cakes pans and one 9 X 5 loaf pan. Set aside.
- Sift together the dry ingredients and set aside.
- In the bowl of an electric mixer, cream together the butter and sugar until light and fluffy. Add the oil and mix to combine. With the mixer on low, add in the cocoa, vanilla, red coloring, and eggs – one at a time. Stop the mixer and scrape down the bowl.
- With the mixer on low, add in half of the dry ingredients followed by the buttermilk and vinegar. Add the second half of the dry ingredients and mix until combined.
- Divide the batter between the pans and bake for 23 to 28 minutes or until a toothpick inserted into the center of the cakes comes out clean.
- Cool on a wire rack for 10 to 15 minutes before removing the cakes from their pans.
To Make the Whipped Vanilla Buttercream
- Beat butter at medium-low speed of electric mixer until smooth and creamy (1 to 3 minutes.)
- Gradually add 4 ½ cups powdered sugar and vanilla extract with mixer at low speed, scraping bowl occasionally. Mix until blended.
- Beat at medium-high speed 3 to 5 minutes, until buttercream is light and airy and nearly white. If needed, add the additional powered sugar or milk until desired consistency. Divide and tint with green gel food coloring.
To Assemble
- Trim the baked cake layers flat so that they are ready to start stacking. Cut out two, 4-inch cakes from the loaf. A large cookie or biscuit works well if you have ones. Trim one of the 6-inch cakes so that it is 5-inches in diameter.
- Begin stack the cake layers, starting with the 6-inch cakes. Add about ½-inch of buttercream between each layer, or even a little less. You don't wan't the buttercream layers to be too thick or it will be hard to shape into the 3D tree.
- After you stack all the cake rounds, chill the cake in the refrigerator for at least 15 minutes. This will help with the carving.
- Use a serrated knife to start shaping and carving the cake into a cone. Angle the knife up the side and trim. Save the trimmings.
- Use some of the cake trimming mixed with a bit of buttercream to make a cone that forms the top of the tree.
- Once you have your tree shape, cover the cake in a thin layer of buttercream.
- To decorate, tint the buttercream green. Use a star tip (I used Wilton 4B) and pipe shells around the tree. Start at the bottom and work your way around and up the tree. Add sprinkles as you go. Once the buttercream dries, they won't stick very well.
Notes
- If you are finding it difficult to carve the cake, try chilling the stacked cake. A chilled cake should yield less crumbs and the filling will be more stable.
- When filling the cake with buttercream, you do not need to go all the way to the edges of the cake. Since the cakes are stacked in a cone shape and the edges trimmed, you don't want to waste buttercream that will be cut off.
- The buttercream should be soft enough to easily squeeze out of the piping bag without straining your hand. If it is too think, try adding a splash more of milk or massage the piping bag to warm it up.
- On the flip-side, chill the buttercream for a few minutes as a time if it gets too warm in the piping bag.
nisha Ragu
Zeroin academy Baking Classes in Velachery will let you to know about the tactics over the piping which will make your cake more and more gorgeous with these piping strategy that you are about to use over your baked stuff adding up the piping over the cakes. https://zeroinacademy.com/baking-classes-in-velachery
pattydukes
Cute design and easy to make. Tastes great too!
Jess
I made this with my son and daughter last night. They loved it!
Anna
the recipe never says where and when to add the 1/4 cup of oil.
I'm making it now and I am confused
stylesweet
Hi! My apologies. You can add it after the butter and sugar. I've updated the recipe. Thank you!!
Bree
Do you think an ermine buttercream would work?
stylesweet
Hi! I think it could work. Ermine is pretty stable. You may want to chill the cake before carving.
Kyla G
This cake is so much fun to make! I made it last year for Christmas. And honestly, it is way easier than you might think. Making with my girls again this year.
Connie
Am I missing reading a step? It doesn't say how to stack? Do I stack all the cakes then just carve cake off in the shape of a tree?
stylesweet
HI! There are brief instructions with the photos, but you're right. The detailed instructions are missing from the recipe card. I will add right now. Thank you!