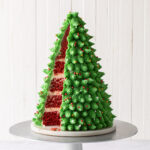
Red Velvet 3D Christmas Tree
Make this super festive Red Velvet 3D Christmas Tree Cake for the holidays!
Servings: 12
Ingredients
For the Red Velvet Cake
- 3 ¼ cups all-purpose flour
- 1 ¼ teaspoons baking soda
- ½ teaspoons salt
- 2 tablespoons unsweetened natural cocoa powder
- ¾ cup unsalted butter softened
- 2 cups granulated sugar
- ¼ cup canola or avocado oil
- 3 large eggs
- 2 teaspoons vanilla extract
- 1 tablespoon red food coloring optional
- 1 ¼ cup buttermilk
- 1 tablespoon white or apple cider vinegar
For the Whipped Vanilla Buttercream
- 2 cups unsalted butter softened
- 5 to 6 cups confectioners' sugar
- 2 teaspoons pure vanilla extract
- 3 to 4 tablespoons milk
Instructions
To Make the Red Velvet Cake
- Pre-heat oven to 350 degrees. Grease and flour three 6-inch round cakes pans and one 9 X 5 loaf pan. Set aside.
- Sift together the dry ingredients and set aside.
- In the bowl of an electric mixer, cream together the butter and sugar until light and fluffy. Add the oil and mix to combine. With the mixer on low, add in the cocoa, vanilla, red coloring, and eggs – one at a time. Stop the mixer and scrape down the bowl.
- With the mixer on low, add in half of the dry ingredients followed by the buttermilk and vinegar. Add the second half of the dry ingredients and mix until combined.
- Divide the batter between the pans and bake for 23 to 28 minutes or until a toothpick inserted into the center of the cakes comes out clean.
- Cool on a wire rack for 10 to 15 minutes before removing the cakes from their pans.
To Make the Whipped Vanilla Buttercream
- Beat butter at medium-low speed of electric mixer until smooth and creamy (1 to 3 minutes.)
- Gradually add 4 ½ cups powdered sugar and vanilla extract with mixer at low speed, scraping bowl occasionally. Mix until blended.
- Beat at medium-high speed 3 to 5 minutes, until buttercream is light and airy and nearly white. If needed, add the additional powered sugar or milk until desired consistency. Divide and tint with green gel food coloring.
To Assemble
- Trim the baked cake layers flat so that they are ready to start stacking. Cut out two, 4-inch cakes from the loaf. A large cookie or biscuit works well if you have ones. Trim one of the 6-inch cakes so that it is 5-inches in diameter.
- Begin stack the cake layers, starting with the 6-inch cakes. Add about ½-inch of buttercream between each layer, or even a little less. You don't wan't the buttercream layers to be too thick or it will be hard to shape into the 3D tree.
- After you stack all the cake rounds, chill the cake in the refrigerator for at least 15 minutes. This will help with the carving.
- Use a serrated knife to start shaping and carving the cake into a cone. Angle the knife up the side and trim. Save the trimmings.
- Use some of the cake trimming mixed with a bit of buttercream to make a cone that forms the top of the tree.
- Once you have your tree shape, cover the cake in a thin layer of buttercream.
- To decorate, tint the buttercream green. Use a star tip (I used Wilton 4B) and pipe shells around the tree. Start at the bottom and work your way around and up the tree. Add sprinkles as you go. Once the buttercream dries, they won't stick very well.
Notes
- If you are finding it difficult to carve the cake, try chilling the stacked cake. A chilled cake should yield less crumbs and the filling will be more stable.
- When filling the cake with buttercream, you do not need to go all the way to the edges of the cake. Since the cakes are stacked in a cone shape and the edges trimmed, you don't want to waste buttercream that will be cut off.
- The buttercream should be soft enough to easily squeeze out of the piping bag without straining your hand. If it is too think, try adding a splash more of milk or massage the piping bag to warm it up.
- On the flip-side, chill the buttercream for a few minutes as a time if it gets too warm in the piping bag.