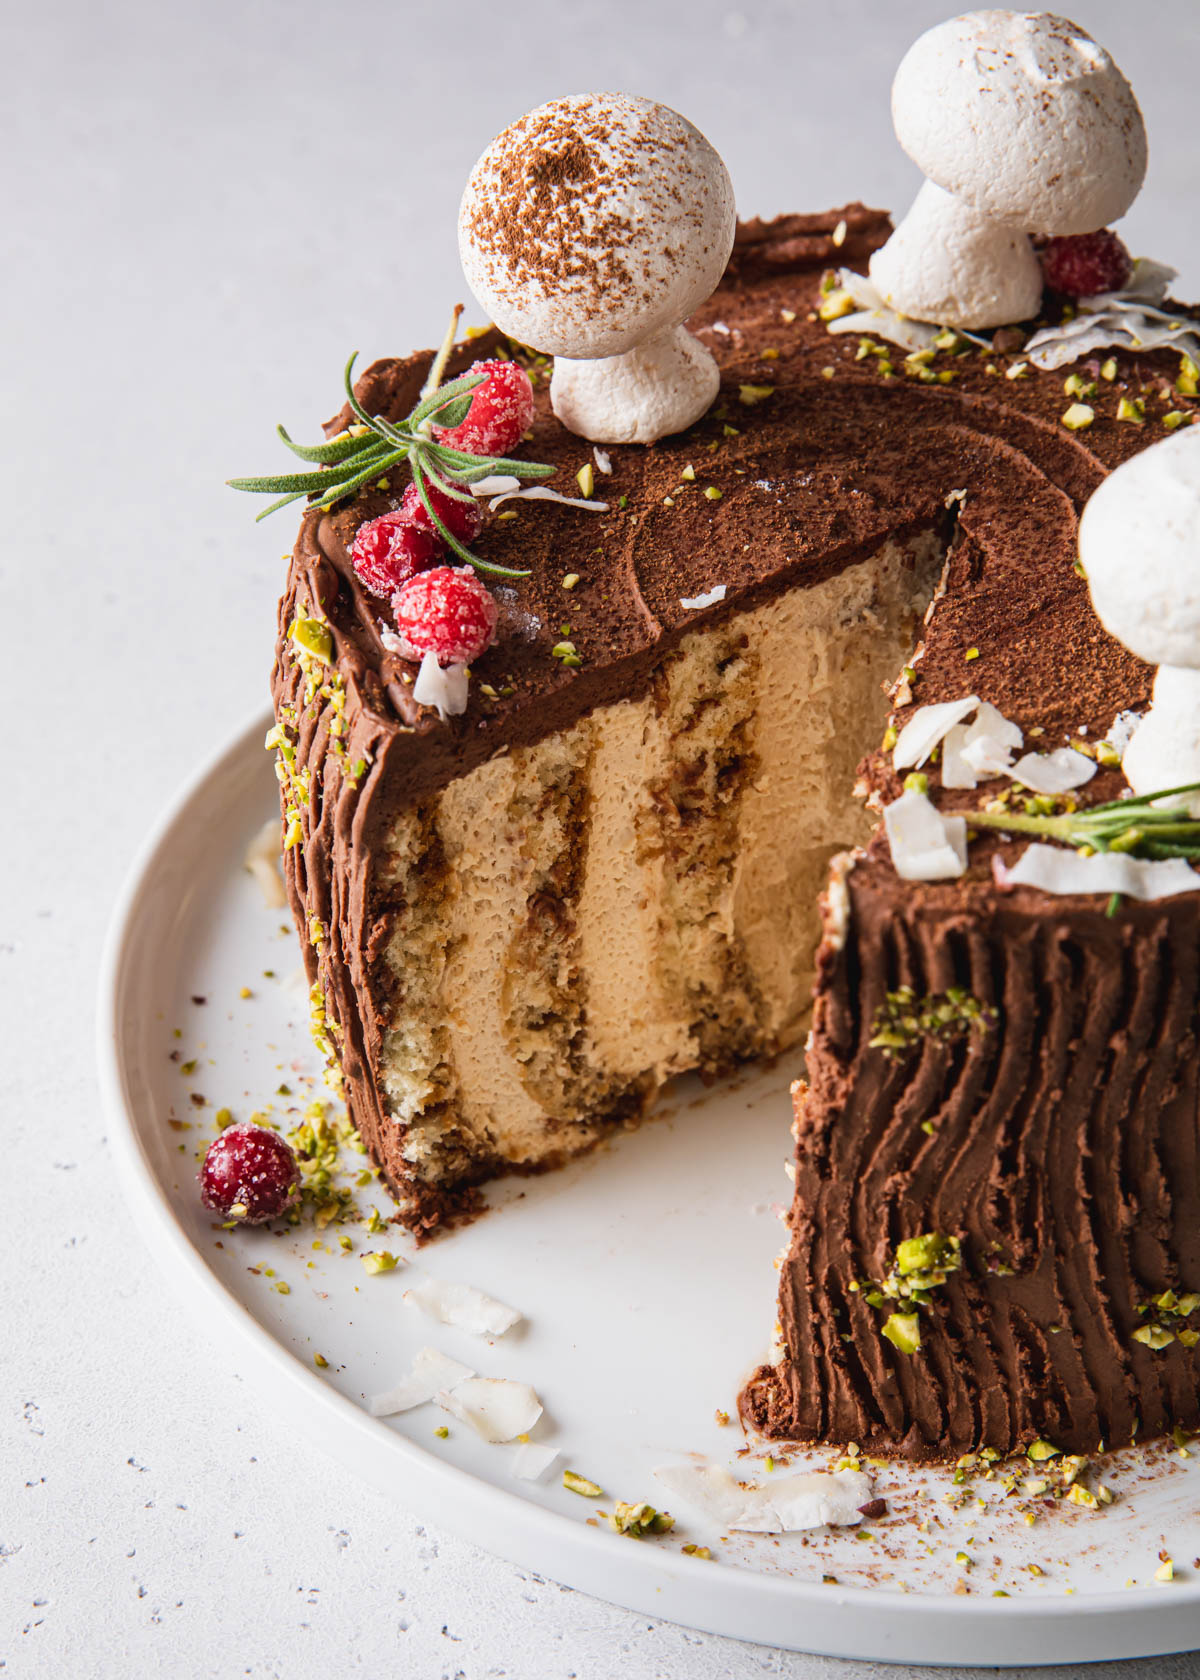
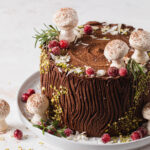
A literal twist transforms a classic Buche de Noel Cake into a festive show-stopper. By simply cutting the cake before rolling and giving it a little flip, the sponge cake turns into a whimsical, woodland tree stump!
Yule logs tend to be highly decorative with lots of flair. The “tree bark” exterior is made from whipped chocolate ganache that is covered in edible moss and drifts of snow. It can be a bit of a project, but making the glittery cranberries and crisp meringue mushrooms is super fun and definitely gets you into the holiday spirit.

Jump to:
- How to Bake a Buche de Noel Cake
- Instructions for Rolling a Vertical Yule Log
- How to Decorate the Buche de Noel Cake
- Baker's Notes for a Vertical Buche de Noel
- Tiramisu Yule Log Tasting Notes
- Ingredients
- Tools and Equipment
- Substitutions
- Variations
- Buche de Noel Serving and Storage
- Top tip
- Join the Style Sweet Bake Club!
- More Festive Recipes to Try
- Recipe
How to Bake a Buche de Noel Cake
There are a lot of steps to make the many components of a decorative buche de noel. You can make some to the decorations ahead of time. It will make things ten-times easier if you save time for the rolled cake to chill in the refrigerator before icing the cake. The ganache needs to cool for 60 to 90 minutes before whipping.
- Make the decorations - The sugared cranberries and meringue mushrooms can be made up to a few days in advance. The sugared cranberries need time to dry, so definitely do those the day before.
- Make the sponge cake - Whip the eggs the full 8 to 10 minutes until they triple in volume and thick. Bake until the top of the cake is set and springy when poke with a finger tip.
- Roll the cake - Right after the cake comes out of the oven, dust with powdered sugar and roll it up in a clean dish towel. It needs to be rolled up while it is warm so the it does not crack. Allow to cool.
- Make the Coffee Simple Syrup - Pretty simple (syrup). Just dissolve the water, sugar, and instant coffee.
- Make the Mascarpone Filling - Once the cake is cooled, make the filling. Do not over mix.
- Fill and Roll - Next up, follow the directions in the recipe card for how to unroll and cut the cake strips. Brush them with the simple syrup then spread on the filling. Roll the strips of cake into a vertical spiral. Chill before adding the ganache (recommended).
Instructions for Rolling a Vertical Yule Log
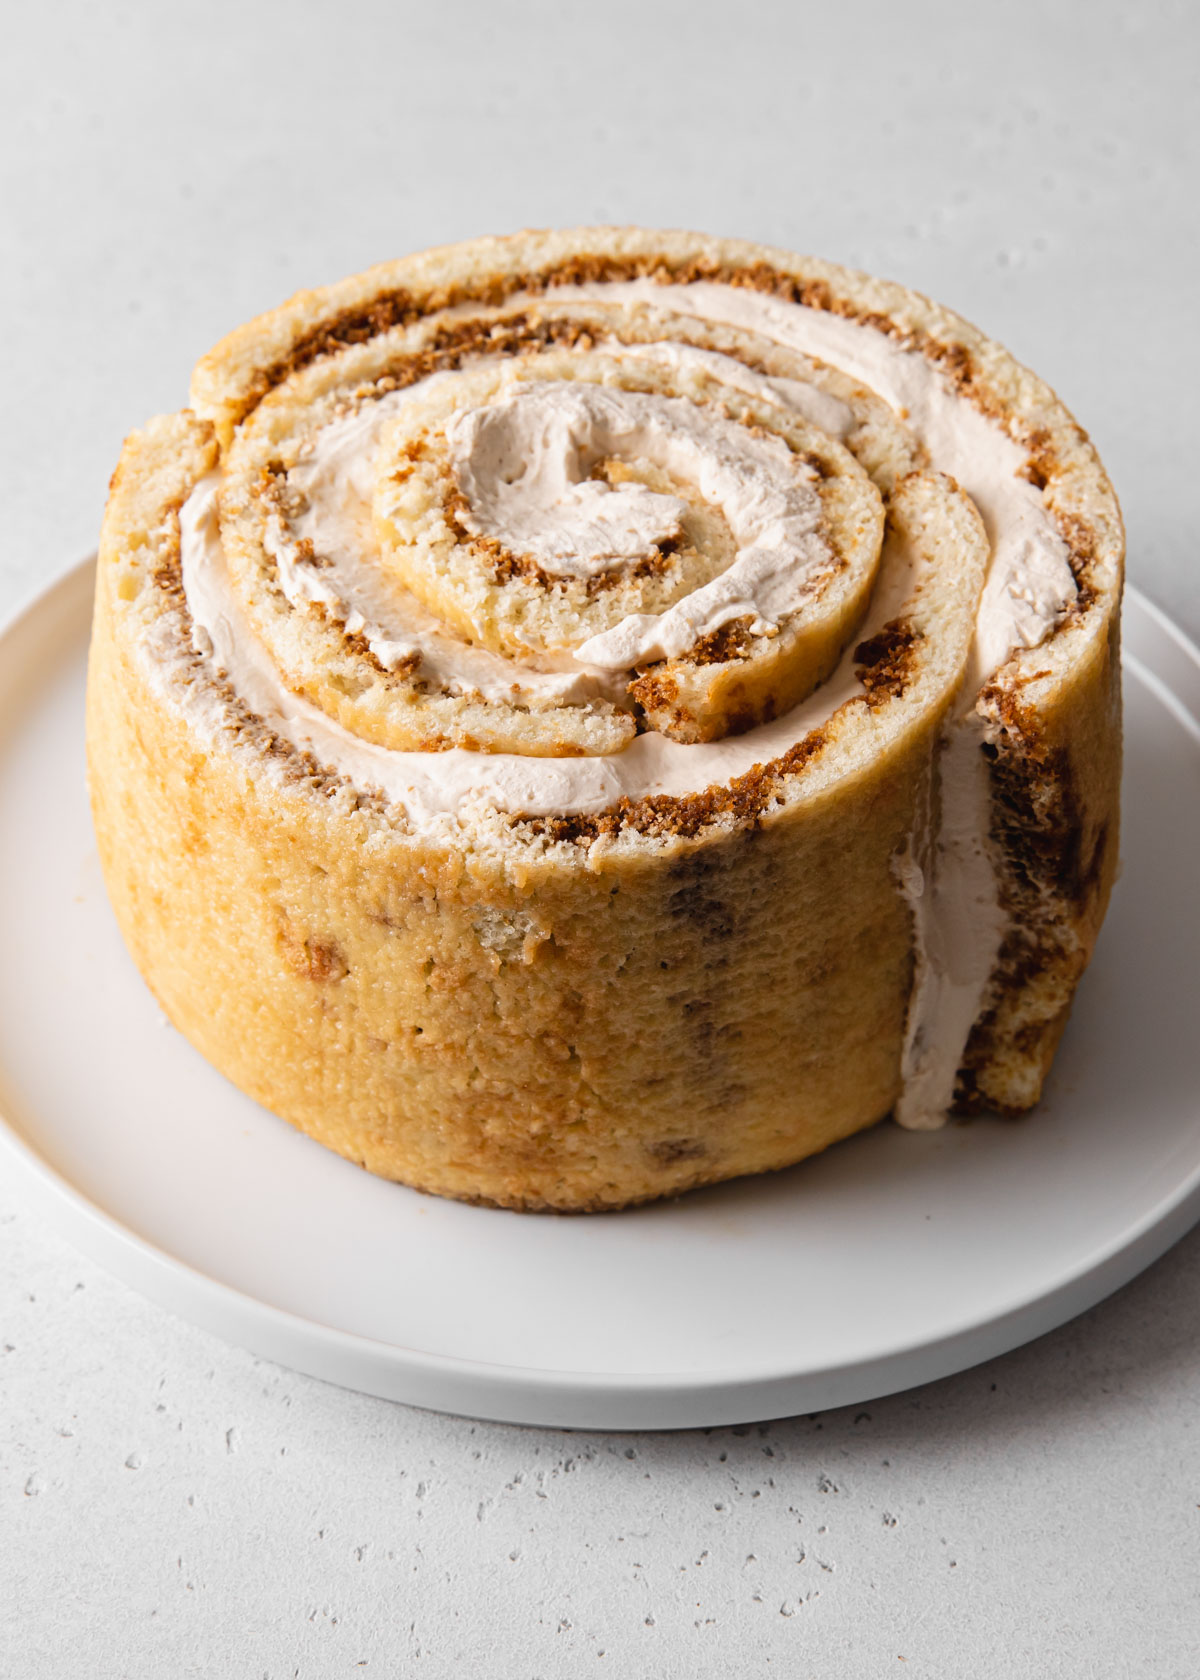
After spreading on the filling, coil the strips around themselves to create the rolled cake "stump."
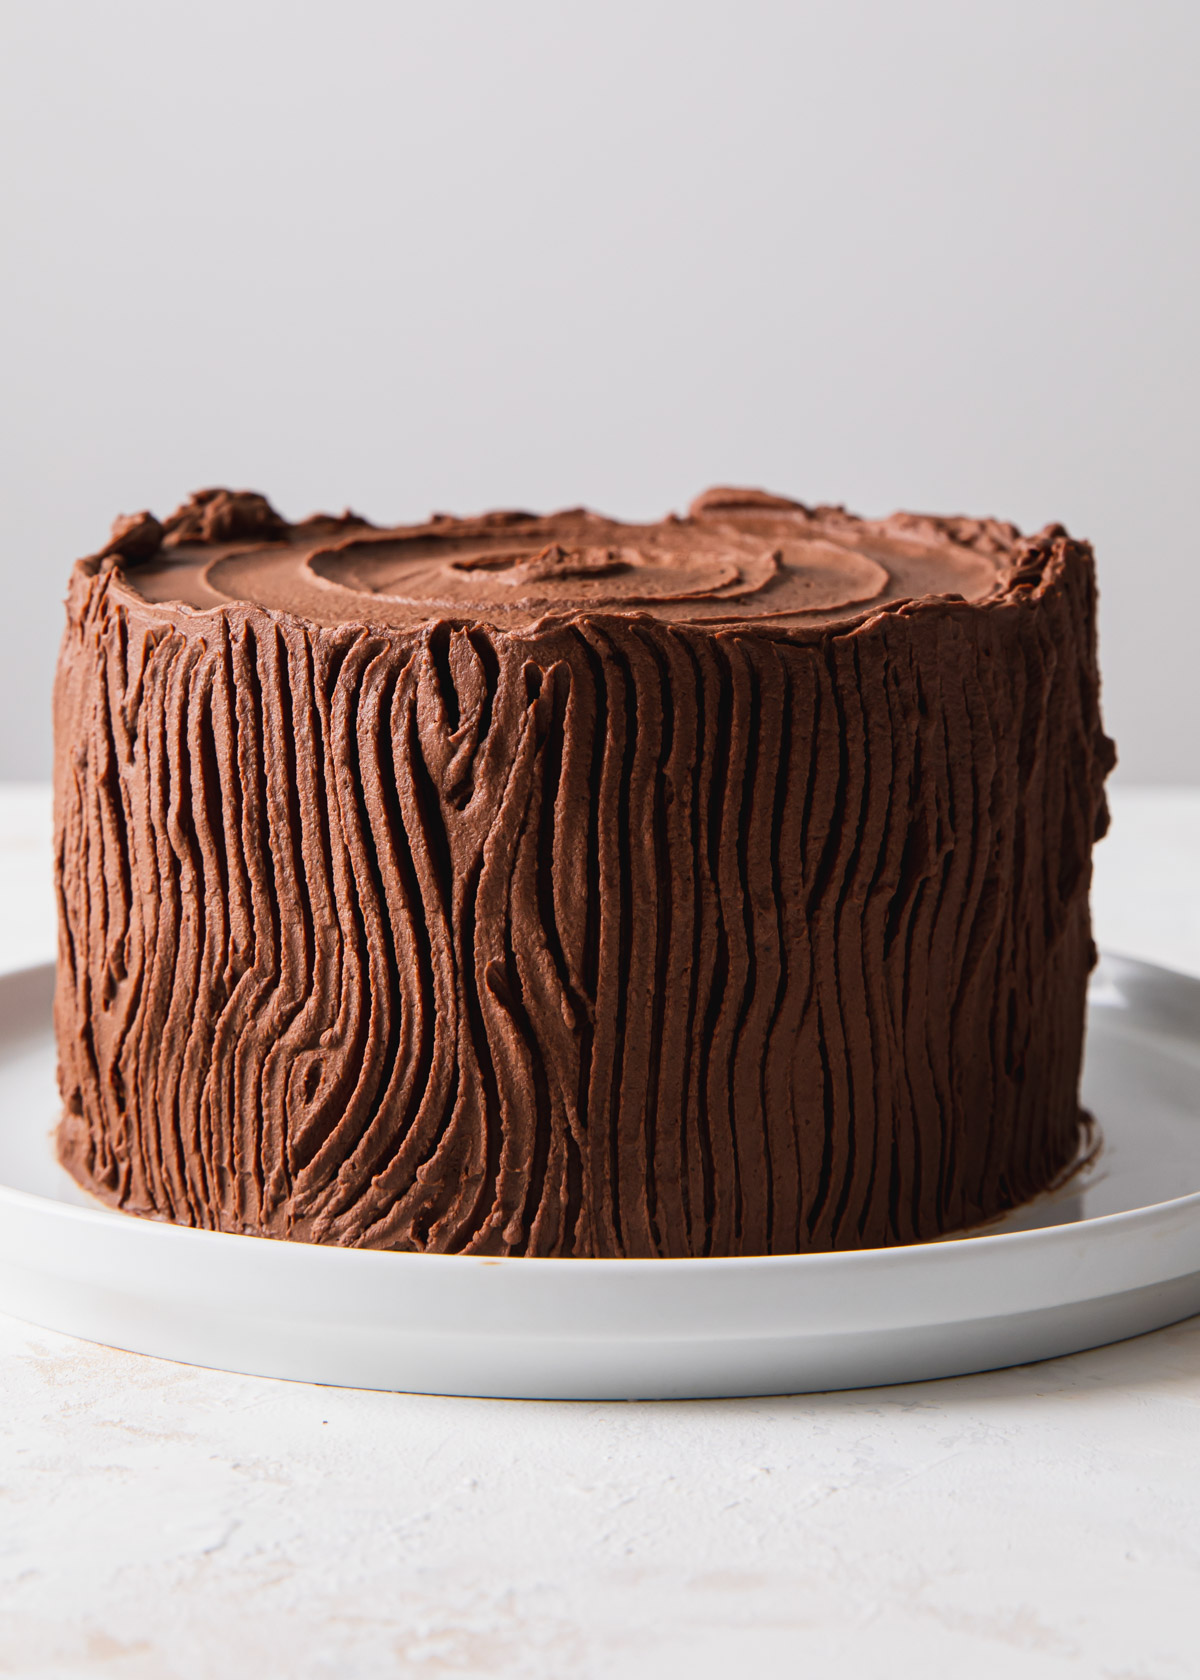
Frost the cake with ganache. Before it sets, quickly make bark markings with the tines of a fork or chopstick.
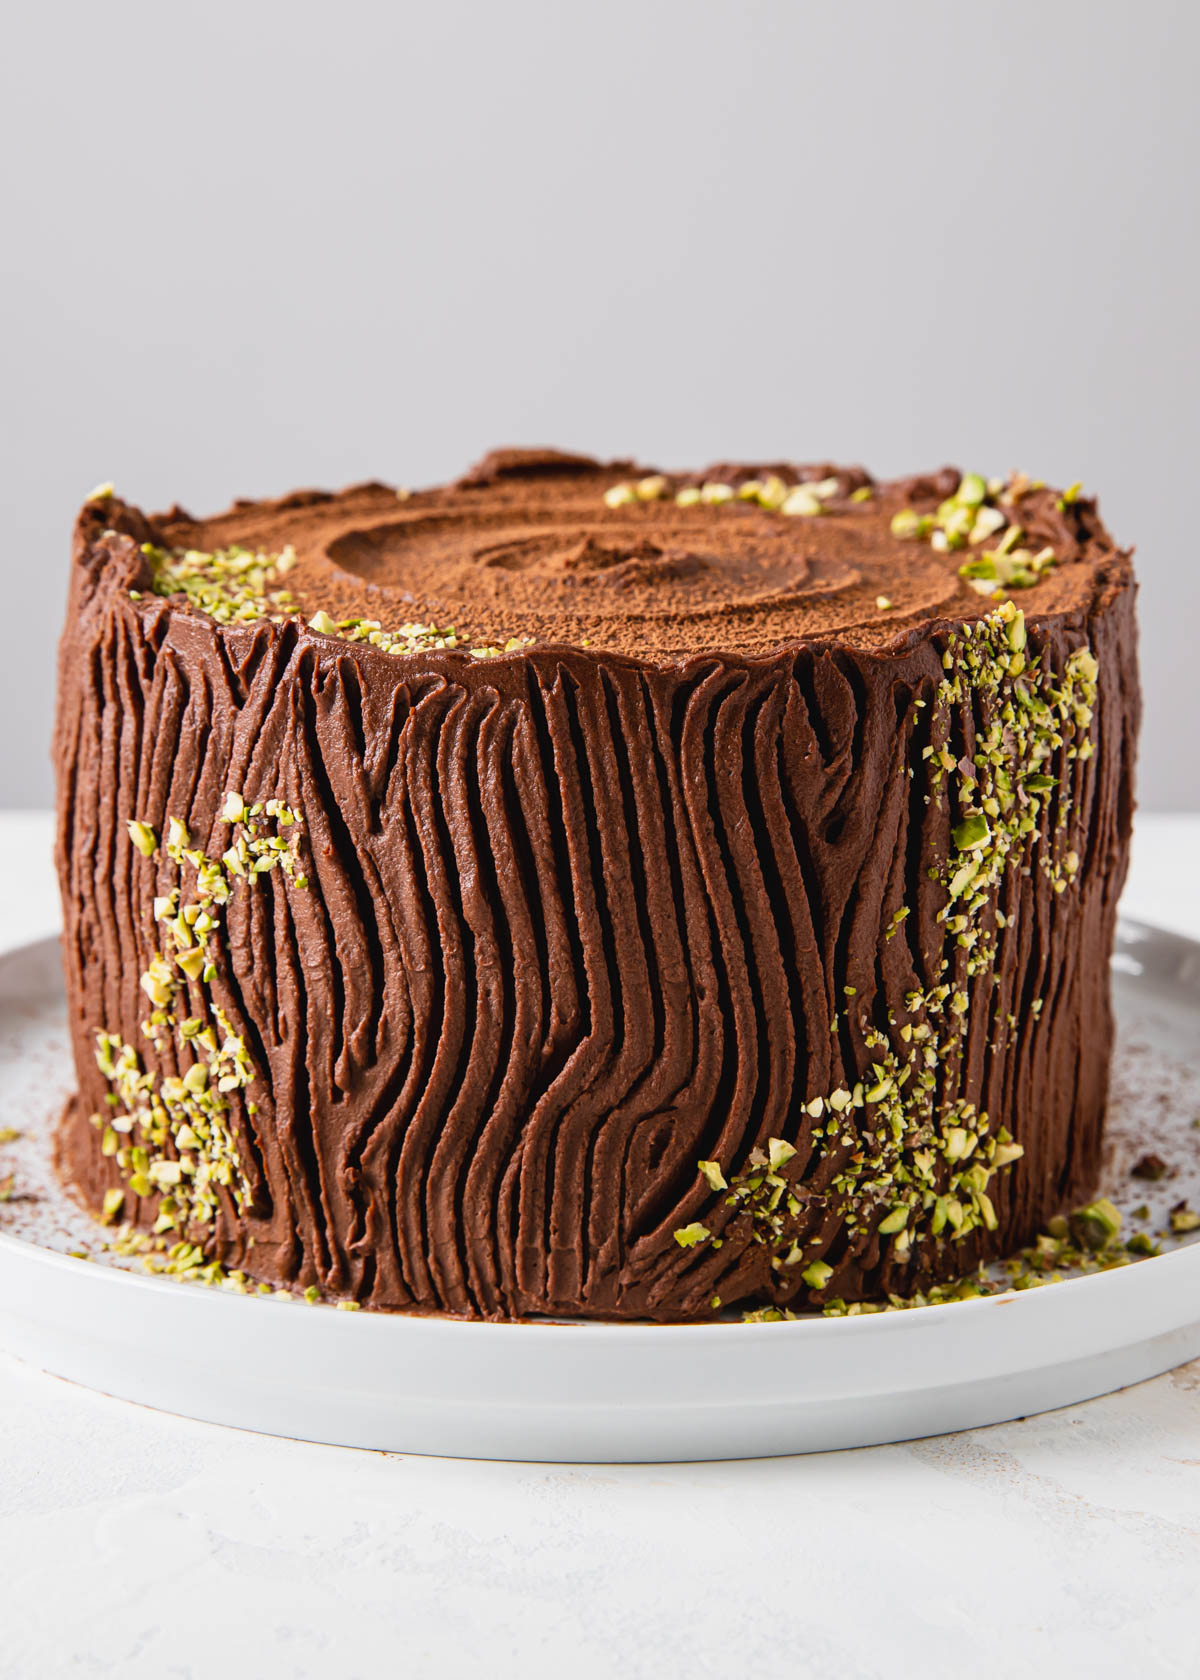
Begin decorating the Buche de Noel with crushed pistachios and cocoa powder.
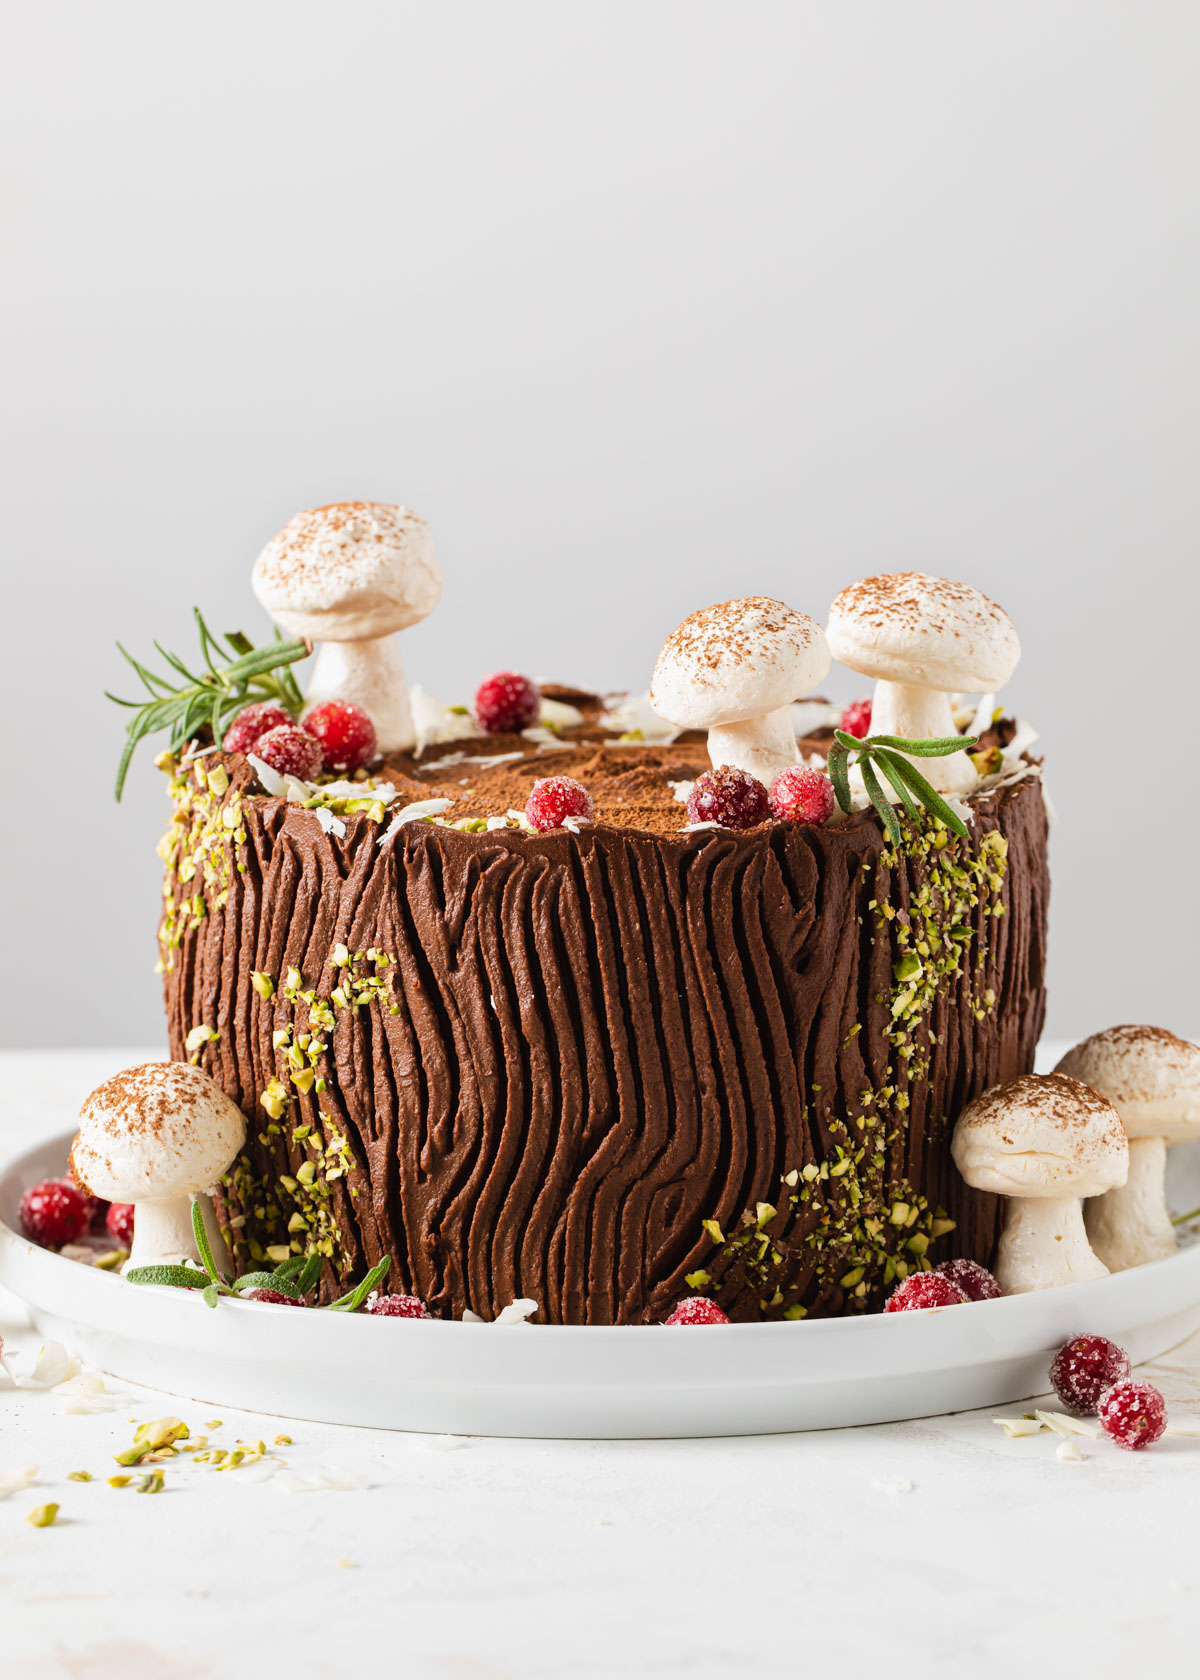
Finish the Buche de Noel with meringue mushrooms, cranberries, and rosemary.
Hint: the whipped ganache frosting sets quickly, so make sure to add the bark markings immediately.
How to Decorate the Buche de Noel Cake
- Melt the Ganache - Start making the ganache. Set aside for 60 to 90 minutes until cool.
- Whip the Ganache - Once the ganache is cool, whip until fluffy. Do not over mix or it will stiffen too much and turn grainy.
- Frost the Cake - Spread the whipped ganache on the cooled cake. Use the tip of a chopstick or tines of a fork to make the tree bark on the sides.
- Decorate! Lastly, add the sugared cranberries, meringue mushrooms, rosemary, ground pistachios, and coconut snow.
Baker's Notes for a Vertical Buche de Noel
- For the sponge cake - If the eggs and sugar are not whipped together properly, the cake may deflate and turn rubbery. Likewise, if you do not fold the batter carefully (both when adding the flour mixture and the oil mixture), the cake may deflate.
- If the mascarpone filling appears too soft to spread on the on cake, pop it in the refrigerator for a few minutes to firm up slightly before assembling. If the filling is over-mixed, add in a couple tablespoons of heavy cream and gently whisk to combine.
- Whipped ganache can be a bit finicky. Read my tips and tricks for ganache here or see notes at the end of the recipe card.
- If the cake cracks as you are rolling, try your best to piece it together. Once placed in the refrigerator, it should hold together.
Tiramisu Yule Log Tasting Notes
It can be a bit of a project, but making the glittery cranberries and crisp meringue mushrooms is super fun and definitely gets you into the holiday spirit.
The coffee and chocolate flavors of tiramisu inspired me to make this cake. I stuffed coffee-soaked sponge cake with the creamiest mascarpone and coffee filling.
Silky, decadent whipped ganache frosting covers the cake before adding the tree bark marks. Slice the cake and reveal the magical vertical layers!
Ingredients
Here is a snap shot of the extra ingredients beyond the baking basics to complete this recipe. The ingredient list may look a mile long, but it includes all of the decorative elements as well.

- Large eggs
- Cornstarch
- Confectioners' sugar
- Instant coffee
- Brandy (optional)
- Heavy cream
- Mascarpone
- Dark chocolate
- Unsalted butter
- Fresh or frozen cranberries
- Cream of tartar
- Pistachios, rosemary, cocoa powder, coconuts flakes for sprinkling
See recipe card for quantities.
Tools and Equipment
- Stand mixer, preferably
- Rimmed baking sheet
- Offset spatula
- Saucepan
- Pastry brush
- Whisk
- General kitchen tools and utensils
Substitutions
For this type of cake, you will need to use a sponge cake that rolls without cracking. However, I have not tried any egg-free or gluten-free versions at this time.
- Simple Syrup - instead of the coffee-brandy soak, you can use a plain simple syrup
- White Chocolate - use white chocolate shavings for snow instead of coconut flakes
Variations
I love the coffee and chocolate combination. Here is how you can switch up the flavors to best suit your needs.
- Cinnamon - simmer the simple syrup with a couple cinnamon sticks and leave out the coffee and brandy
- Fudge - making the whipped ganache can be an intensive process. Use fudge frosting as a simple alternative.
- Kid friendly - skip the coffee all together and fill with cream cheese frosting.
If you love show-stopping recipes, to my Red Velvet Bundt Cake!
Buche de Noel Serving and Storage
- If making in advance, store the cake in the refrigerator without the sugared cranberries or meringue mushrooms. Finish decorating before serving.
- Store leftovers (ideally in an air-tight container) in the refrigerator for up to a few days.
- Store leftover cranberries in an air-tight container for a few days. If they weep, toss in more sugar to coat.
- You can make the Mushroom Meringues up to 5 days in advance and stored in an air-tight container at room temperature.
- You can make the Coffee Simple Syrup in advance. Store in a jar in the refrigerator for up to a week.
Top tip
The ganache will take about 60 to 90 minutes to cool before being whipped. Once whipped, ice the cake immediately.
Join the Style Sweet Bake Club!
Get exclusive recipes and articles sent straight to your inbox. Become a subscriber today! Click to join.
More Festive Recipes to Try
Please leave a star review if you loved this recipe! Make sure to share your recipes and tag me on Instagram @stylesweetdaily.
Recipe
Buche de Noel
Ingredients
For the Vanilla Sponge Cake
- 5 large eggs
- ¾ cup (150g) granulated sugar
- 1 ¾ cup +3 tablespoon (235g) all-purpose flour
- 1 tablespoon cornstarch
- 1 teas baking powder
- ½ teas salt
- 2 tablespoon grapeseed or avocado oil
- ½ teas vanilla extract
- confectioners' sugar for dusting
For the Coffee Simple Syrup
- ½ cup (100g) granulated sugar
- ½ cup (120ml) water
- 2 teas instant coffee
- 2 tablespoon brandy, optional
For the Mascarpone Filling
- 1 cup (240ml) heavy cream
- ⅓ cup (50g) confectioners' sugar
- 1 cup (225g) mascarpone
- 3 tablespoon coffee simple syrup
For the Whipped Ganache Frosting
- 6.5 ounces dark chocolate (65 to 70%) finely chopped
- 2 tablespoon unsalted butter diced
- 1 cup (240ml) heavy cream
For the Sugared Cranberries
- ½ cup (100g) granulated sugar
- ½ cup (120ml) water
- 1 cup (110g) whole fresh or frozen cranberries
- ¼ cup (50g) cane sugar for rolling or granulated
For the Meringue Mushrooms
- 2 large egg whites
- ½ cups (100g) granulated sugar
- pinch cream of tartar
- ½ teas vanilla extract
- cocoa powder for dusting
Instructions
To Make the Vanilla Sponge
- Preheat the oven to 350°F. Lightly grease an 18” X 13” jelly roll pan with cooking spray and line it with a non-stick baking mat (the same size as the pan) or a fitted piece of parchment paper. Set aside.
- Place the eggs and sugar in the bowl of an electric mixer fitted with a whisk attachment. Beat the egg mixture on medium-high speed until the batter reaches ribbon stage, 8 to 10 minutes. It is done when the mixture has tripled in volume, is very pale, and thick. When you lift the whisk from the batter and move it around, the batter should hold two figure-eights before melting back into the bowl.
- Stop the mixer and sift the flour, cornstarch, baking powder, and salt straight into the bowl. Use the whisk attachment to fold the dry ingredients into the batter, making sure to incorporate any dry pockets at the bottom of the bowl.
- In a separate bowl, combine the oil, vanilla extract, and about 1 cup of the batter. Stir together until thoroughly combined. Add the oil mixture into the batter and fold together with a flexible rubber spatula until combined.
- Tip the batter into the prepared pan and gently spread it out into an even layer with an offset spatula. Bake for 12 to 14 minutes, rotating halfway if your oven heats inconsistently. When done, the surface of the sponge cake should start to brown and spring back when lightly poked with a finger.
- While the cake bakes, set up your rolling station. Gather a clean dish towel, fine-mesh sieve, large cutting board or cooling rack (about the same size or larger than the baking sheet), and a thin paring knife or metal spatula. You will need to roll up the cake before it cools or the cake may crack.
- When the cake is done, remove it from the oven. Sift confectioners’ sugar all over the top of the cake. Run the knife or metal spatula around the edges of the cake to release it from the pan. Place the clean towel on top, followed by the cutting board. Carefully flip everything upside-down (using oven mitts, if the pan is still hot to the touch). The cake should release onto the towel. Remove the pan and set aside.
- Remove the parchment paper or baking mat from the bottom of the cake. Sift confectioners’ sugar all over the bottom of the cake. Starting with one of the long edges, gently roll the cake up lengthwise within the towel. You should have a long log of cake with the towel rolled into the spiral. Allow the cake to cool inside of the towel, seam-side down. This will take about an hour.
- Meanwhile, make the coffee soak.
To Make the Coffee Simple Syrup
- Place the water, sugar, and instant coffee in a saucepan and stir to combine. Bring to a simmer over medium-high heat, then reduce the heat to low and allow the mixture to simmer for about 5 minutes. Remove the syrup from the heat and stir in the brandy (optional).
To Make the Mascarpone Filling
- Once the cake has cooled and is ready for assembly, make the filling. Place the cream in the bowl of an electric mixer fitted with the whisk attachment. Mix on medium speed until it begins to thicken. Add in the sugar and mix on high speed until the mixture holds soft peaks.
- Add the mascarpone to the mixture. Whisk on medium-high speed until thickened. The mixture should be similar to stiff whipped cream. Do not overmix. If the filling starts to clump and/or appear grainy, then stop mixing immediately. Add the simple syrup and mix until combined.
To Make the Whipped Ganache Frosting
- Place the chopped chocolate and butter in a heat-safe bowl. Pour the cream into a saucepan and place it over medium heat. Heat the cream until it simmers.
- Pour the hot cream over the top of the chocolate and butter. Let stand for about 60 seconds. Starting in the center of the bowl and working outwards, whisk the ganache together until smooth. Allow the ganache to completely cool, about 45 to 90 minutes at room temperature.
- Once cool, whip the ganache. This should take no longer than 30 to 60 seconds using a hand mixer. The ganache will begin to thicken and be lighter in color. When done, it will still be soft but spreadable, like pudding. The ganache should thicken more as you frost the chilled cake.
- I advise that you whip the ganache by hand for at least the last 30 seconds for better control. If it is over-whipped, the ganache will not spread smoothly on the cake and will turn grainy. Likewise, if the ganache is overmixed or you do not work quickly enough, the ganache may set too soon and create rough edges when you go to make the tree bark markings.
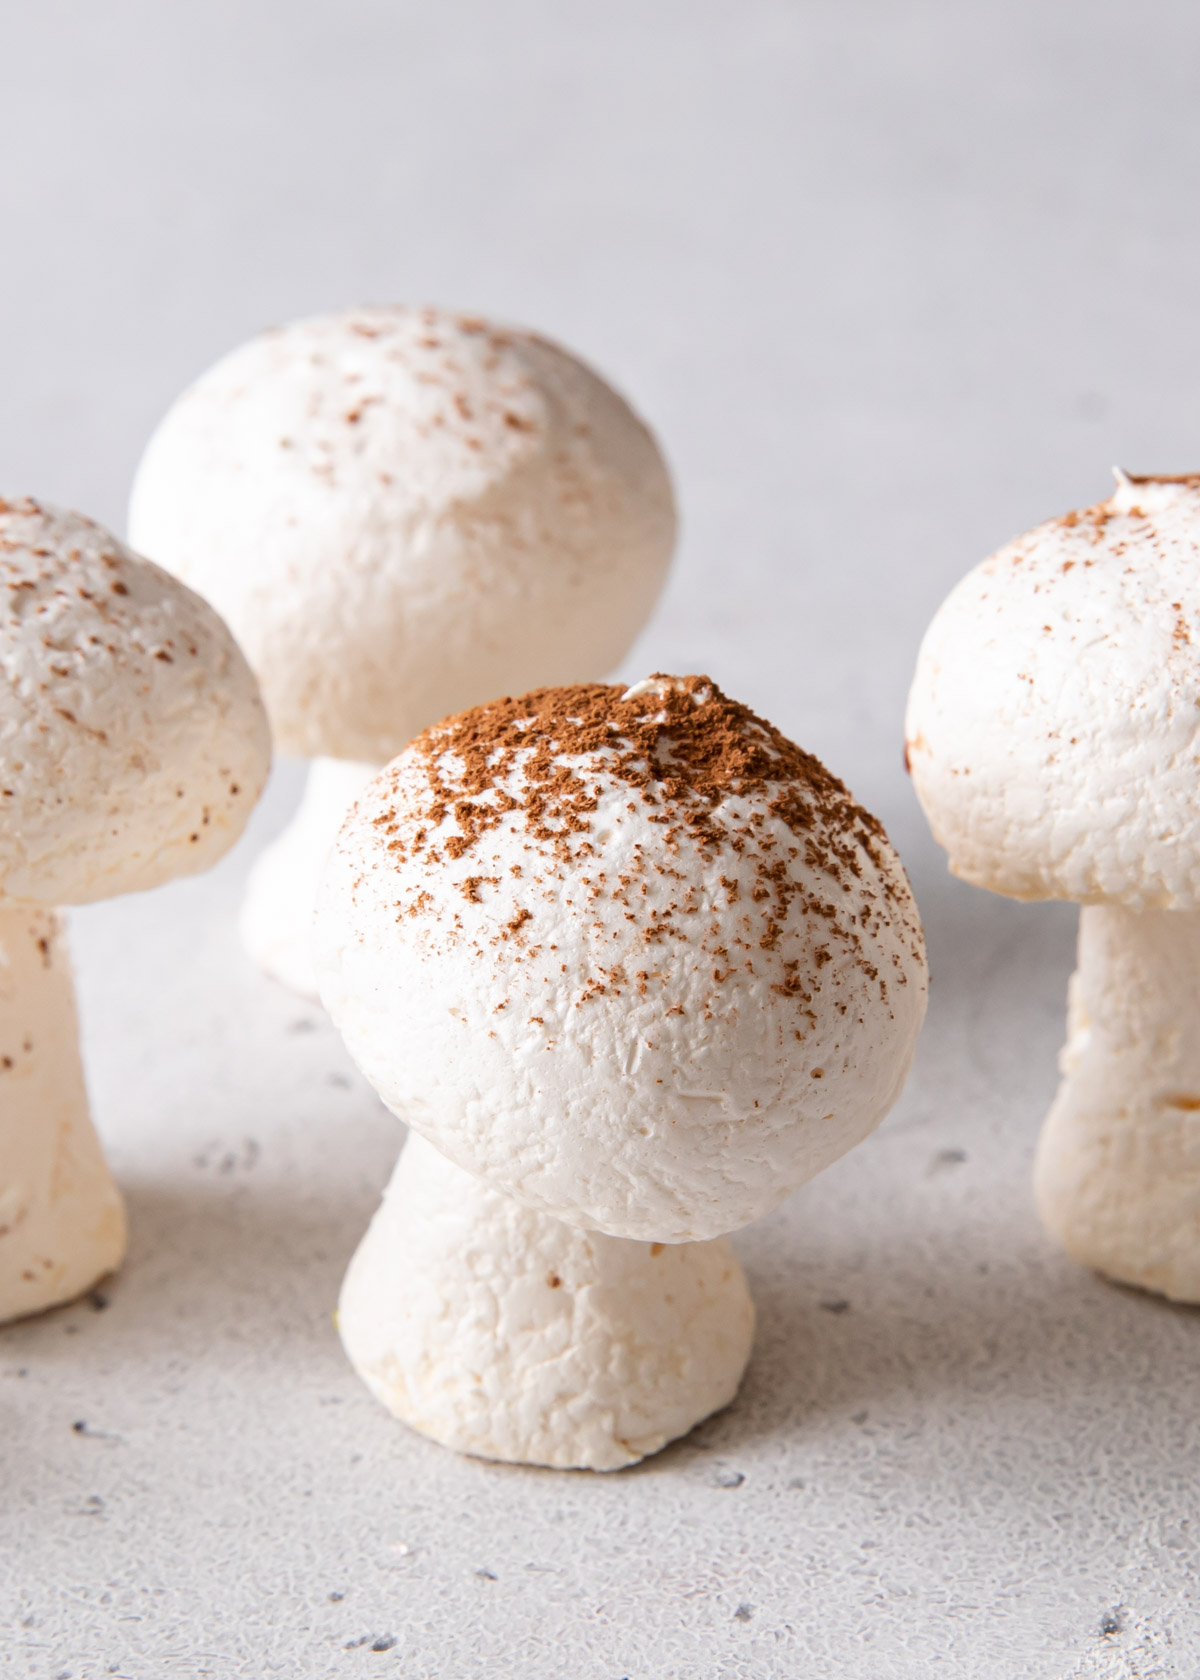
To Make the Meringue Mushrooms
- Preheat the oven to 225°F. Line a baking sheet with parchment paper and set aside.
- Place the egg whites in the bowl of a stand mixer fitted with a whisk attachment. Begin beating the eggs while on medium-low speed until foamy. Once a bunch of tiny bubbles form, raise the speed to medium and very slowly pour in the sugar. Add the cream of tartar and increase the speed to medium-high until the meringue holds stiff peaks. Add the vanilla and mix again until combined.
- Fill a piping bag fitted with a large round piping tip with the meringue. Pipe an equal number of both mushroom bases and mushroom caps onto the parchment paper. For the stems, hold the piping bag straight down with the tip nearly touching the parchment. Begin to squeeze to establish the base then pull the bag straight up to grow the stem. Release the pressure at the top and pull away. For the cap, hold the piping bag straight down with the tip ½-inch above the parchment. Apply pressure to the piping bag and allow the meringue to form a mound first before slowly pulling up. Create a tiny spiral as you release the pressure on the piping bag to keep the top of the cap round.
- Bake the meringues for 50 to 90 minutes. When done, they should be dry to the touch and easily peel off the parchment paper. If possible, allow them to cool in the turned-off oven with the door cracked open.
- Dust the caps with cocoa powder using a mesh sieve. To assemble, use the tip of a paring knife to very carefully carve a small hole into the bottoms of the caps. Insert the bases into the holes.
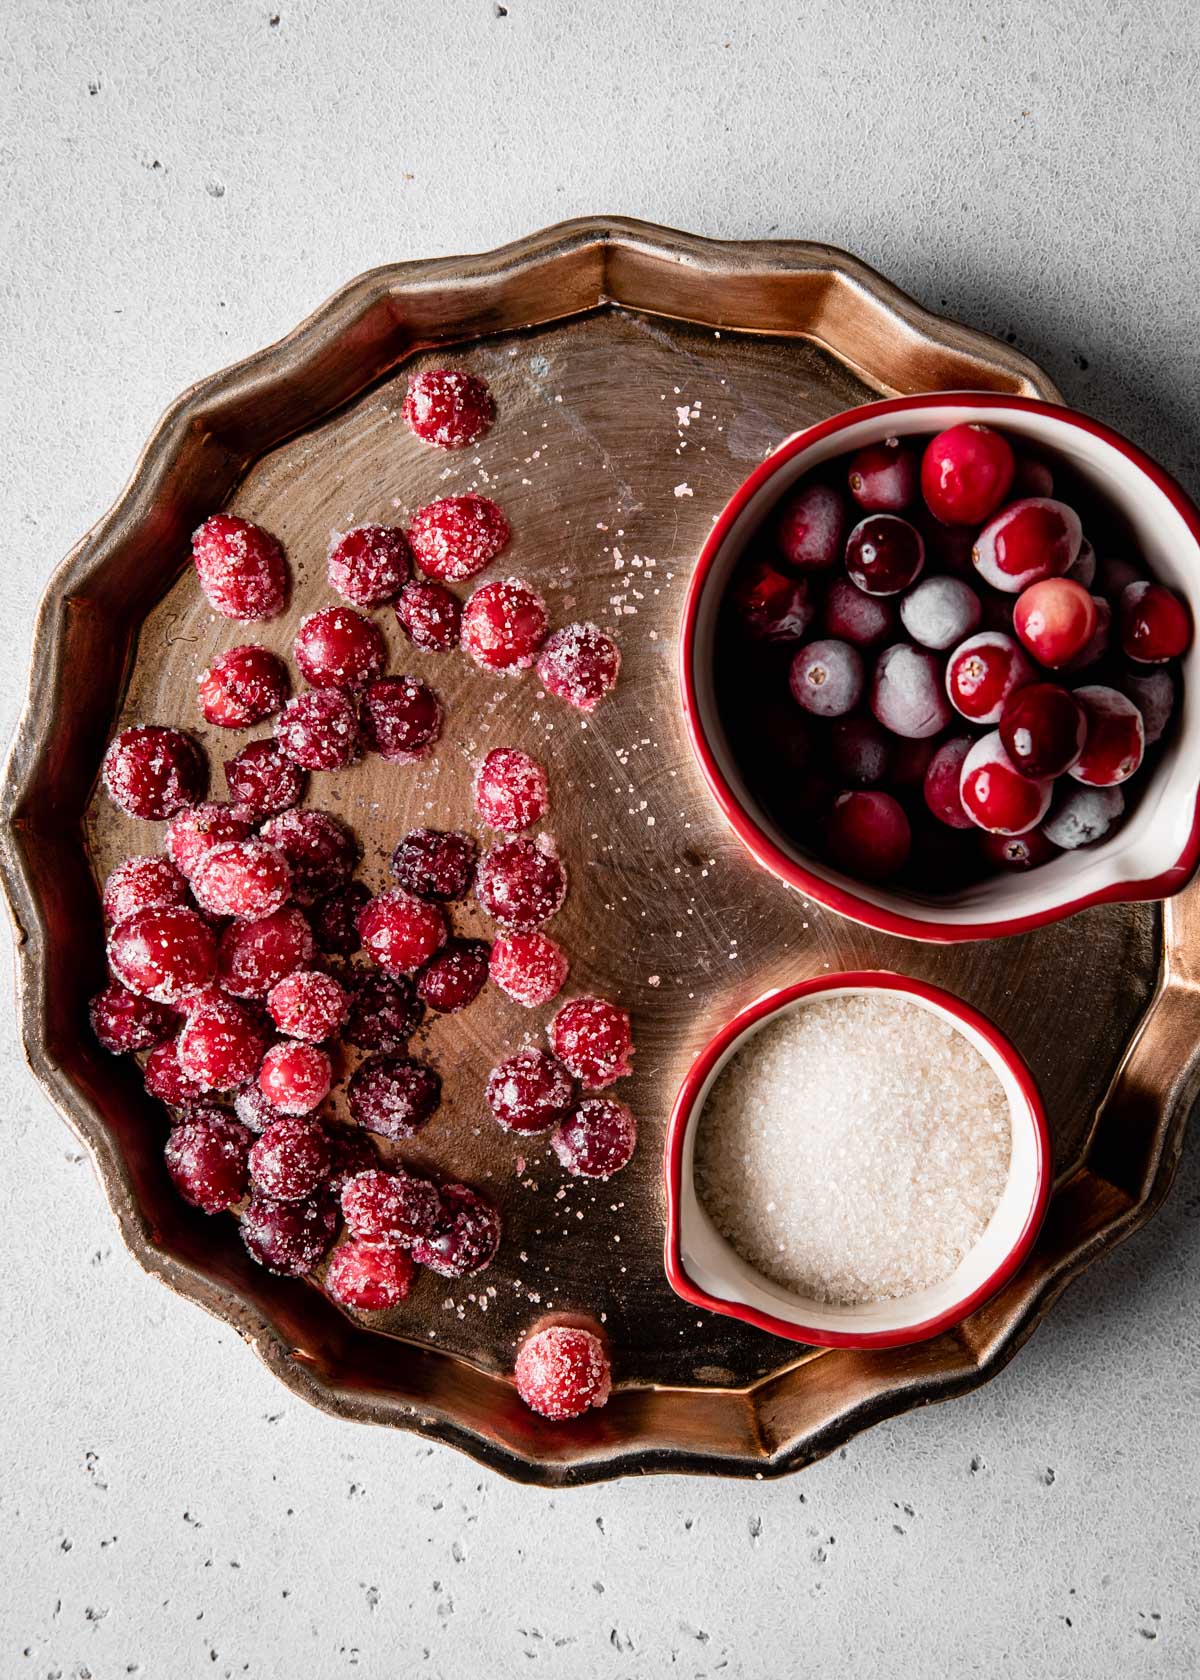
To Make the Sugared Cranberries
- Line a rimmed baking sheet with parchment paper and set aside.
- Place the granulated sugar and water in a saucepan and bring to a simmer over medium-high heat. Once the sugar has dissolved, stir in the cranberries and remove from the heat. Allow the cranberries to steep for about 5 minutes.
- Strain out the cranberries and place them on the parchment paper. Separate any cranberries that stick together and allow to dry, about 1 hour. Sprinkle the cane sugar over the tops of the cranberries then shimmy the baking sheet so that the cranberries roll and cover themselves in sugar.
To Assemble
- Carefully unroll the cooled cake and remove the towel. Place the cake on a cutting board. Using a pastry brush, brush the top of the cake with the coffee simple syrup.
- Measure the long side of the cake and divide into fourths. Cut the cake down the middle. Cut each piece in half again. You should have four strips of cake, about 4” wide and 12” long.
- As the cake absorbs the simple syrup, make the filling. Doing this first makes it easier to roll up the cake.
- Evenly distribute the filling on the four strips of cake. Use an offset spatula to smooth out the filling. Roll up the first strip of cake into a spiral. Rotate the cake and place it on a cake board or serving dish, spiral-end up.
- Wrap the second, third and fourth pieces of cake around the center spiral. Try to keep the sides of the cakes from sagging. Loosely cover in plastic wrap and place the cake in the refrigerator to set as you make the ganache, or overnight.
To Decorate
- Frost the chilled cake with the ganache. You will need to move rather quickly to make sure that the ganache does not set and firm up too much before you have a chance to give it the tree bark markings.
- Use the tines of a fork or pointed end of a chopstick to make the tree bark markings.
- Decorate the cake by dusting the top with cocoa powder. Press crushed pistachios in clusters to the sides of the cake to resemble moss. Adorn the top of the cake and around the cake board with the sugar cranberries, meringue mushrooms and sprigs of fresh rosemary. Finish the cake with a sprinkle of flaky coconut or grated white chocolate to resemble snow.
laticia
great recipe and instructions. so easy to bake and decorate
Carrie
Made this for my nieces birthday and she loved it!
Nancy Lee
I made this last year and it was so fun to create and put all the elements together. Even better yet, my family and I devoured it and I'll be making it again this year!
stylesweet
Awe yay! It's a bit of a project to make all the parts, but so fun! I am so glad you all enjoyed it =)
Joan
For the vanilla sponge cake, 3/4 of a cup +3 tablespoons of flour does not seem to be 235 g. I get more like 127 g. Is it 3/4 of a cup and 3 tablespoons? Or is it 235 g?
stylesweet
It is the 235 grams - I've edited the recipe to match. It is 1 3/4 cup + 3 tablespoons. My apologies!
Nicole
Amazing recipe and instructions. Each component is detailed perfectly and the quantities are exact so no wastage! That mascarpone filling is DIVINE! I made this for Christmas this year and loved it! I substituted the meringue mushrooms for marzipan mushrooms since I've tried and failed at meringue before so didn't want to take any chances. 😀
(One tip would be to take the mascarpone out of the fridge about 20 mins before making the filling to make it easy to mix in!)
stylesweet
Oh yay! Thank you so much for such an awesome review. I am glad you enjoyed the recipe.
Courtney Scott
Talk about a show stopper!!! Okay yeah it's a lot of work. But worth it. The rolling is a bit tricky. But putting it in the refrigerator definitely helped. I actually made this for a fairy-forest bday for my daughter. Now she wants to make it again for Christmas!
Bree
Hi Tessa, you mention storing the cake in the fridge if making in advance. How many days in advance can you make the cake/filling? (And is it possible to freeze it if making it further in advance?)
stylesweet
Hi! Wrapped well in plastic, I'd say you can make it up to two, maybe 3, days in advance. I have not tried to freeze it yet, but would be weary that the texture of the filling would be altered after thawing. Hope that helps!
Bea Coleman
Okay wow. This is definitely a once a year thing. There are so many steps but it turned out amazing! The instructions are exhaustive. Give yourself plenty of time but it will be worth it. Tasted great too!
Susan
The filling and ganache were spot on but my sponge was a disaster and ended up in the trash. I reverted to my tried and true sponge which mixes the yolks and whites separately. Next time I would up the coffee flavor too. The tips and the video are very helpful.
stylesweet
Hi! Thank you for your message. I am glad the ganache and filling came out well. Sorry to hear about the sponge. I know it can be tricking if the egg whites are not whipped just so. I am glad you had an alternative and hope you still enjoyed the overall cake!
Bree
I learned so much making this cake. First, if you haven't made a swiss roll cake before (me!), watch a video of the rolling technique. I was overconfident and ended up with strips of cake and had to make the sponge recipe again. The cake was smaller than I anticipated and I was taking it to a large event, so I salvaged a 4" x 18" strip from my first sponge and added it at the end. (I didn't increase the ganache recipe, but I did increase the coffee syrup and filling by .25.) The cake looked really amazing. Tessa's video was very helpful for the decorating steps. I ended up making all the cake components on the day it was served because I was nervous about making it in advance, but we actually liked the flavor better when we ate the leftovers on day 3, so I recommend making the cake/syrup/filling part a day ahead next time. I ran out of coffee syrup before the filling step, so I added a little instant coffee to the leftover simple syrup from the cranberries, heated it to dissolve, and used that. I would make more upfront next time. With the unsalvageable part of the first sponge (.75 of the cake), I made a "trifle" by ripping the cake up and pouring a shot of decaf espresso over it with a little leftover coffee syrup, topping it with 3/4 recipe of the filling and then grating chocolate over the top. It was like a delicious faux tiramisu and I served it with the extra sugared cranberries and crushed pistachios from the cake. Next time, I'll try the chocolate/cinnamon version from the cookbook!
stylesweet
Wow! I absolutely appreciate your commitment to making this cake and all the components. I know it can be a lot of work. Thank you for the reply!! I hope you enjoyed it!