Last updated on March 28th, 2023 at 02:36 pm
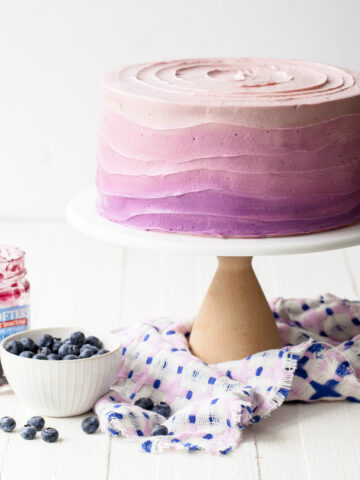
The dreamy blend of buttercream on an ombré cake outlasted its trending years and will be a forever classic cake design. Beautiful colors of silky buttercream create this versatile finish for nearly any layer cake. Learn how to ice an ombré cake with this simple tutorial:
Jump to:
I first created this cake tutorial back in 2014 when ombré was having a huge moment - from hair to textiles.8 years later, I’m still swooning over the ombré effect on a buttercream cake. In fact, I love it so much that it made the cover of my book, Icing on the Cake.
After many, many years, please allow me to reintroduce this cake decorating technique with all new photos and a few more helpful hints.
Equipment for Icing an Ombré Cake
- Rotating cake stand
- Offset spatula
- Gel food coloring
- Icing smoother
- Paring knife
- Round piping tip and bag
Read up about my Favorite Cake Decorating Tools.
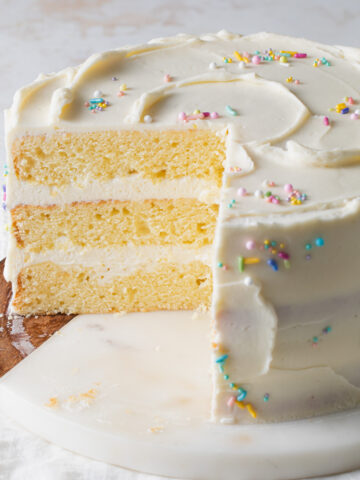
Before getting started, learn how to stack and fill a layer cake.
How to Ice an Ombré Cake
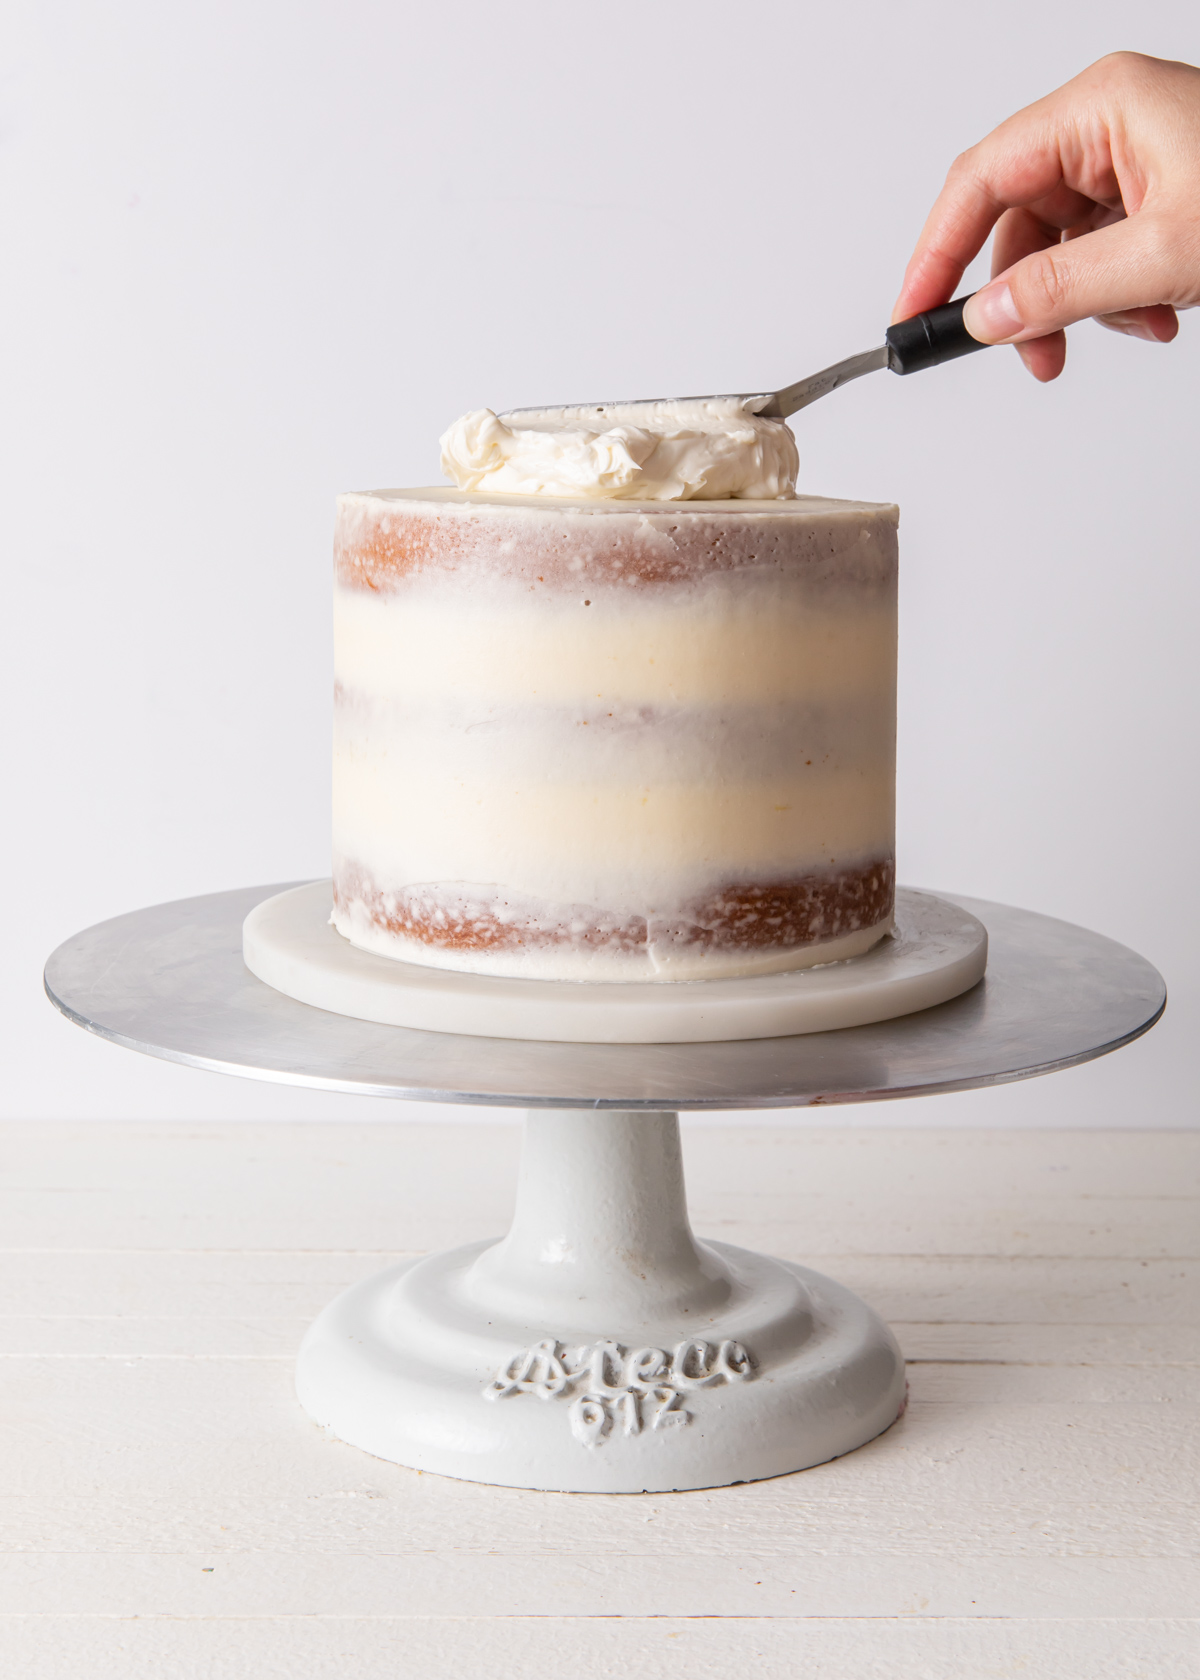
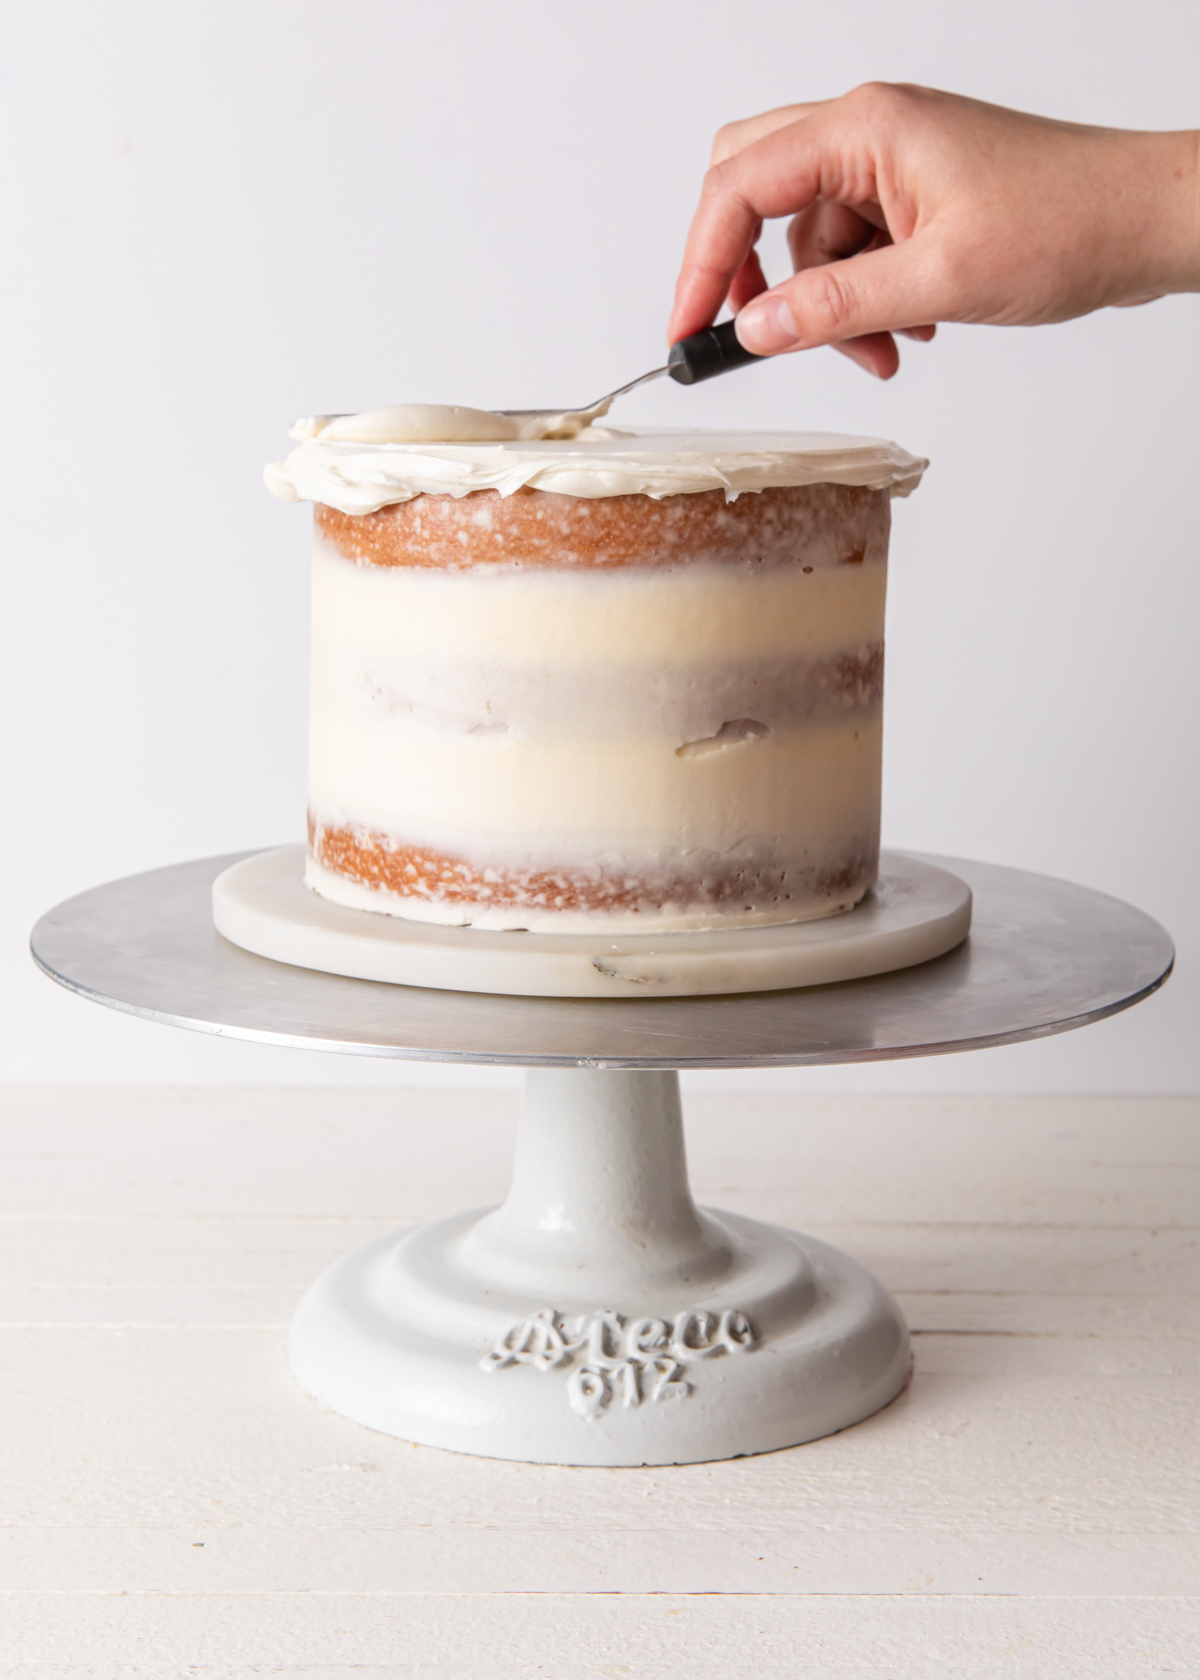
1. Prepare the Cake
Before you get started, fill and stack your cake layers. Give the cake a good crumb coat, a thin layer of icing that traps in all of the crumbs, and chill it in the refrigerator for 15 minutes.

2. Pick Your Colors
Select your color palette (3 to 4 colors) and decide which color you want for the top of the cake. For me, I used white. Place a large dollop of buttercream on top of the cake.
3. Frost the Top
Using a small offset spatula, smooth out the buttercream on top of the cake (as you would ice a regular cake). Don't be afraid if some of the frosting hangs over the edge of the cake - it will help with the ombré blend later.
4. Tint the Buttercream
Reserve a small amount of the buttercream color used for the top of the cake, then divide the remaining buttercream into 3 bowls. Tint each bowl the colors of your choice.
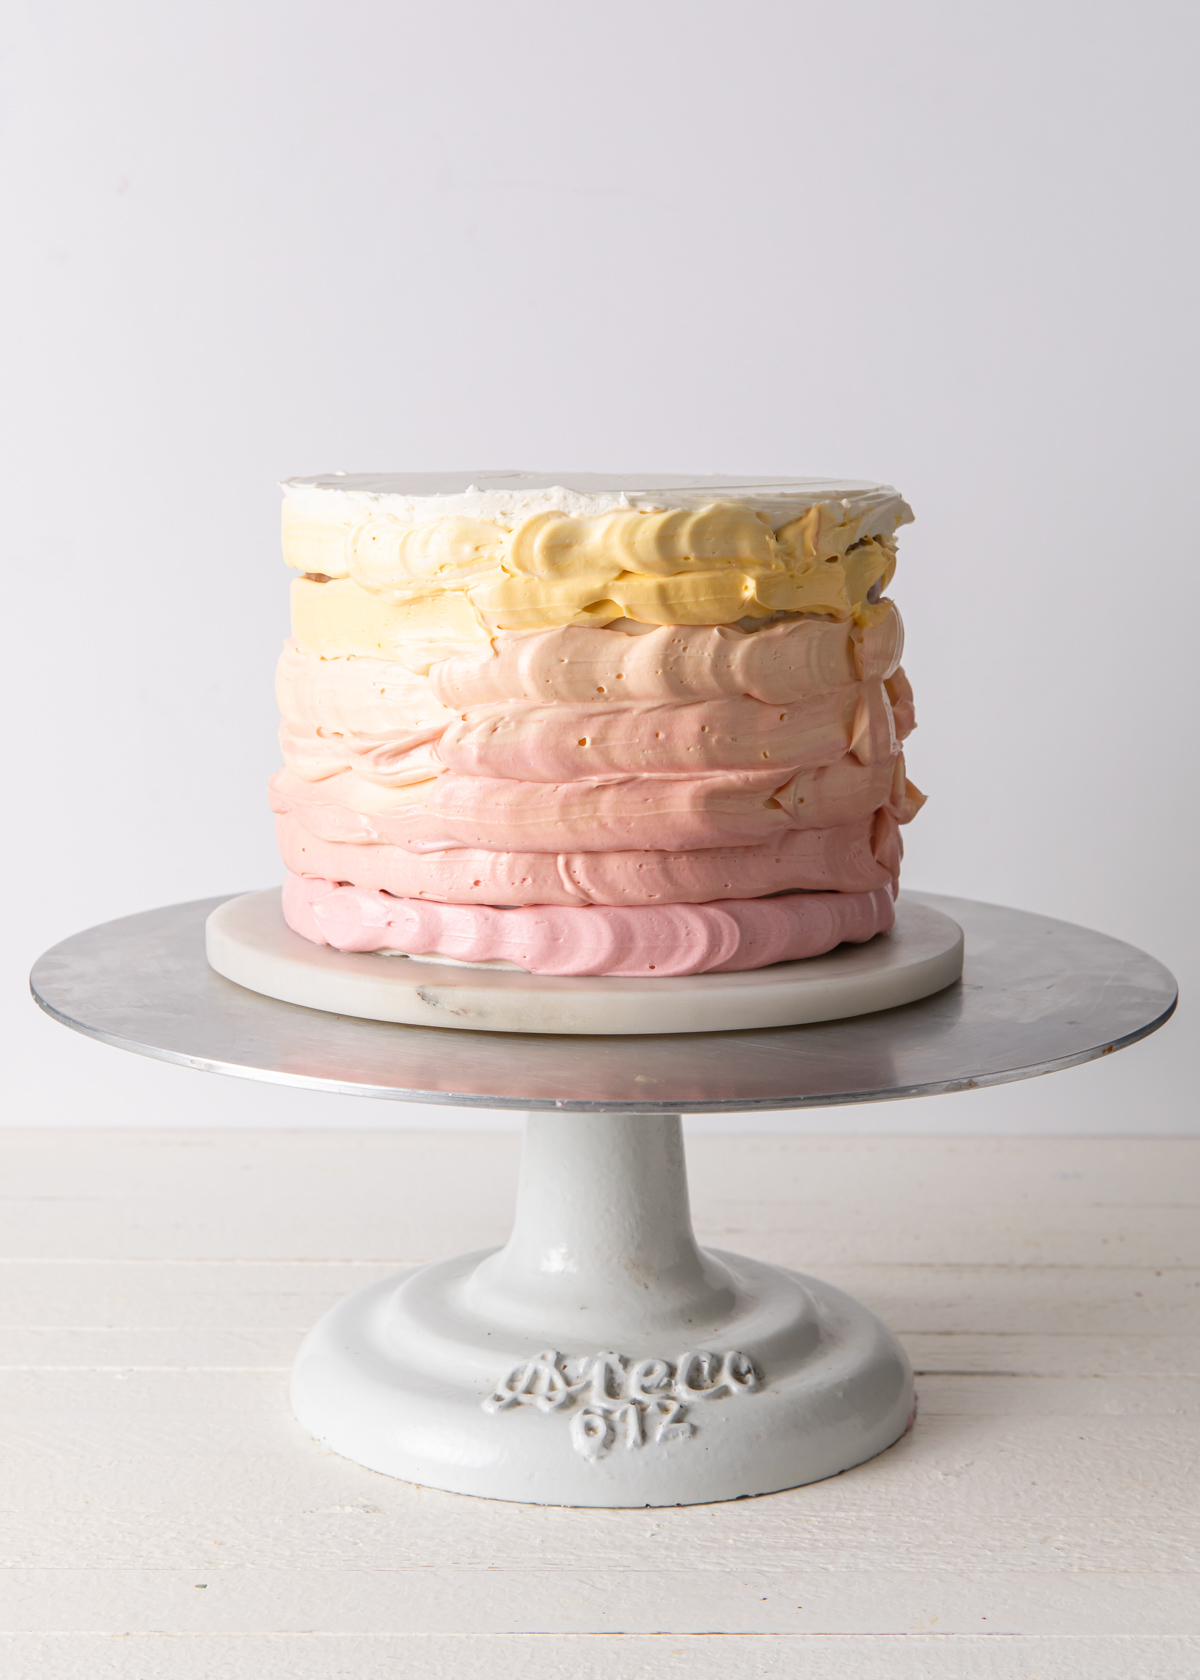
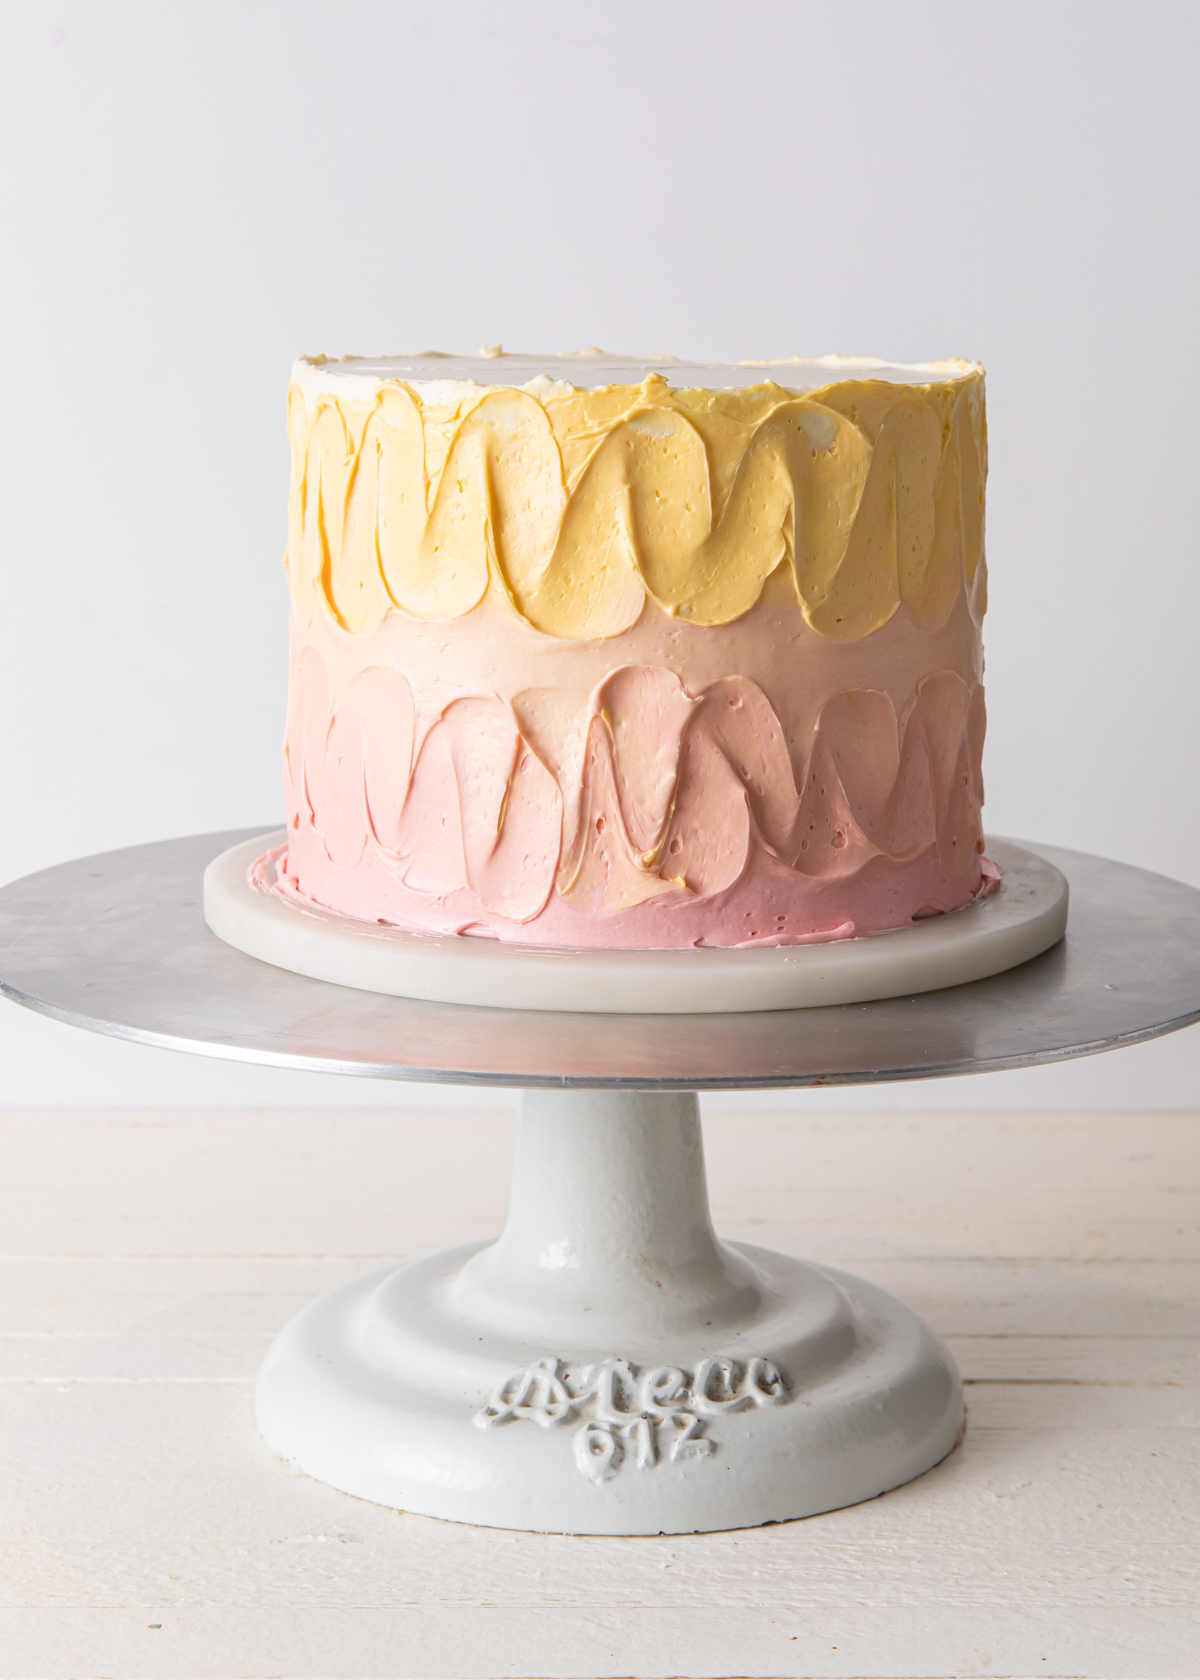
5. Start Piping
Place your first color in a piping bag fitted with a plain round tip. Starting at the bottom, pipe a ring or two of icing around the cake.
Empty the buttercream back into the bowl and mix in some of the next color. I started with pink, then added in some of the orange to create a pink-orange buttercream. Add the new pink-orange buttercream back into the piping (using the same bag is fine).
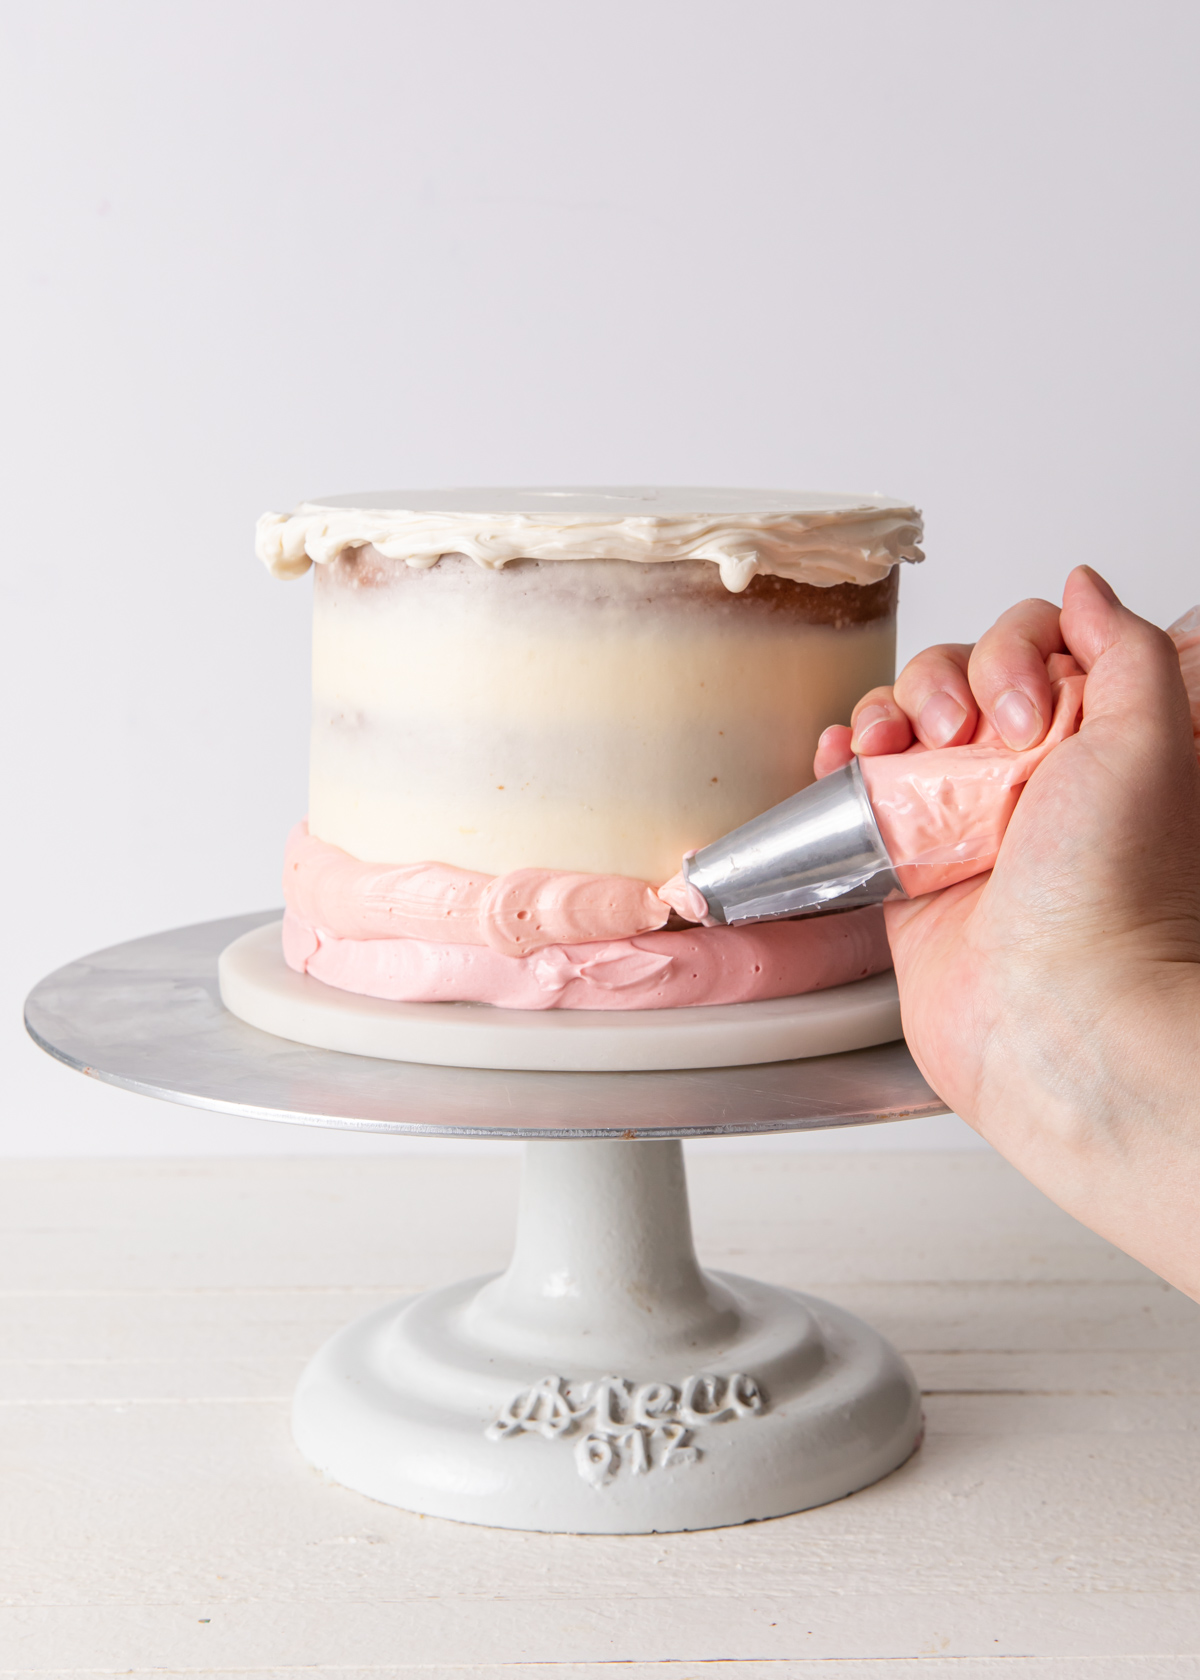
6. Mix and Repeat
Pipe another ring around the cake and repeat with the remaining buttercream, mixing the colors as you go.
Complete the sides of the cake by piping on the last color (yellow, in my case). You may mix this with the reserved buttercream color from the top of the cake, if you’d like.
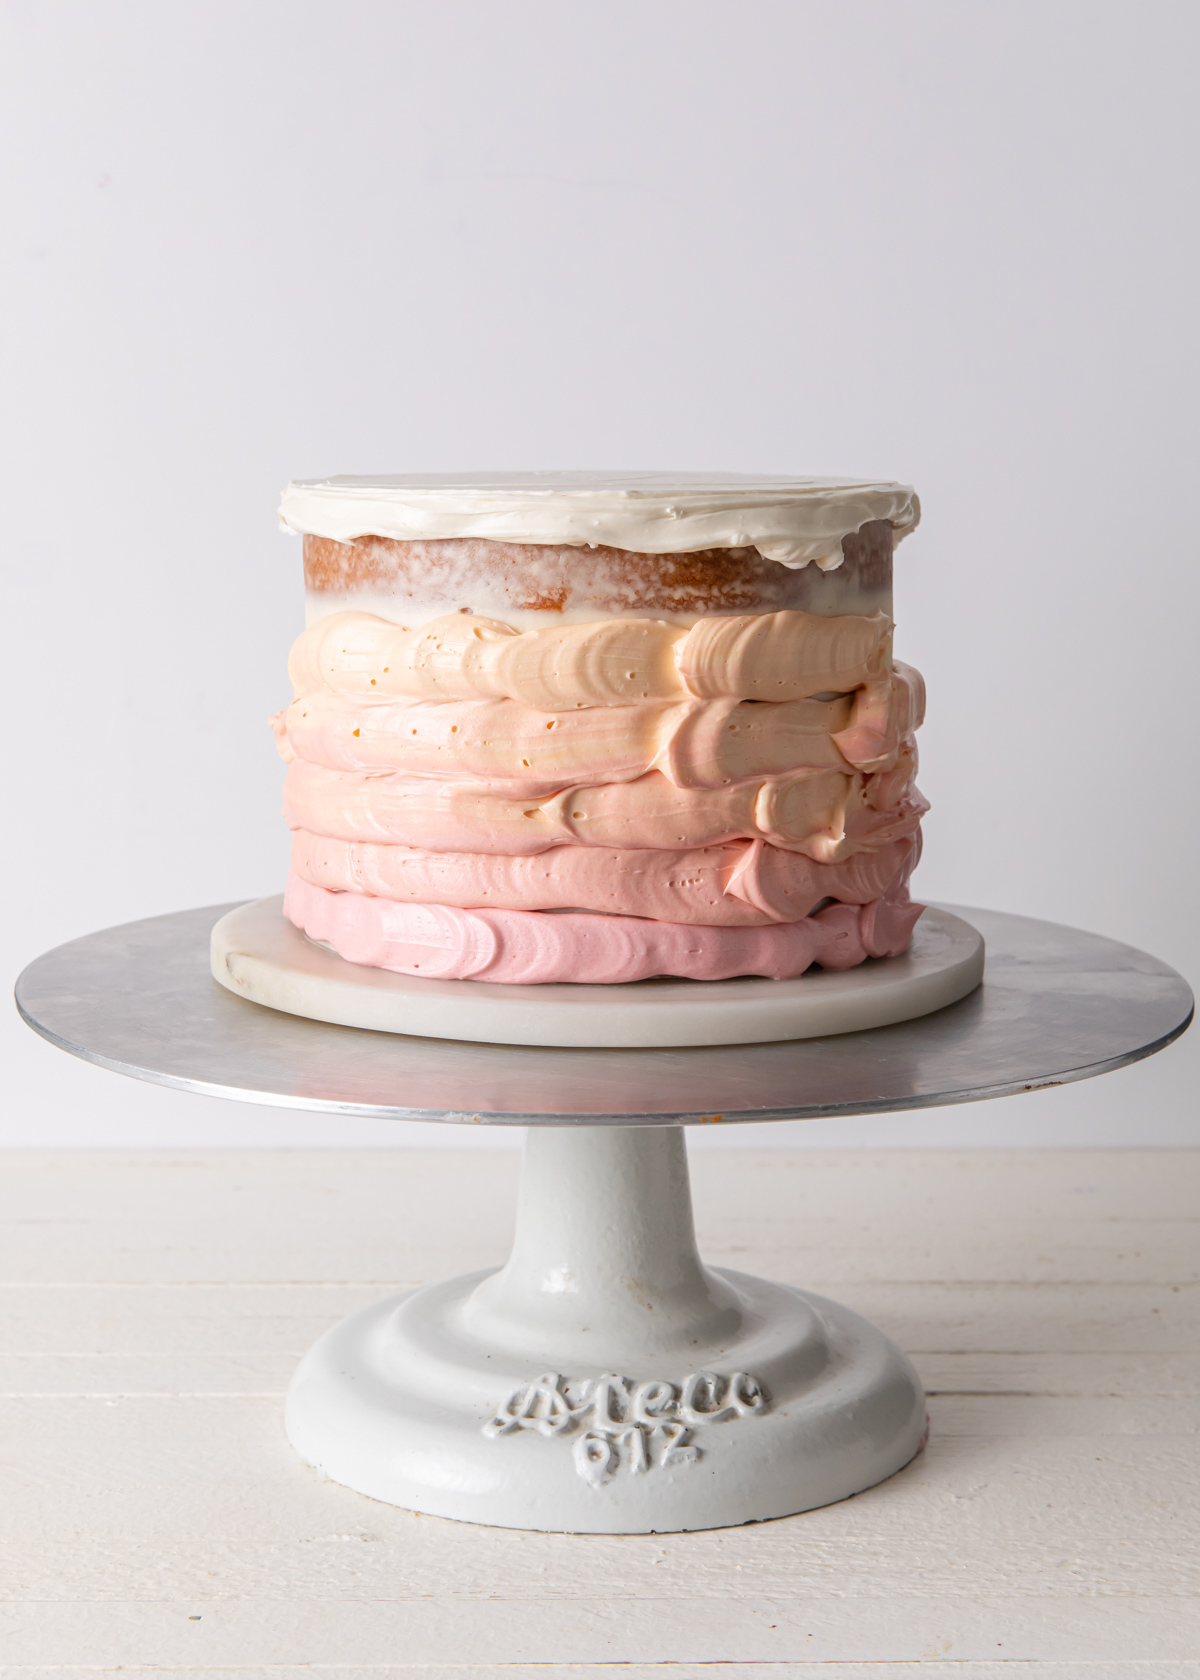
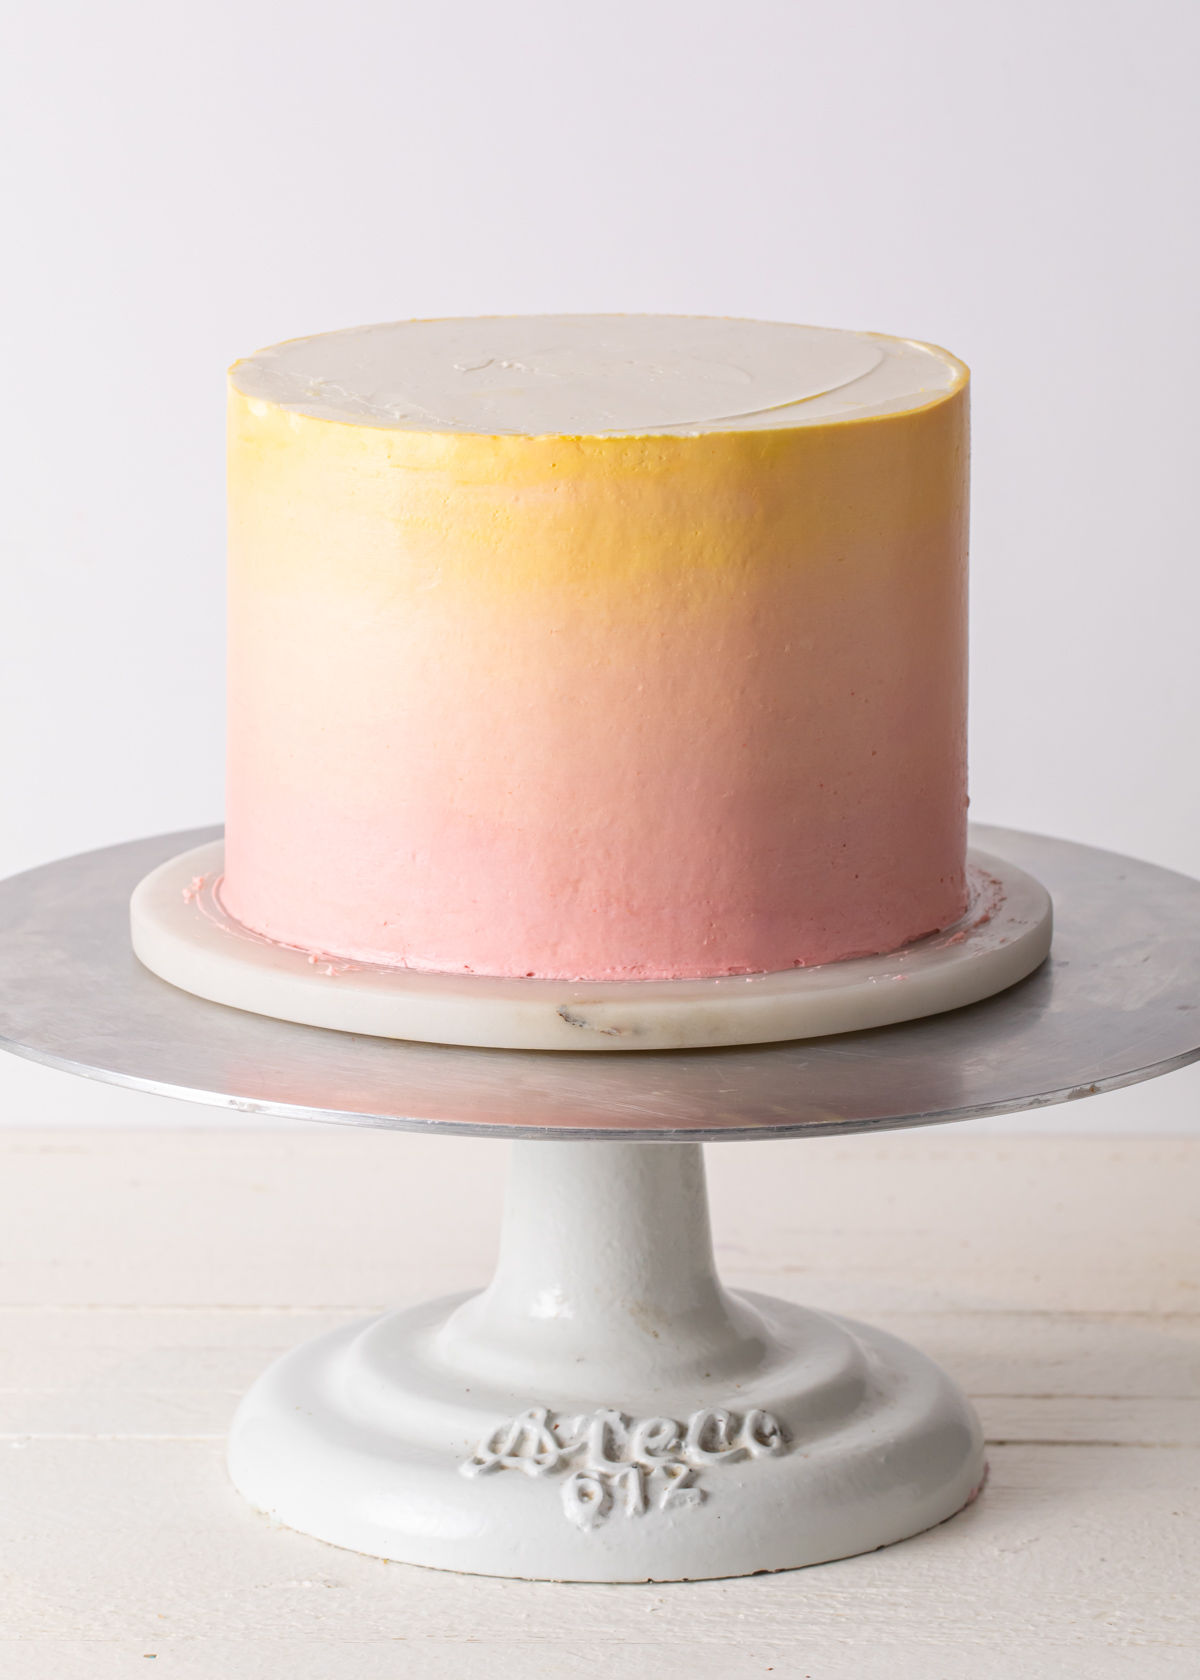
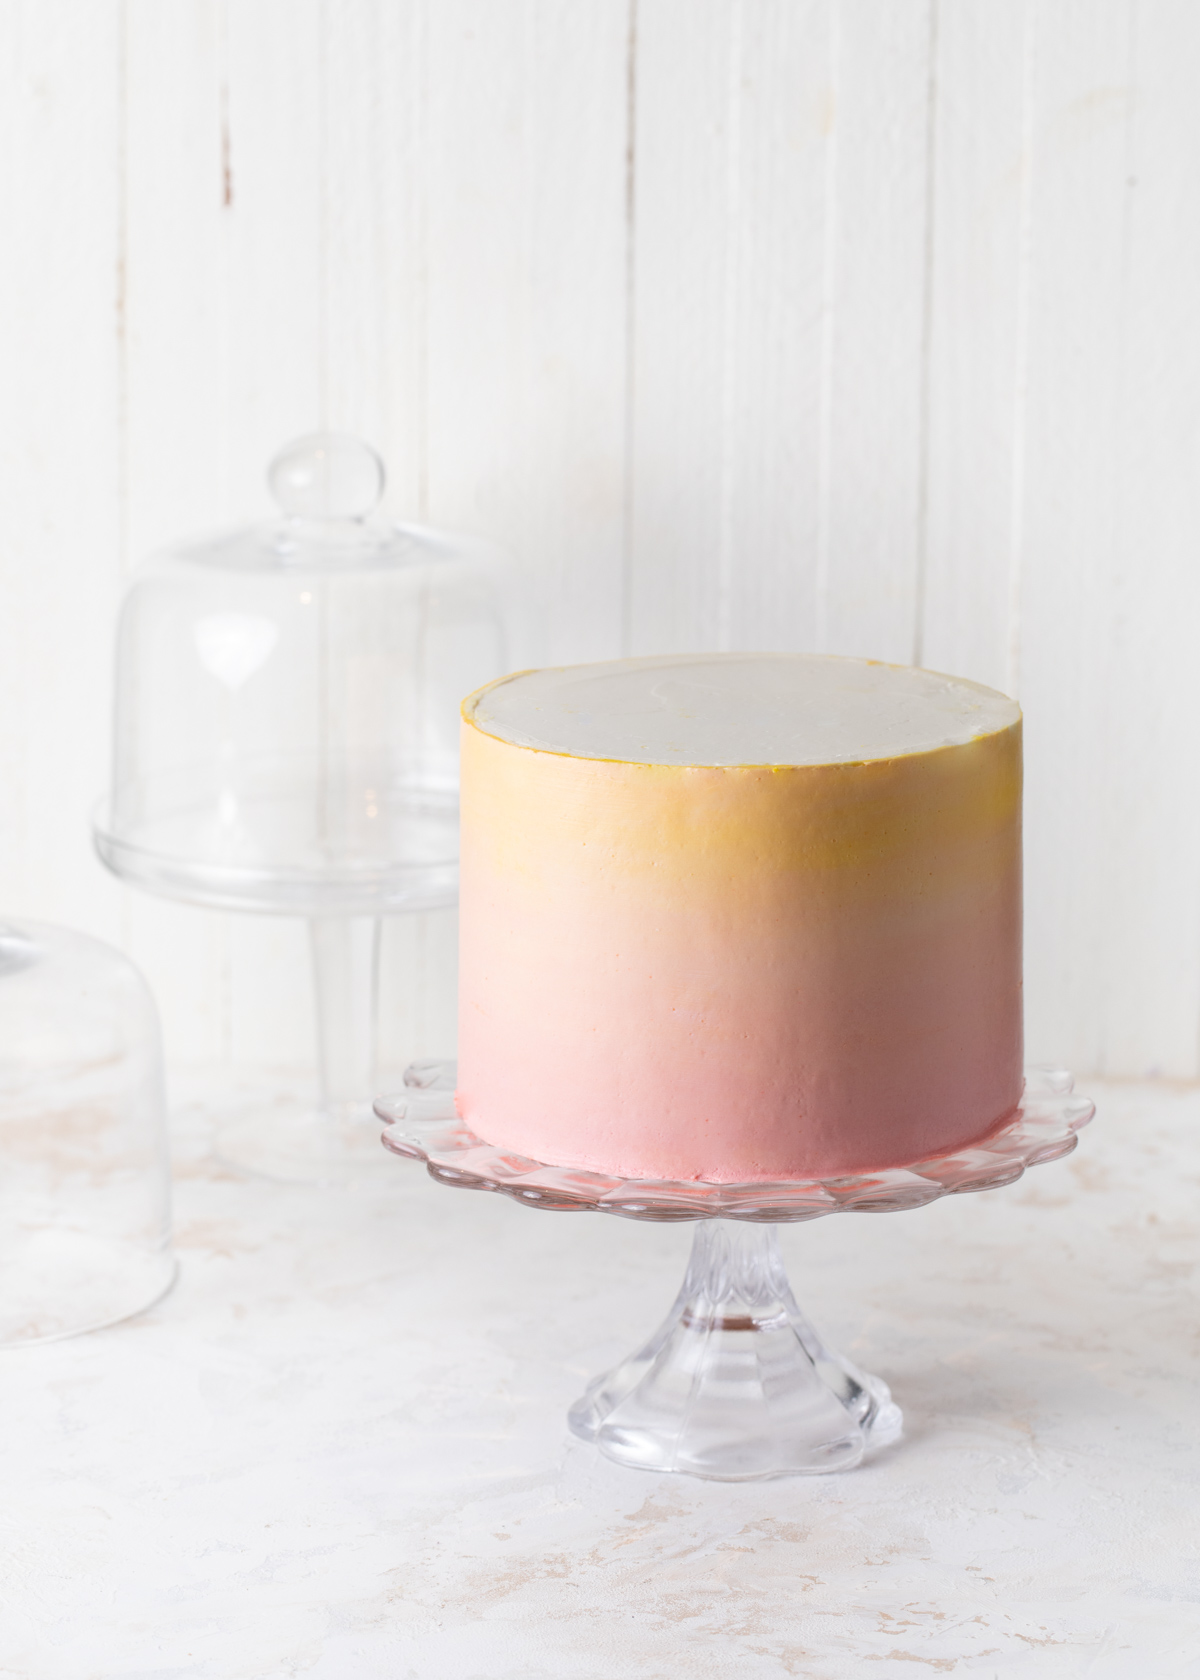
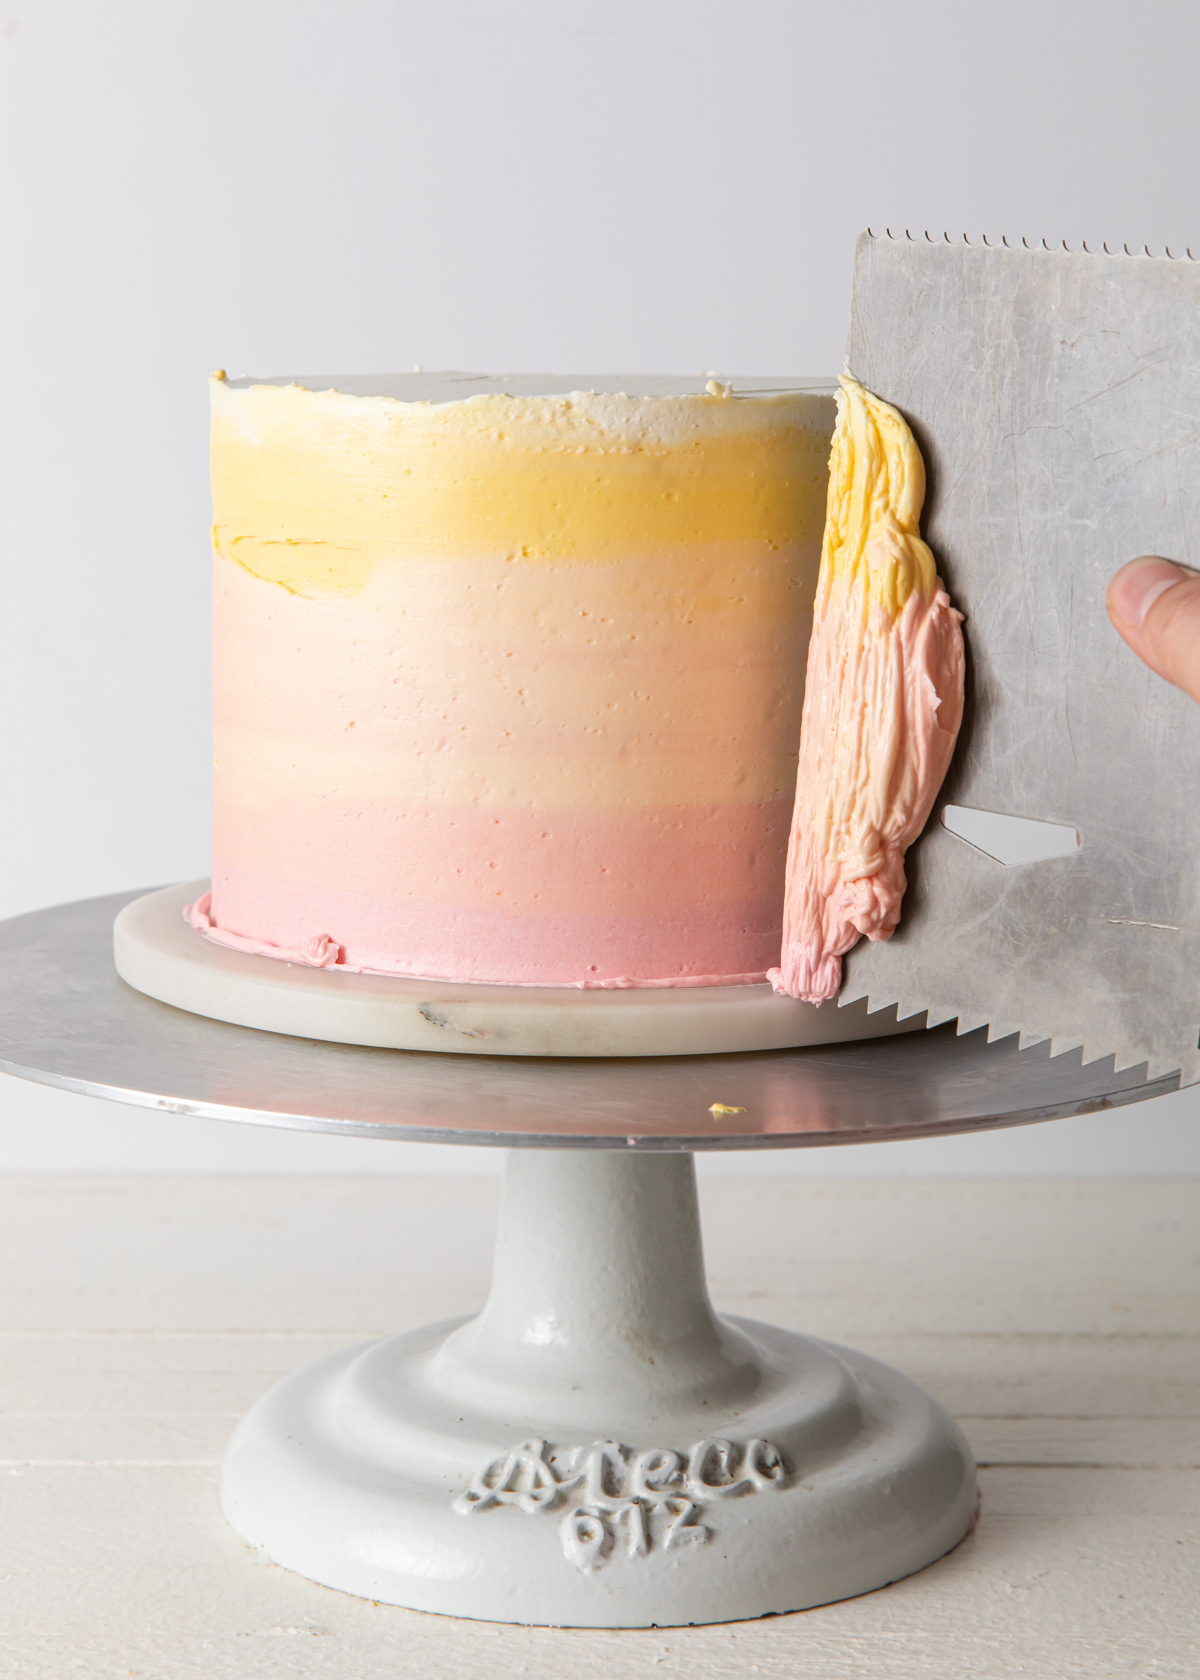
7. Smooth and Spread
Once all of the colors are on, begin smoothing out the buttercream. Start by using an offset spatula held perpendicular to your turntable. Remove any excess frosting, but do not worry about getting things perfect just yet. Be sure to clean off your tools between use.
New to cake decorating? Learn how to smoothly ice a cake.
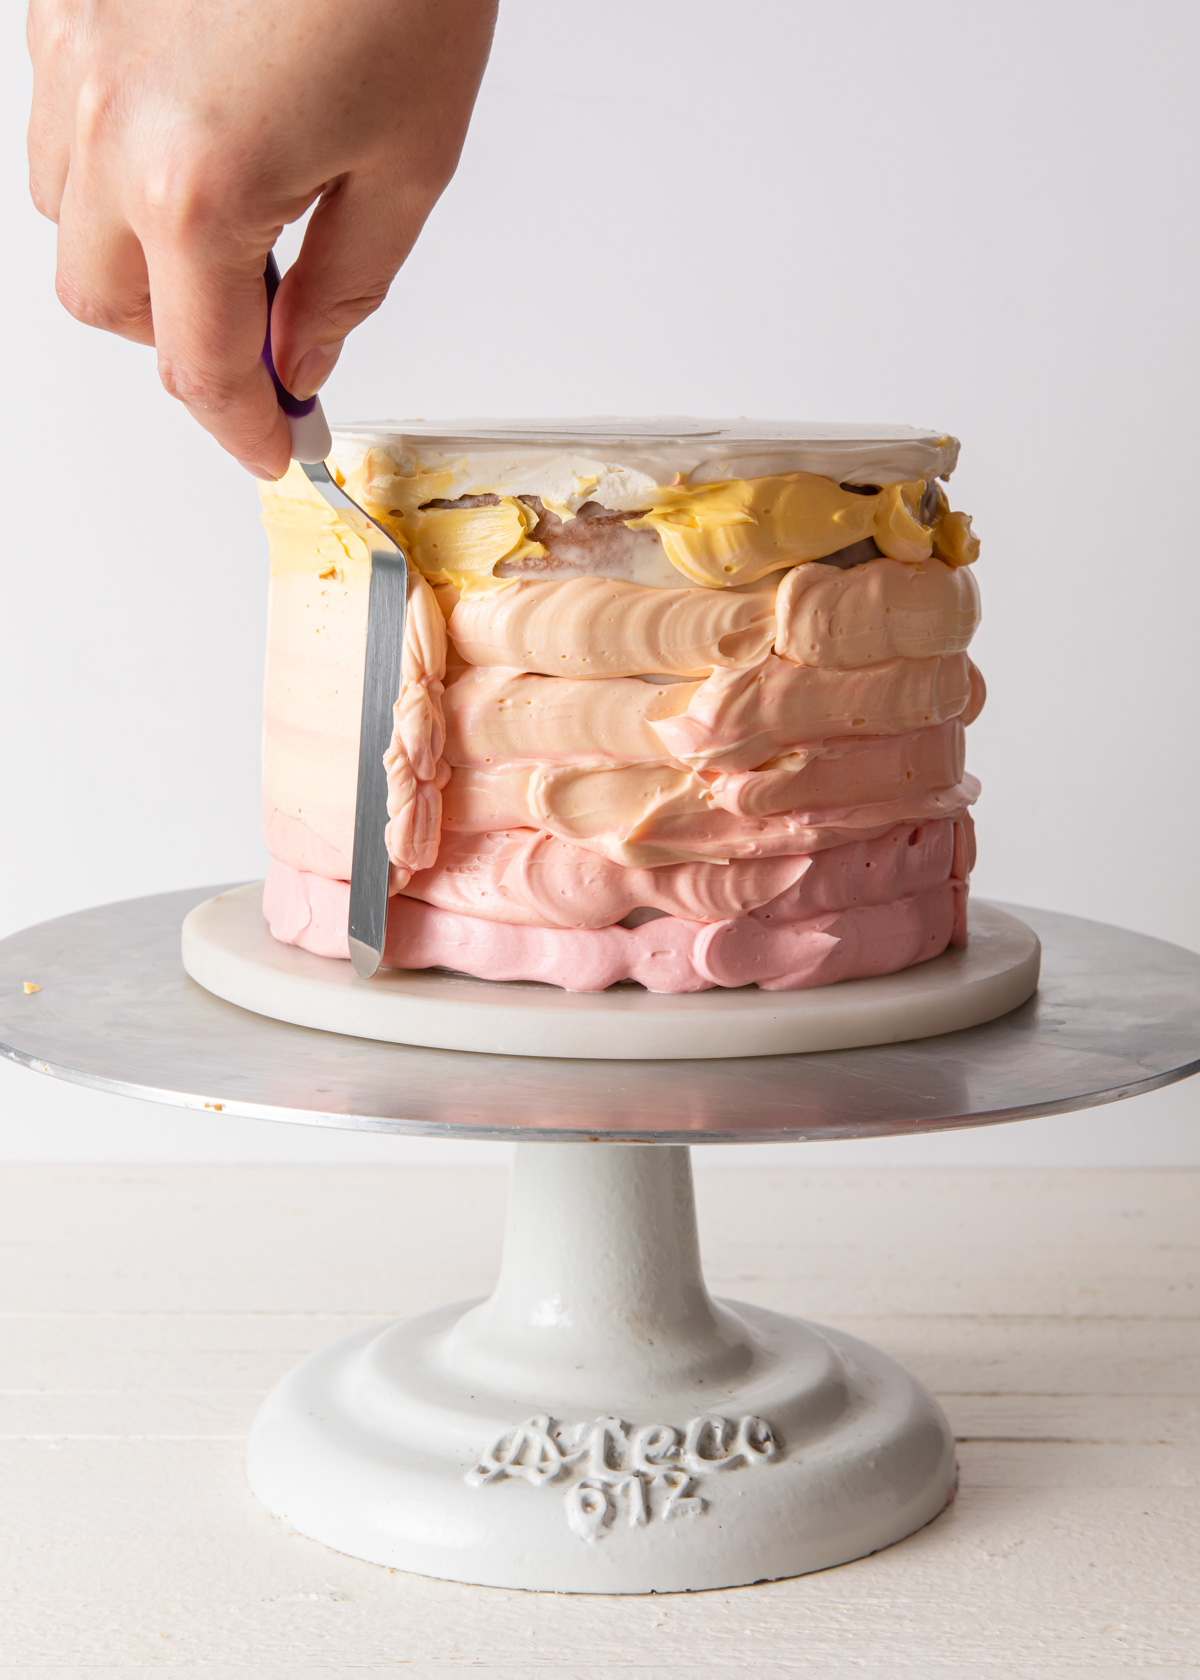
8. Blend the Colors
To blend even further, use the tip of your spatula to create horizontal zig-zags around the sides. If not, it may appear striped, which is also quite pretty.
9. Smooth and Smear
Next, take your icing smoother and continue to even out the buttercream. Place the smoother lightly on the cake, with the bottom touching the turntable, and rotate the cake around. Remember to smooth, not scrape off, the buttercream and clean your tools between rotations.
Touch up any gaps with leftover buttercream.
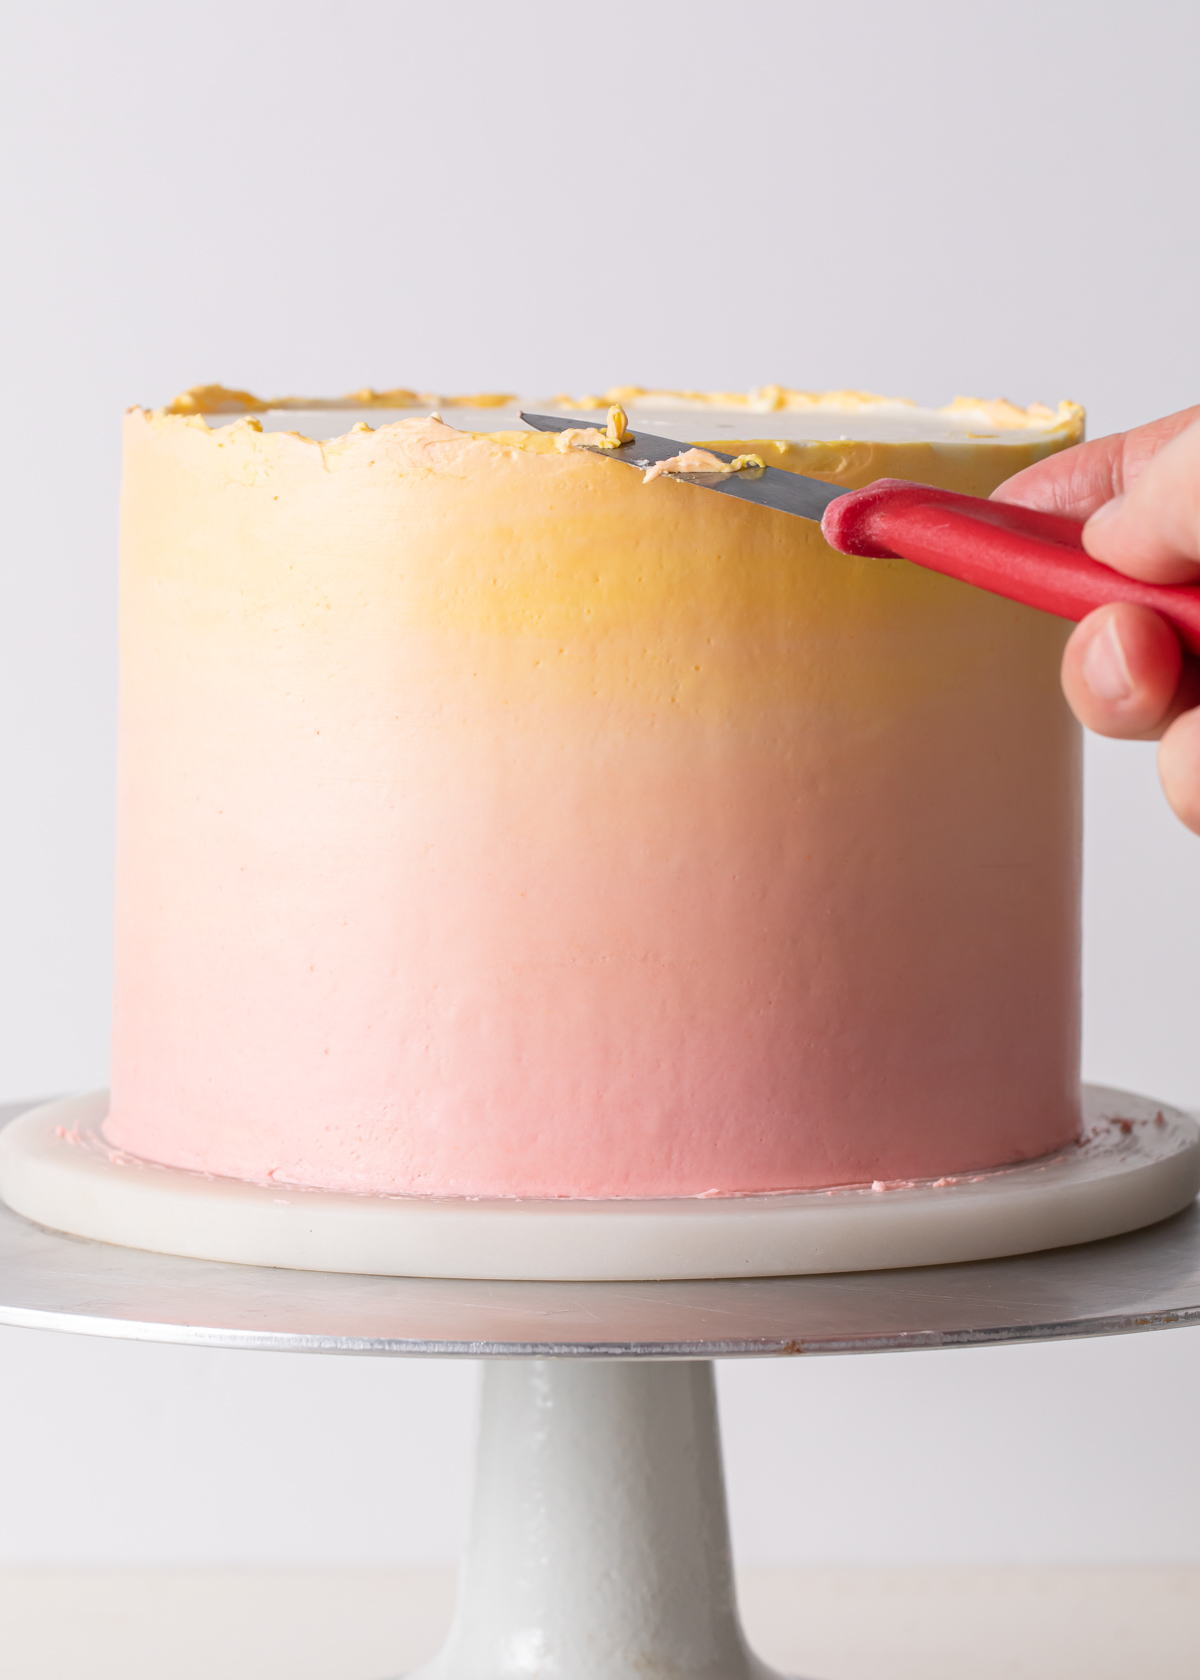
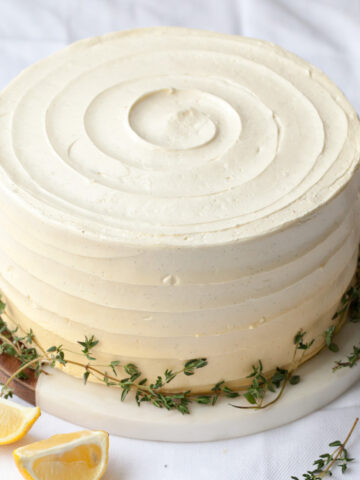
10. Trim the Top
For a super clean and crisp top edge, trim off the excess buttercream with a paring knife. This technique works best if the buttercream is firm (chill for about 10 minutes, or as needed).
Why trim the top? This technique prevents the colored buttercream from smudging onto the top of the cake.
Not so difficult, right? The color transition does not have to be perfect (mine wasn't), but still pretty. There are so many color options to explore! All pinks or all blues - or get crazy with a tie-dye of purple, red, and yellow! What colors will you try first?
If you are beginner baker, check out this tutorial on How to Ice a Cake. – Not confident about getting such a smooth finish or prefer a more rustic looks? Try this Watercolor Cake version.
Join the Style Sweet Bake Club!
Get exclusive recipes and articles sent straight to your inbox. Become a subscriber today! Click to join.
Decorating FAQs
I recommend using an American style, Swiss or Italian meringue buttercream.
Use a gel food coloring, like Americolor or Wilton.
Baker’s Notes
- Be mindful of your color choices and think about how they might blend together. Using colors that are in order on the color wheel will ensure that the blended colors don’t turn muddy. Think pink/orange/yellow or blue/purple/pink.
- I’ve successfully made this cake design with both meringue-based and American-style buttercreams.
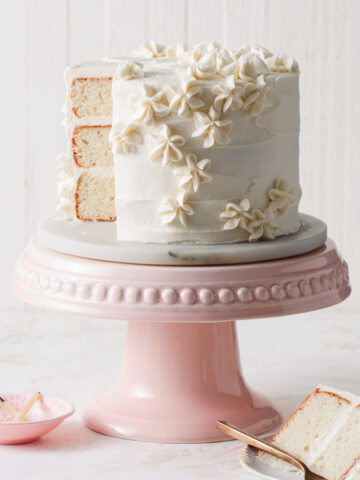
More Cake Decorating Ideas to Try
How to Make a Buttercream Flower Cake
Easy Textured Buttercream Cakes
Please leave a star review if you loved this recipe! Make sure to share your recipes and tag me on Instagram @stylesweetdaily.
Recipe Pairings
These are my favorite cake recipes to frost with watercolor buttercream:
Quick Steps for Making an Ombre Cake
- Prepare the cake
Fill and stack your cake layers. Give the cake a good crumb coat, a thin layer of icing that traps in all of the crumbs, and chill it in the refrigerator for 15 minutes.
- PICK YOUR COLORS
Select your color palette (3 to 4 colors) and decide which color you want for the top of the cake
- FROST THE TOP
Using a small offset spatula, smooth out the buttercream on top of the cake (as you would ice a regular cake). Don't be afraid if some of the frosting hangs over the edge of the cake - it will help with the ombré blend later.
- START PIPING
Place your first color in a piping bag fitted with a plain round tip. Starting at the bottom, pipe a ring or two of icing around the cake.
- MIX AND REPEAT
Pipe another ring around the cake and repeat with the remaining buttercream, mixing the colors as you go.
Complete the sides of the cake by piping on the last color. - SMOOTH AND SPREAD
Once all of the colors are on, begin smoothing out the buttercream. Start by using an offset spatula held perpendicular to your turntable. Remove any excess frosting, but do not worry about getting things perfect just yet.
- BLEND THE COLORS
To blend even further, use the tip of your spatula to create horizontal zig-zags around the sides.
- SMOOTH AND SMEAR
Next, take your icing smoother and continue to even out the buttercream. Place the smoother lightly on the cake, with the bottom touching the turntable, and rotate the cake around.
- TRIM THE TOP
For a super clean and crisp top edge, trim off the excess buttercream with a paring knife. This technique works best if the buttercream is firm (chill for about 10 minutes, or as needed).
molly yeh
this. is. amazing. and i want to do it right now... is 8:30 am too early for a cake??
(seriously, i have ALWAYS wondered how this is done. please keep the tutorials coming!!!!)
Tessa
Never too early for cake 😉 I do hope you try it out! I am sure your version would be GORGEOUS!
Nicole | Culinary Cool
I love everything about this cake. I think I might have to make a cake this weekend just to try this out!
Tessa
Yes! I hope you try it out 🙂
dlyan rowe
number one fan here sister girl
Beth @ bethcakes
This is absolutely gorgeous! I can never get my frosting that smooth and flat, so I'll have to try this for sure. How did you get the cake off the turntable and onto the cake stand? I feel like that's where I would really mess up, haha. Beautiful cake!
Tessa
Thank you! In the "Tips" I suggest placing the cake on a cake round. Or, if you are like me, just very carefully slip a thin off-set spatular under the cake and spin/lift at the same time.
Christin
Thats Beautiful!!!
Tessa
Thank you!
dlyan rowe
tessa is beutiful
cynthia
Totally stunning, Tessa!! I love your how-tos so much -- I haven't gotten up the courage to do a layer cake in awhile but your tutorials are bolstering my confidence for the next time I do 🙂 Thank you so much for this!
Tessa
Thank you, Cynthia! Yes, I do hope you give layer cakes a try again soon. I know you would do a fabulous job 😉
Elaine
Beautiful! I'd loved to try this technique. How dramatic would it be to dye the cake layers to match?
Tessa
LOVE that idea!!!
Lyndsay // Coco Cake Land
Prettiest ombre cake I've ever SEEN! Love your tutorial - the buttercream before it's blended looks so puffy and perfect, I even like the look of it as is! ^__^ Gorgeous work as always Tessa!
Tessa
Thanks so much, Lyndsay! If I did a more even job piping, I think keeping the rings of color as is would be awesome too! Great idea =)
Laura (Blogging Over Thyme)
Amazing, amazing job! This cake looks perfect. I haven't even dove into the world of cake decorating, but you make me feel like I could pull it off 😉
Tessa
Thanks, Laura! I sure hope you give it a try.
Anita Segreti
I came across this just a day or two before I was scheduled to bring a cake entry to our county fair. I knew that I was going to bring an ombre cake that went from white to dark chocolate, but hadn't decided on a frosting technique. I made the frosting to match the color of each layer of the cake, took a deep breath, and went for it. It came out great after just once around (I don't even have a turntable), so I could start breathing again. I added a pile of white chocolate shavings to the top, and sprinkled a few on the dish. And, of course, I tripped while walking it across the fairgrounds, but didn't do any real damage. In a field of 12 "other" cakes, it took first place, then first first place of all cakes, then best of show - all the breads, cookies,cakes, pies, etc. The judges were very impressed, and I am really grateful. I am looking for a job in a bakery, and this is just the "icing on top" of my resume. I'll try to get a picture to you if you would like to see it. Thanks so very much!
Tessa
Anita,This is FANTASTIC!! Congrats =) Best of luck as you follow your cake dreams xoxo
Thursday Things | The Wheatless Kitchen
[…] crumble is pure genius. Seriously the cutest funfetti biscotti EVER. I need to learn how to make an ombre cake. Stat! This white pizza with eggs looks ah-mazing. And congrats to 4 years to A Couple Cooks! I am […]
Ms Tyler Andrews
I used this tutorial as a cake for one of my first set of cake orders (I'm a newbie) and it I loved it, loved the results. Easy to follow! How do I post a pic to show u? 🙂
Tessa
Awesome! I am so glad you stopped by and tested it out =)
Oh Hey, Ombré | Politics to Pastries
[…] Oopsies. If you’re a visual learner like yours truly, you can find full tutorials, here, here, and […]
Cake Trends | My Blog
[…] butter icing. Its looks rustic and home made, yet simple and classy. Has anyone tried to achieve an ombre effect to their icing yet? A definite challenge but the finished result looks […]
Sara
Hi! This was a great tutorial and I'm definitely going to use it!I have a question regarding how you started your own business in the cake decorating world....I've always had a passion for it but have been too afraid to take that first step...
Thanks again for the tutorial 🙂
*~Sara~*
Tessa
You are very welcome! For my questions, you can always email me at tessa@stylesweetca.com
Katya
Hi! Thanks a lot for tutorial! I have a question, how do you transfer cake on cake stand without ruined bottom frosting of cake, I always fail at this phase.(Sorry for bad english)
Tessa
Katya,You can try using a cake board underneath or icing the cake directly on the cake stand. If not, chill the cake once it is frosted so the buttercream sets up a bit. Use a thin off-set spatula to release the cake around all of the edges from the turntable before trying to lift it off to move.
thebrielet
Hi, can you tell me what colors you used? Love the effect!
Tessa
I'm not entirely sure, but I believe it end up being a mix of just pinks, orange, and egg yellow =)
Dory
I don't bake. Period. Yet, I decided to make my daughter's birthday cake and I wanted to do this effect here. I had no idea of what I had to do to achieve this. I didn't know what a crumb coat was or anything else. Your tutorial was great and I managed to get it done.
Tessa
Dory,Thant's fantastic! I am glad I could help =)
Michelle @ Hummingbird High
I'm obviously late to this party, but Tessa your skills are out of CONTROL. This cake is beautiful!!!
Tessa
Thanks so much, Michelle!! You are too sweet =)
Kue Ulang Tahun | Nami Bakery and Patisserie
[…] Sumber: http://stylesweetca.com/2014/07/08/how-to-ice-a-cake-perfect-ombre/ […]
Cara
I'm trying this out for my niece's birthday party cake and can only hope mine's somewhat as pretty as yours. 🙂 Question for ya, What size piping tip is that? I can't seem to find one with a wide opening like the one in your tutorial. Thanks so much for this post!
Tessa
Cara - I think the piping tip is about 1/2" in diameter. If you can't find a round tip that big, you could just try using a piping bag without a tip at all - just cut the opening to the right size. Best of luck! =)
Friday Faves Part 9 - TheresesPieces
[…] THIS amazingly gorgeous Ombre cake from StyleSweet. I mean, are you kidding me?! […]
Tiphenie
I love this! I want to make a pretty cake for Independence Day!! This would be so pretty in red white and blue!!
Aileen
I LOVE your tutorials!! so incredibly helpful. After your cake is frosted, how do you transfer the cake from your turntable to the serving plate without denting the bottom edges? I always have this problem and I keep buying cakeboards, but sometimes the cake just looks prettier directly on the serving plate. Thanks for your help!!!
Aileen
Wait!! nevermind. I just saw your notes towards the bottom of the post. Question answered!! thanks!!! 🙂
carolina francis
OMG this is amazing, I will make for my aunt's party and a will put a gumpaste flower on top, any recomendation?
Tökéletes vajkrémes OMBRE díszítés készítése | tortaiskola
[…] Forrás: http://stylesweetca.com/2014/07/08/how-to-ice-a-cake-perfect-ombre/ […]
| 15 cakes that are too pretty to eat
[…] pink three tier cake // flower topped cake // pink with sprinkles // rainbow cake // gold dots // ombre cake […]
Jennifer leak
When we do these Ombre Cakes, do we need a border? I am gifted this cake and just want to make sure it is completed. I love your colors, very elegant. 🙂
Tessa
A border is totally up to you! I am sure either way would look lovely =)
Fun & Easy Cake Decorating Ideas » Ashley Stafford Curated
[…] Watercolor Graffiti // Easy Ombre // Sides un-iced […]
Vanilla Malt Buttercream Birthday Cake | hungrygirlporvida.com
[…] what I’m calling a “water color stripe”–basically I followed the method for making an ombré cake, but alternated white and colored frostings instead. It turned out pretty cute, I think, and it was […]
Baking for Wonderland | the crafty mastermind
[…] icing was much easier than last years frozen take. I found a brilliant tutorial, http://stylesweetca.com/2014/07/08/how-to-ice-a-cake-perfect-ombre/ I just wish I had a better scraper, I was using one normally reserved for bread […]
15 Pastel Wedding DIYs | SouthBound Bride
[…] but if you’re going to do it, go big or go home by learning to ice this gorgeous ombre cake. By Style Sweet 9. These little paper hearts are so versatile. You could place one at each setting, string them up […]
Friday's Favorites: Birthday Bash » Tickle My Whimsy
[…] Sweet Style CA: DIY Ombre Cake I love anything ombre. It’s gorgeous, super feminine, and makes everything look better. Ok, maybe not everything, but I would definitely not be opposed to trying. So, mix that with cake and you’ve just combined 2 of the best things in the world. Recently, I’ve been looking for excuses to make anything sweet, and this DIY just might make a good one! M […]
Eden Passante
What a great tutorial! The cake looks amazing!
Tessa
Thank you, Eden!
Mae
Hello, Tessa! Thanks for this wonderful tutorial! This cake looks amazing! I've included your tutorial in a roundup blog post in recognition of National Cake Decorating Day! I'll paste the link - feel free to delete if that feels too spammy.
Thanks again,
Mae
http://www.customaed.com/national-cake-decorating-day-2015/
Funfetti ‘hot air balloon’ layer cake | The Fakery Bakery
[…] Using a long metal spatula, press the icing into the cake while moving around the circumference. Here a nifty step-by-step tutorial for making the icing lovely and smooth. 11. Pipe two rounds of buttercream dollops around the […]
Buttercream Cake Inspiration
[…] Alright…now on to the REAL inspiration!!!! These are PURTY cakes I was trying to resemble!!! I hope you find some inspiration here and try some buttercream of your own!! This cake is by “Style Sweet”! SO pretty…this is what I wanted!! She even has a tutorial…click HERE. […]
Mojito Layer Cake | Always Add Cinnamon
[…] this Ombre tutorial to do the ombré frosting effect. Make sure you’re organised! Get it all meaasured out […]
Sofia Salvador Mf
Very nice!
Thanks for sharing!
dlyan rowe
love you and this cake it was so jazz !!1!