Last updated on September 24th, 2022 at 03:44 am
Delicate waves and intricate ruffles simply made from buttercream icing!
Hi All! Thank you so much for all of the kind words regarding last week’s cake. I hope the gluten-free part didn’t scare too many of you away, but also inspired those that are gluten intolerant to bake beautiful things. Also, I am super relieved that you all seemed to like the new blue backdrop. It’s not something I plan to use everyday, but glad to have something fun and a little out of my comfort zone to spice things up every now and then. But what you really seemed to be excited about is the delicate wave/ruffle piping. As promised, I will be sharing how to do it yourself!

I love experimenting with buttercream every change I get. When I first started my career working with cake back in 2007, it was all about fondant and novelty cakes. I found the most joy either spending hours on delicate sugar flowers or making a cake that looked like other food – a hamburger cake or a donut, perhaps. Trends come and go, and I am so glad to see that buttercream has made a definite comeback and seems to be here to stay.
I personally made the transition from fondant back to buttercream after I closed my bakery and moved to Vancouver. I was no longer making wedding cakes and didn’t have room in our city apartment to keep all the tools and supplies needed for those types of cakes. Plus, I had nobody to eat or order them. I started gravitating towards interesting flavour pairings and buttercream textures because those were the types of layer cakes that I wanted to eat myself and ones that you home bakers would appreciate the most.
I feel pretty nerdy and so pretentious saying that cake decorating is an art form and buttercream is my medium of choice, but it’s true! As a child and into my twenties, I used dance as my creative outlet. Now I use sugar and butter. Using just an offset spatula and various piping tips, it’s fun and challenging to come up with new textures. This delicate wave/ruffle pattern just happens to be one of my new favourite designs.
About 5 years ago I made a very similar design, except it was made purely from fondant. Each wave was ruffled by hand and then gilded with a bit of edible gold paint on the delicate edges. It took forever. By the time all the ruffles were added, the fondant had dried and hardened. It was gorgeous, but you’d have to pick off all of that hard work just to get to the yummy cake inside – essential making it a time-consuming decoration and not necessarily an edible garnish.
Today’s version is so much tastier and takes only about 10 to 15 minutes. No, seriously! Once your cake is crumb coated and your buttercream already whipped, the piping is quite simple and fast. Plus, the organic-ness of it all means that your waves don’t have to be perfect. In fact, embrace the imperfection!
How to Make a Ruffle Cake
1. Place the cake on a cake board of the same size. Fill, stack, and crumb coat your cake in buttercream icing. You do not have to fully ice the cake, but the crumb coat should be thick enough that the cake layers do not show through. Finish off the top of the cake as normal.
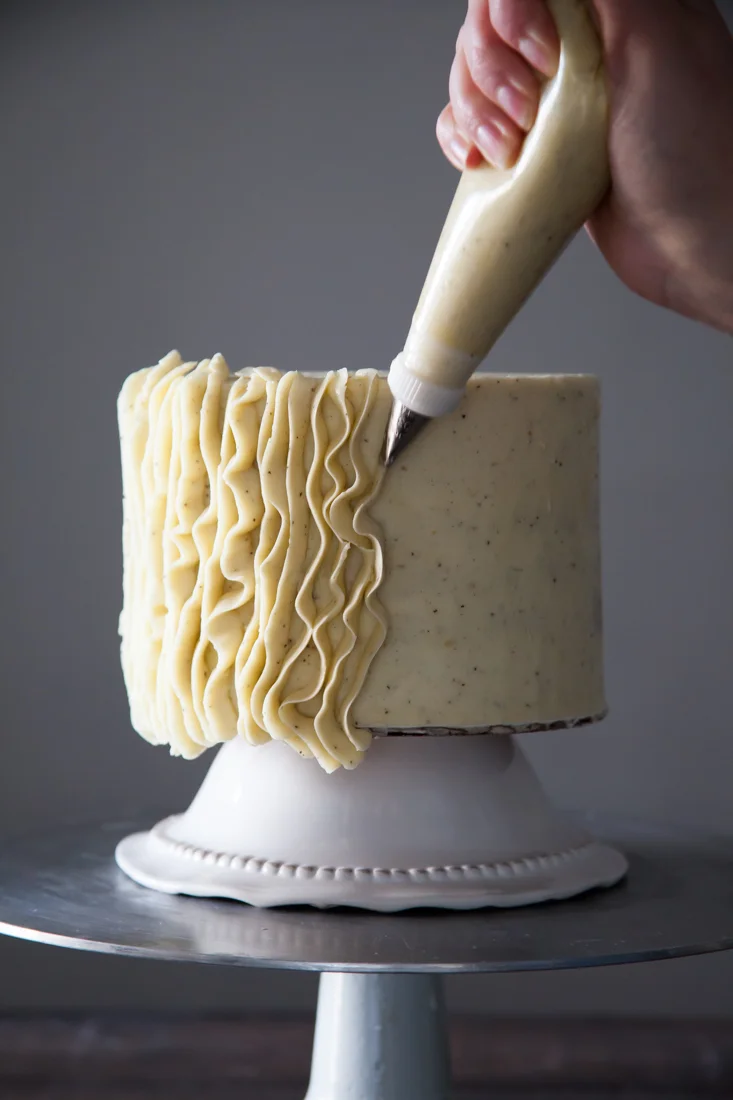
2. Fit a piping bag with a petal tip (I used #103 on this 6-inch round cake) and fill with buttercream.
3. (optional) Place the cake board (and cake) on top of an upside-down bowl so that it elevates the bottom of the cake.
4. Hold the piping bag parallel to the side of the cake, keeping the wide end of the piping tip towards the cake – slightly touching the crumb coat.
5. Keeping consistent pressure, start piping ruffles from the bottom of the cake to the top. Create long, curvy waves as well as short ruffles for more interest. Stop pressure before pulling the piping bag away at the top. Repeat.
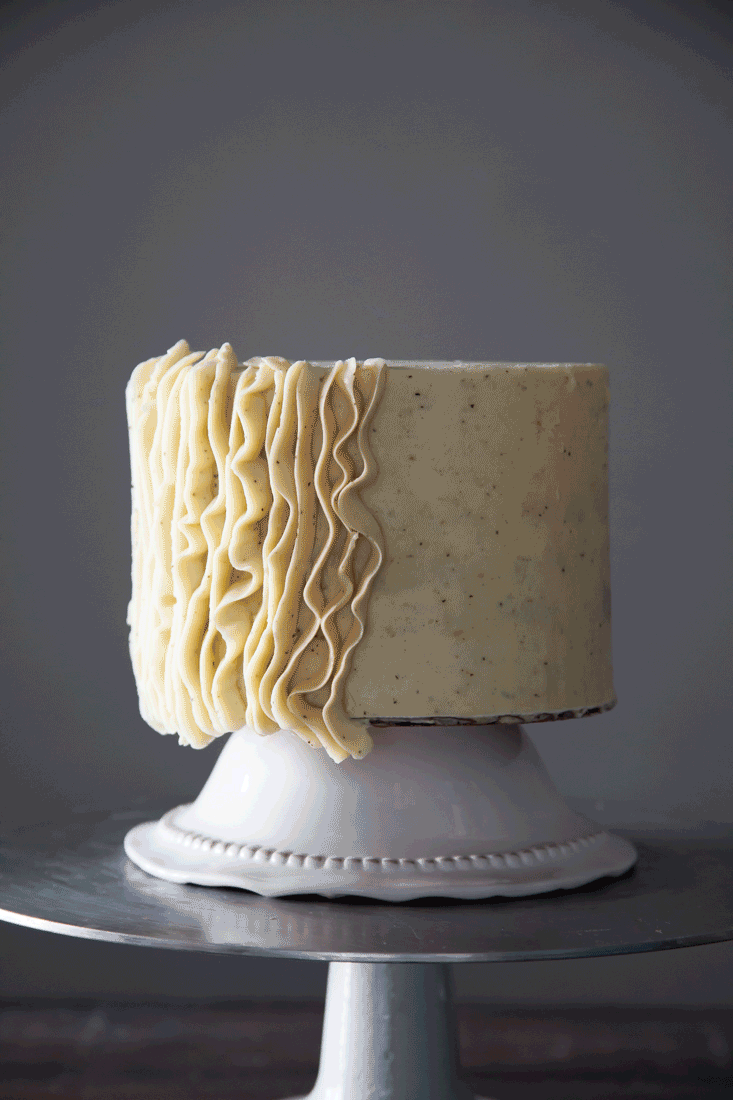
6. Continue around the cake – sometimes following the curves of the previous wave and sometimes mixing it up. I prefer the ruffles to be fairly close together for a delicate look.
7. I find that the waves look more natural if the begin slightly bellow the cake – hence why I elevate it. Once you pipe waves all the way around the cake, take an offset spatula or paring knife to gently “cut off” the bottom excess without disturbing the rest of the wave.
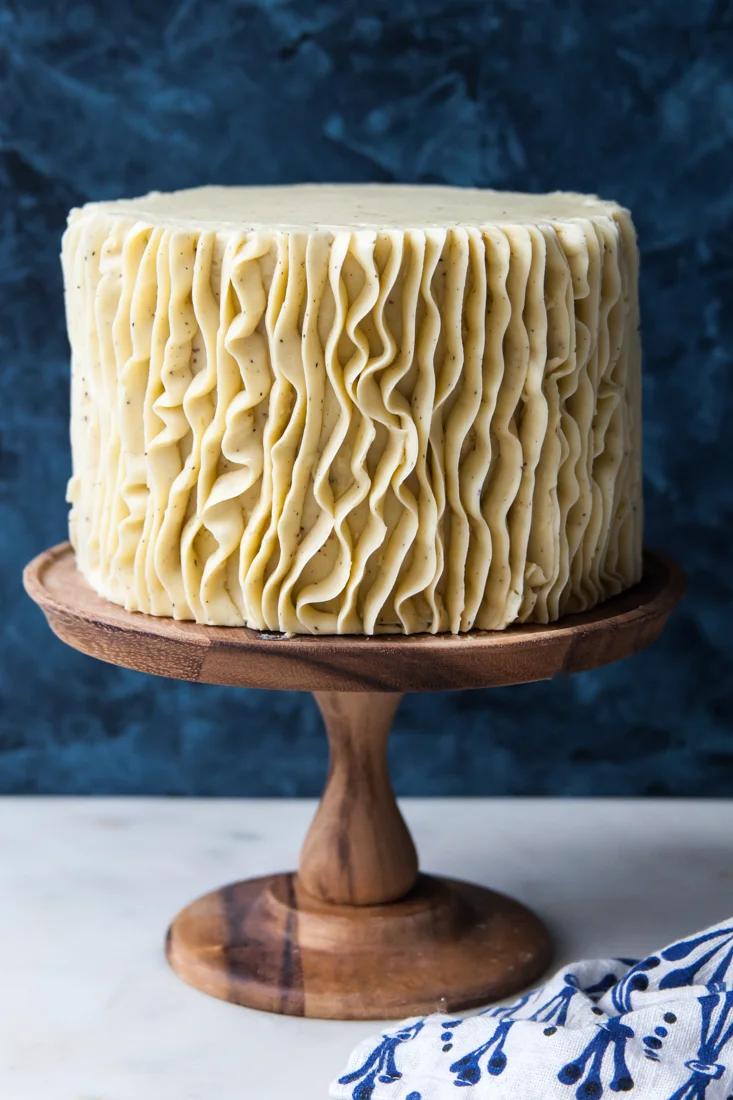
8. Use an offset spatula to carefully lift the cake and place on a serving dish or cake stand. Enjoy!
Leave a Reply