Last updated on October 14th, 2022 at 03:10 pm
When does something transition from merely a trend to a prominent style? Because let's face it, Naked Cakes are here to stay. And I'm not complaining one bit about it!
I've definitely played around with my fair share of "naked" cake designs over the past few years - going from completely "stark naked" to more of a sheer crumb coat and topped with either sugary drips, sprinkles, and candy to more rustic, natural adornments. Sure you can slather on some frosting between layers of sponge cake and call it a day, but have you ever thought about what makes up a beautifully styled and staked Naked Cake? Since this "trend" seems to be sticking around for a while, and surely there are some of you out there that are just jumping on board and would like to know, I've come up with some of my top tips and tricks for How to Make a Naked Cake.

Start with a Plan
Naked cakes deserve your time and respect, too! Haha. Just because there are not copious amounts of frosting or intricately piped details doesn't mean naked cakes should be thrown together without much thought or preparation. Think about style, degree of nakedness, toppings, etc. Are you going for a rustic, natural look with fresh flowers or herbs? Or do you want to top it with other goodies like macarons, meringues, and swirly chocolate bark? What about a caramel drizzle? Might it not ripple the way you want it to down the side of a cake if the sides are bare? Some food for thought - literally.
Of course, even good laid out plans need a little wiggle room. I suggest having at least a rough idea of what you want your final cake to look like, then let your inner artist get to work after you bake and begin assembling your cake.
Pan Prep
This is probably not the best time for you cake to get stuck in the pan. Since the sides are so exposed, be sure to be conscious of how you prepare your cake pans before baking. I use butter (or non-stick spray) and flour for most of my cake. To be extra careful, you can line the bottom with parchment paper. Let cakes cool about 10 to 15 minutes on a wire rack (or long enough that you can safely handle the cake pans without oven mitts) before removing them from their pans.
Keep Structure in Mind
Want to try your hand at making a naked cake simply because the idea of frosting an entire cake is daunting and a bit scary? Trust me, I get it. And I think that is a perfectly valid reason to stick with naked cake, too. However, the cake should still be filled and stacked with care.
While cakes covered with frosting or fondant might be harder to pull off, some of that extra sugar may in fact help support a cake and act almost as a frosting "glue" for wobbly layers. Since naked cakes don't have that extra insurance, let's take a look at some helpful cake-stacking techniques:
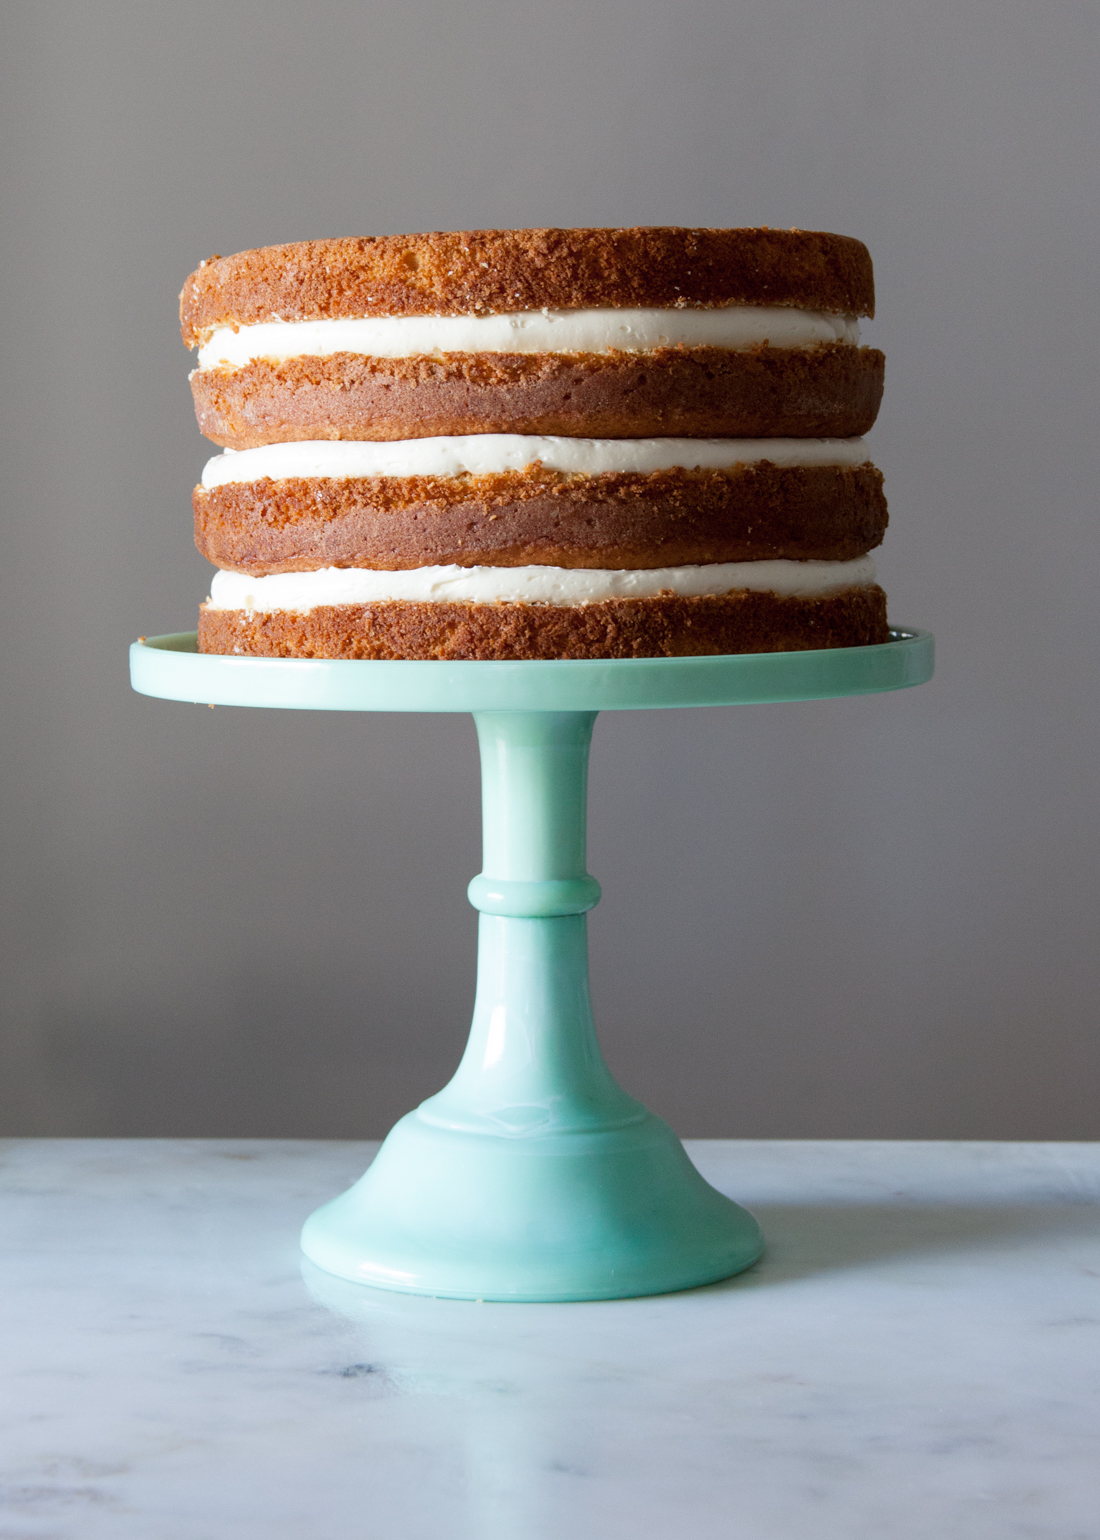
1. Carefully cut and trim your cakes into layers with a long serrated knife. Before cutting, it is best to wrap a cooled cake in a double layer of plastic and then chill it in the fridge for about two hours (or up to a couple days). Chilling the cake will help keep the cake from crumbling and/or splitting.
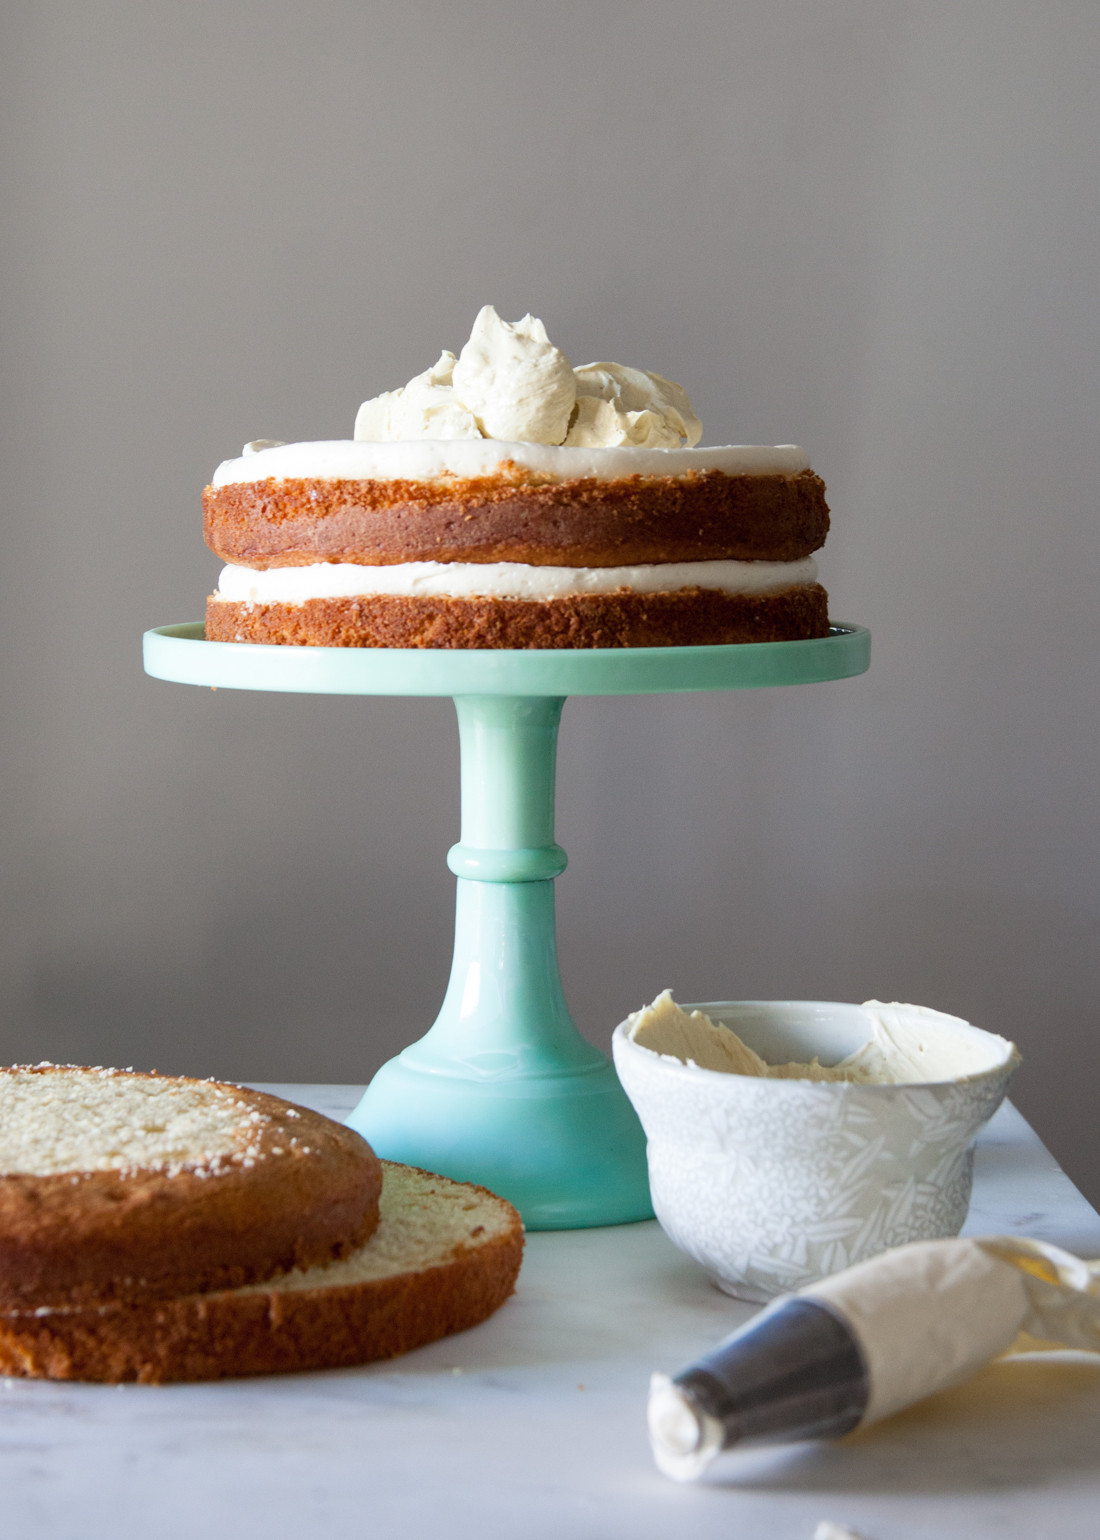
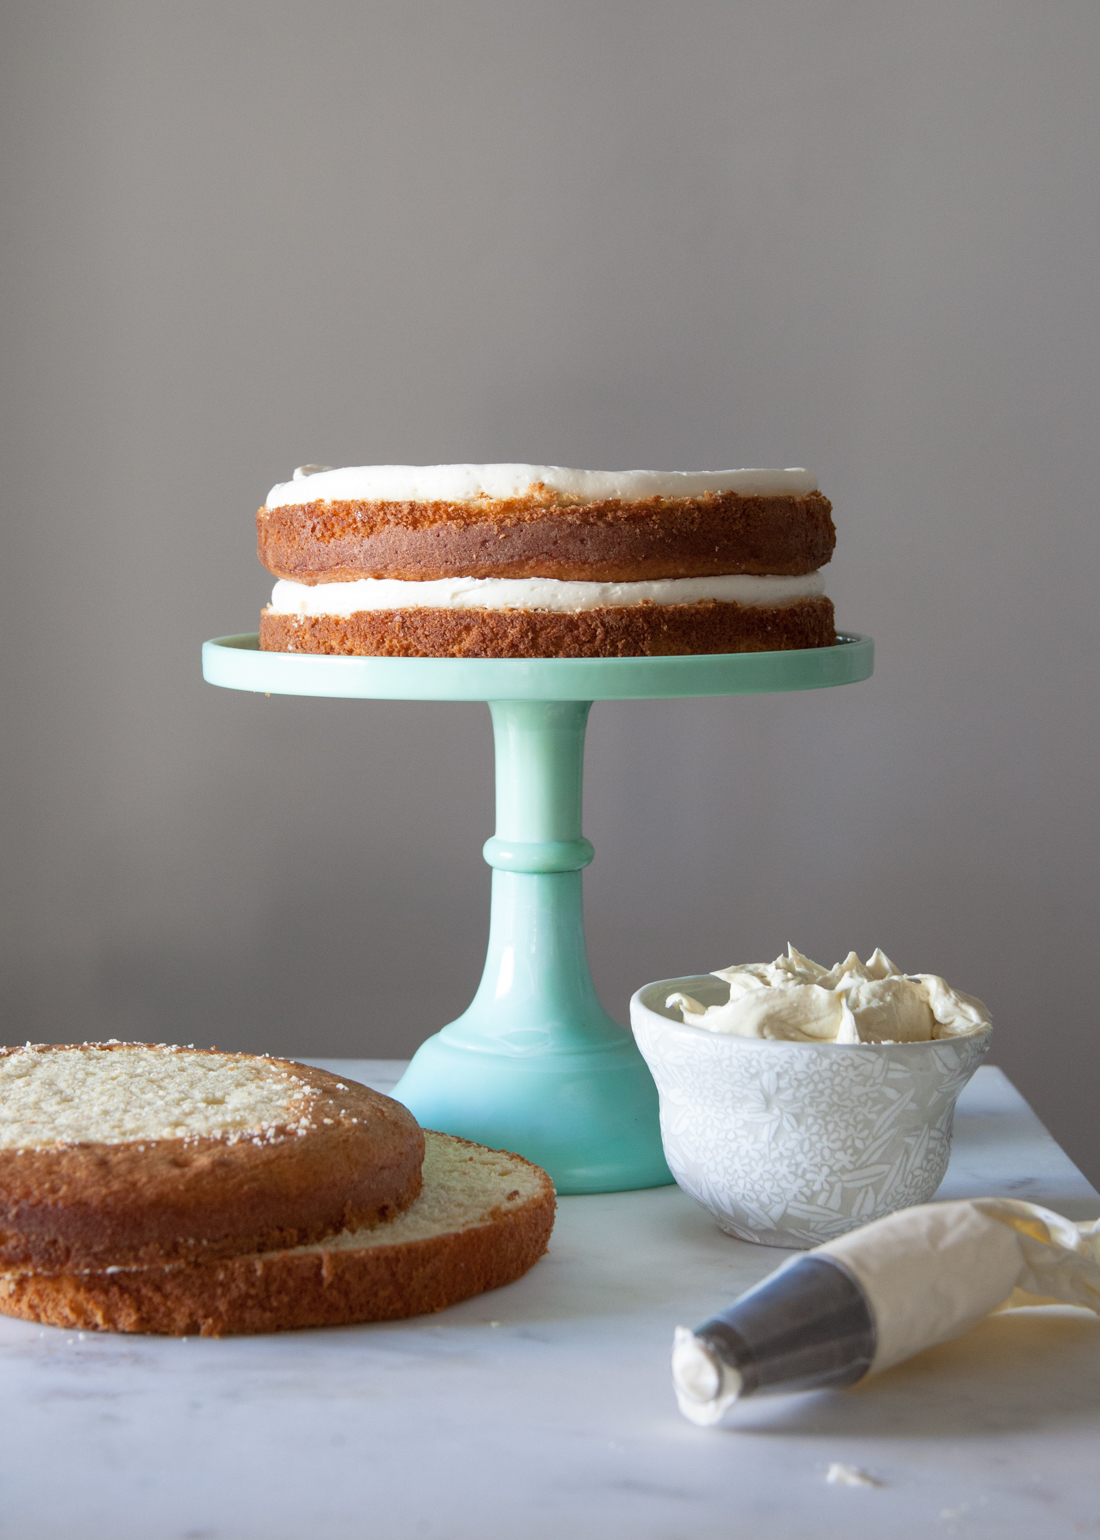
2. Use a frosting dam to create clean, even layers as well as to contain any softer fillings that may be used. Fill a piping bag fitted with a medium plain (round) tip with frosting (buttercream, cream cheese, ganache, etc) and pipe a ring around the top edge of each layer. Try to pipe this ring as even as possible - using the opening of the piping tip as a guide to how thick the filling layer should be (I usually use about a ½" opening). Pipe the frosting slightly away from the very edge of the cake to allow some space for the frosting to shift and squeeze out a bit as the cake layers are stacked on top of each other.
3. Fill the dam with your filling of choice and repeat with the remaining layers. If you are using softer fillings like lemon curd, pastry cream, or fruit preserves, then using a frosting dam is always a pretty good idea.
4. Save a bottom layer for last, and stack it upside down. Use the naturally flat bottom as the top of your cake to keep things level.

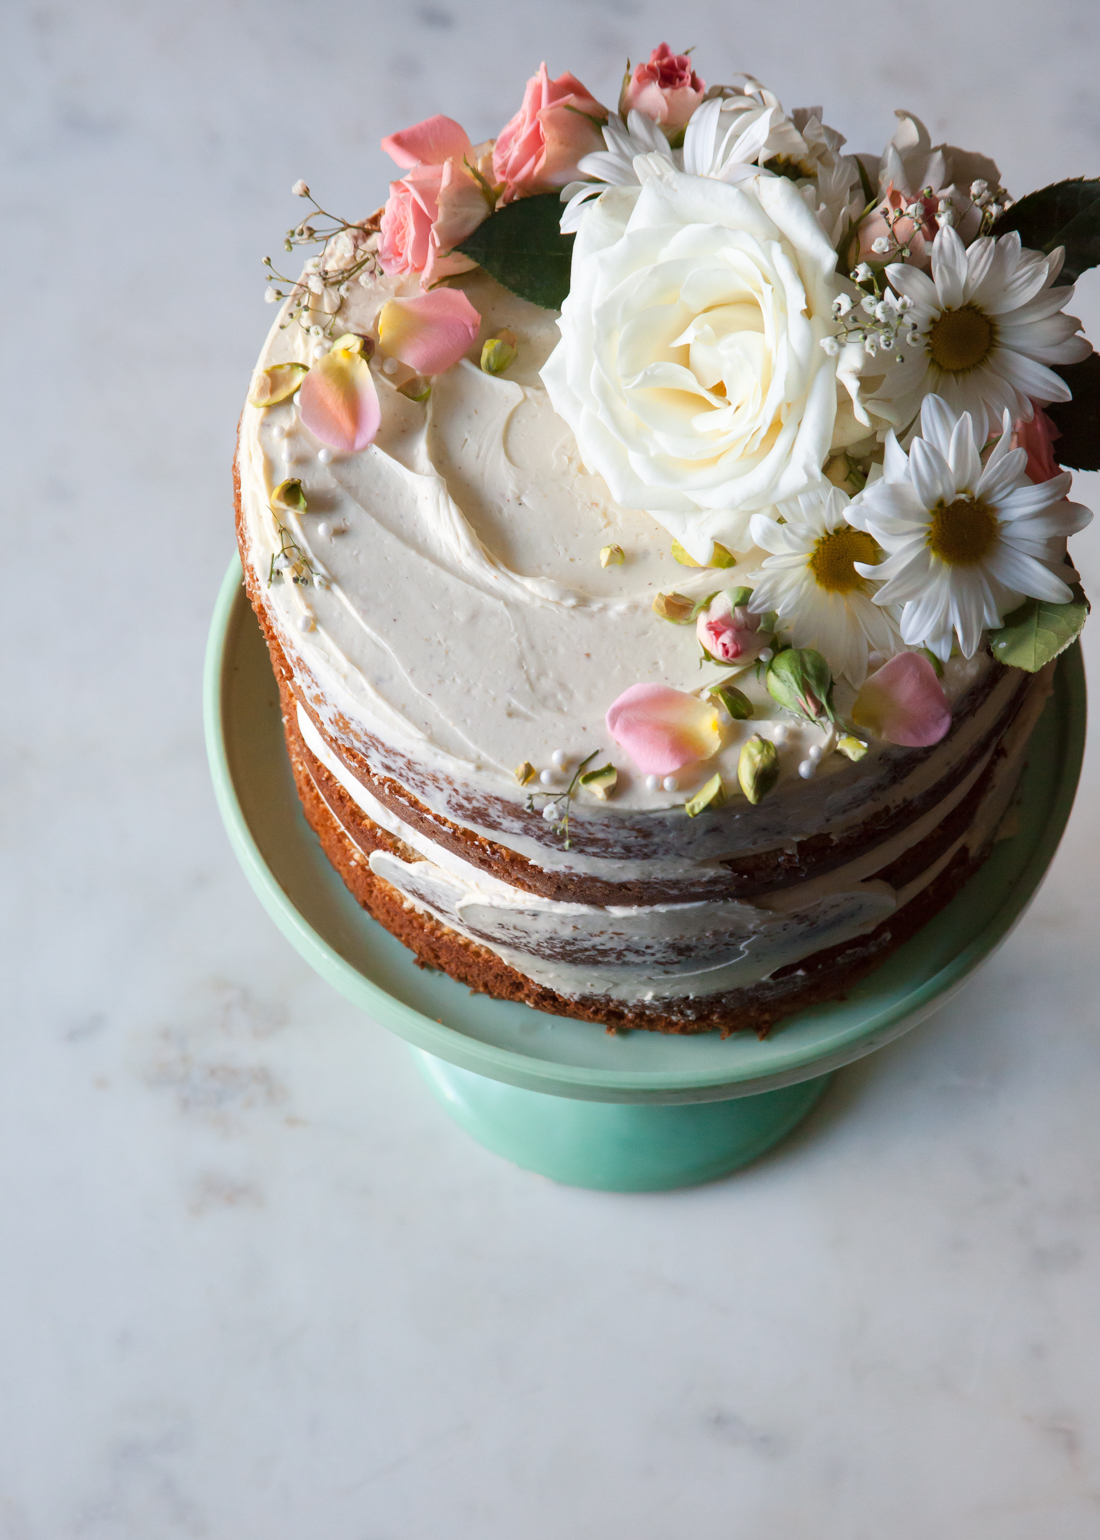
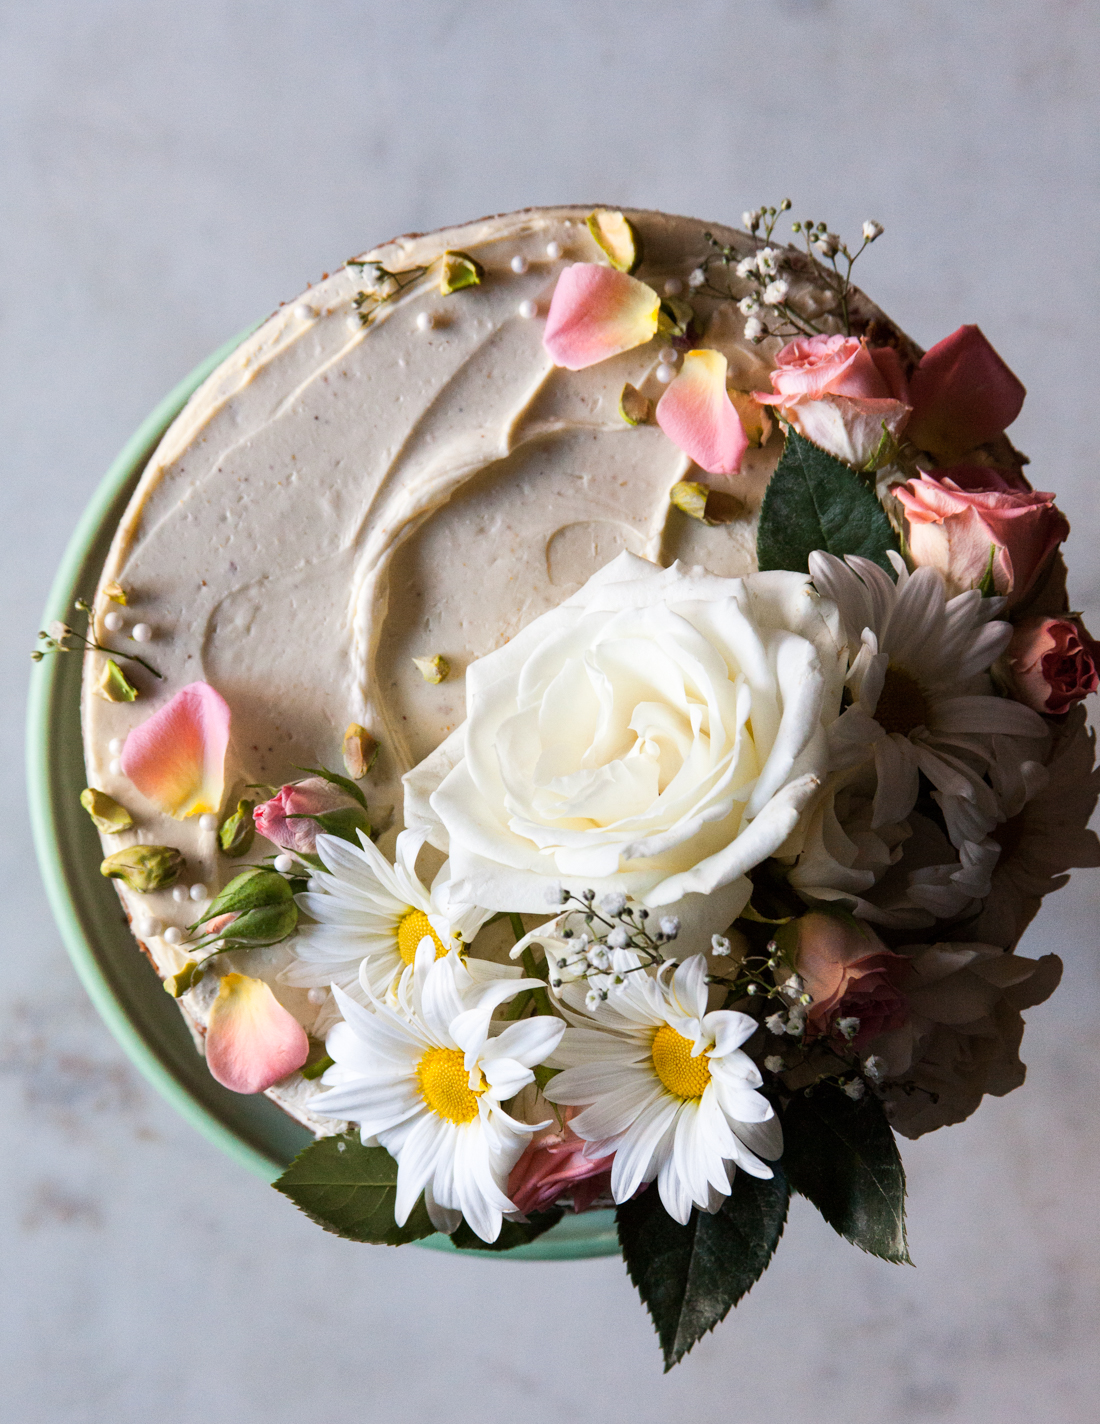
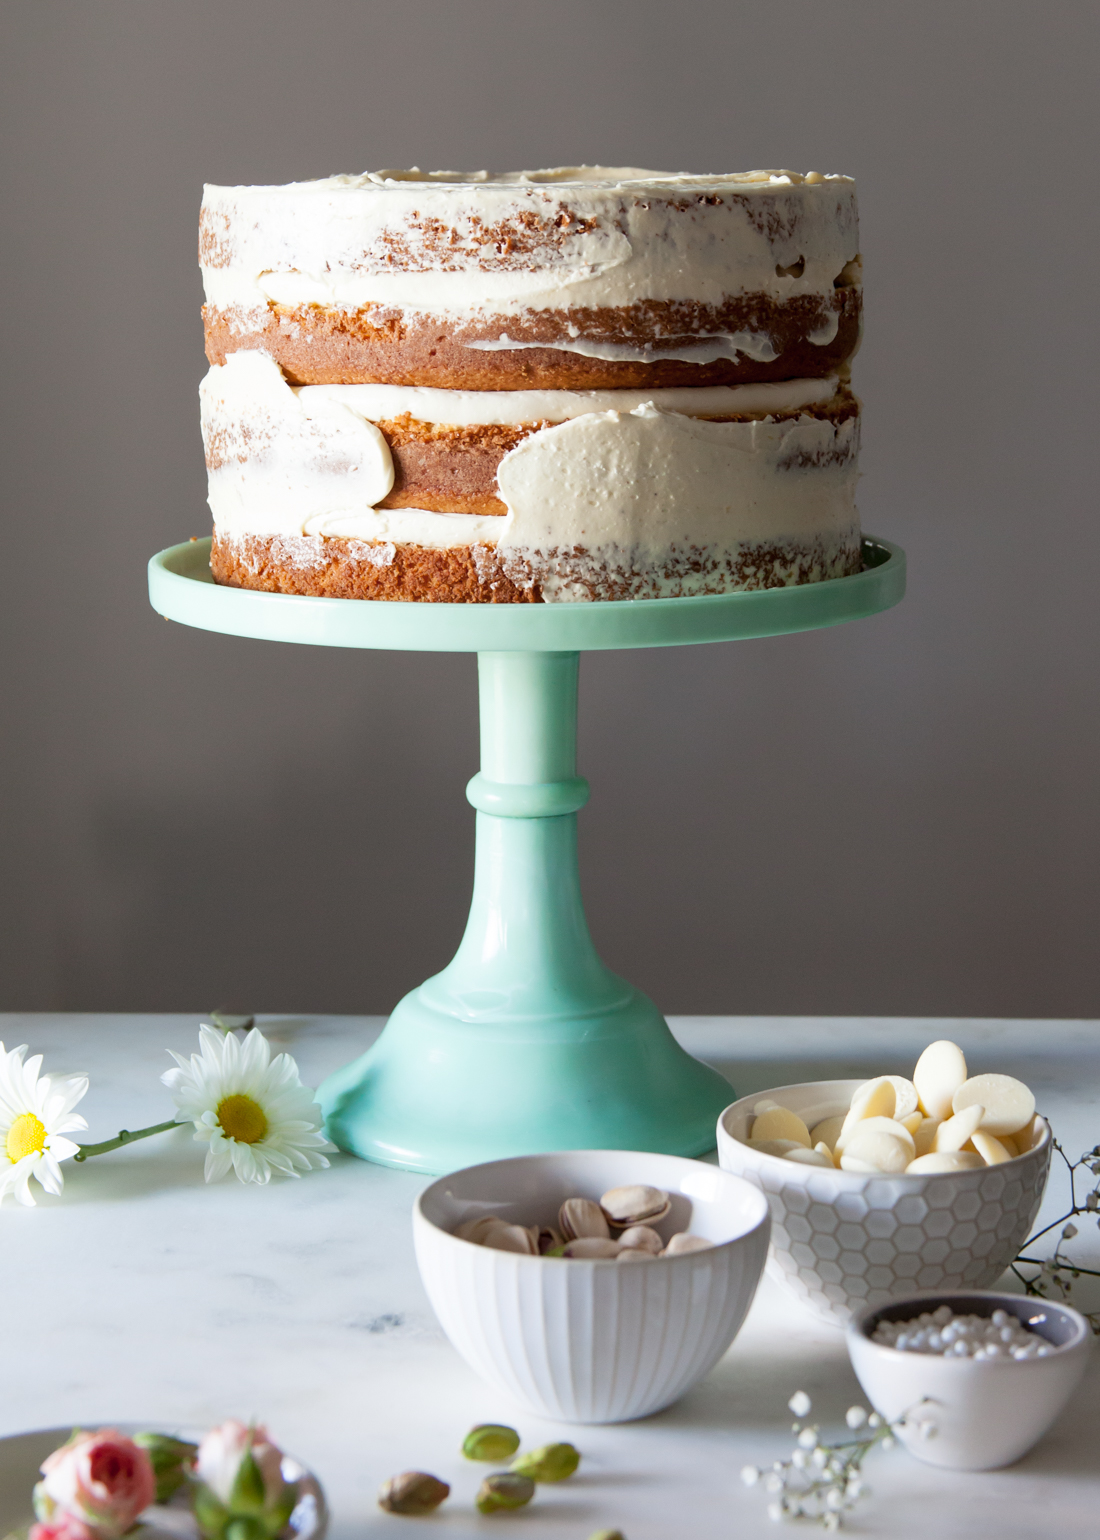
Degree of Nakedness
Just typing that made me smile a little, hehe. Of course, it is totally up to you on just how bare you want your cake to be. Personally, I tend to go with partial crumb coat. I like that the top of the cake gets a decent amount of frosting (making a great canvas for decorations), while the sides get a few random patches to create a rustic look. Try using a small off-set spatula to direct where you want the frosting to go, or even fill in any gaps with leftover frosting from your piping bag.
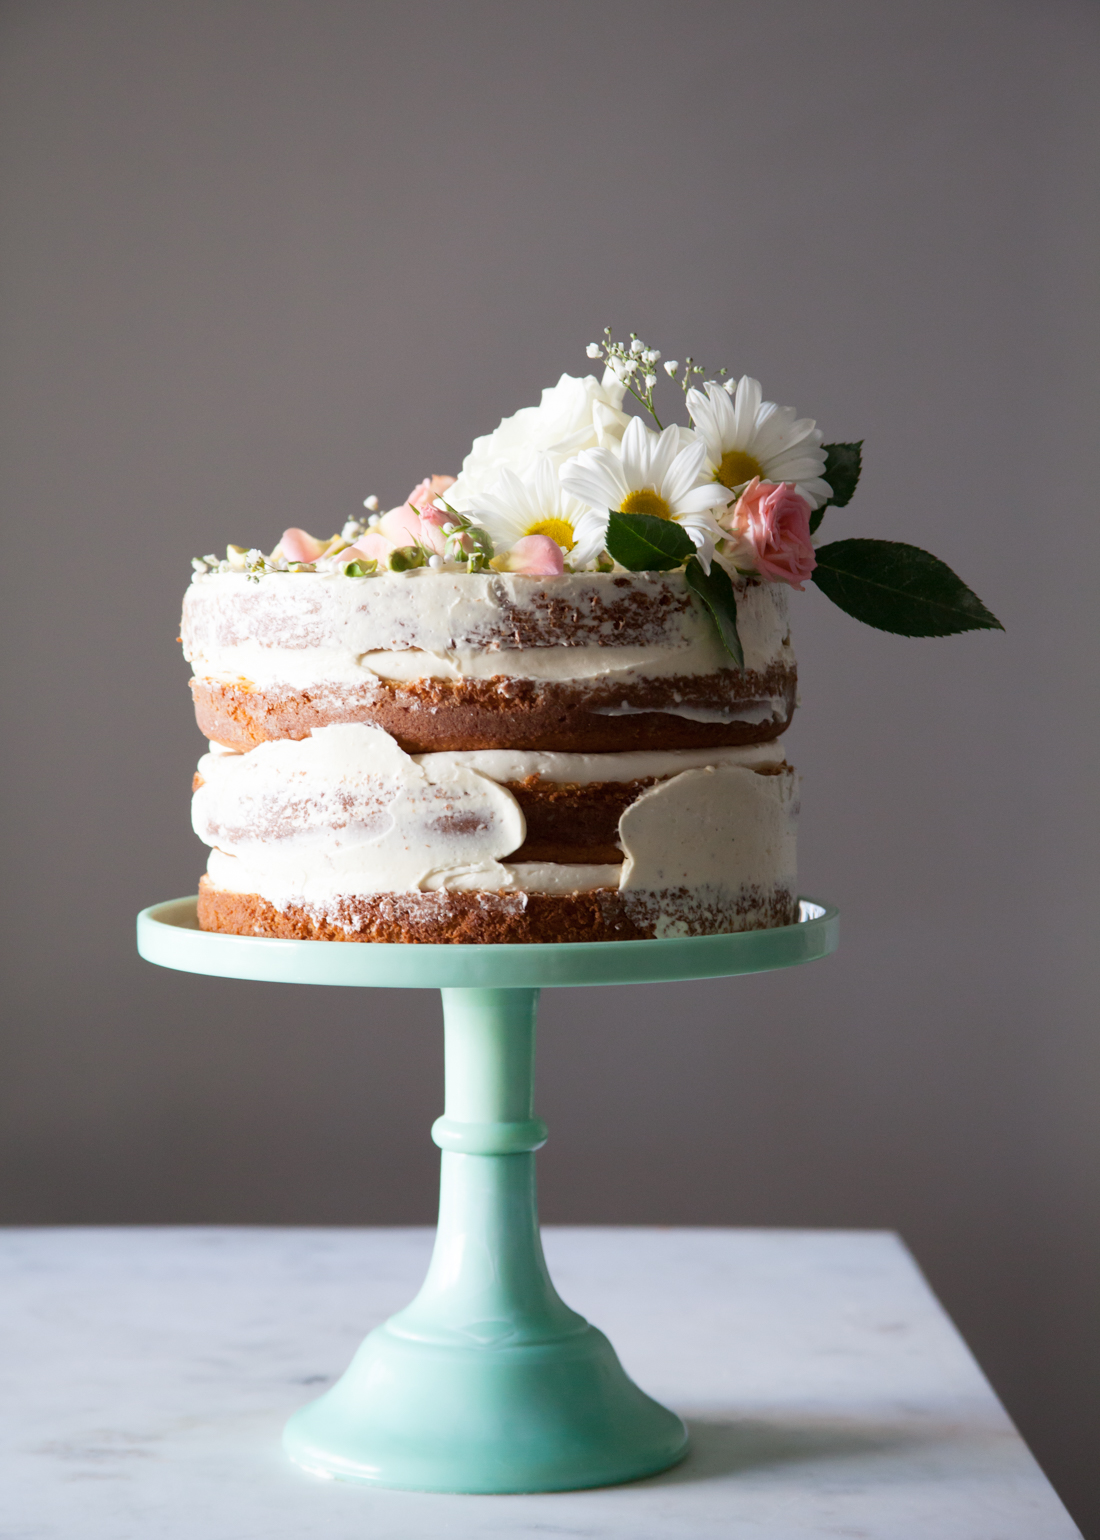
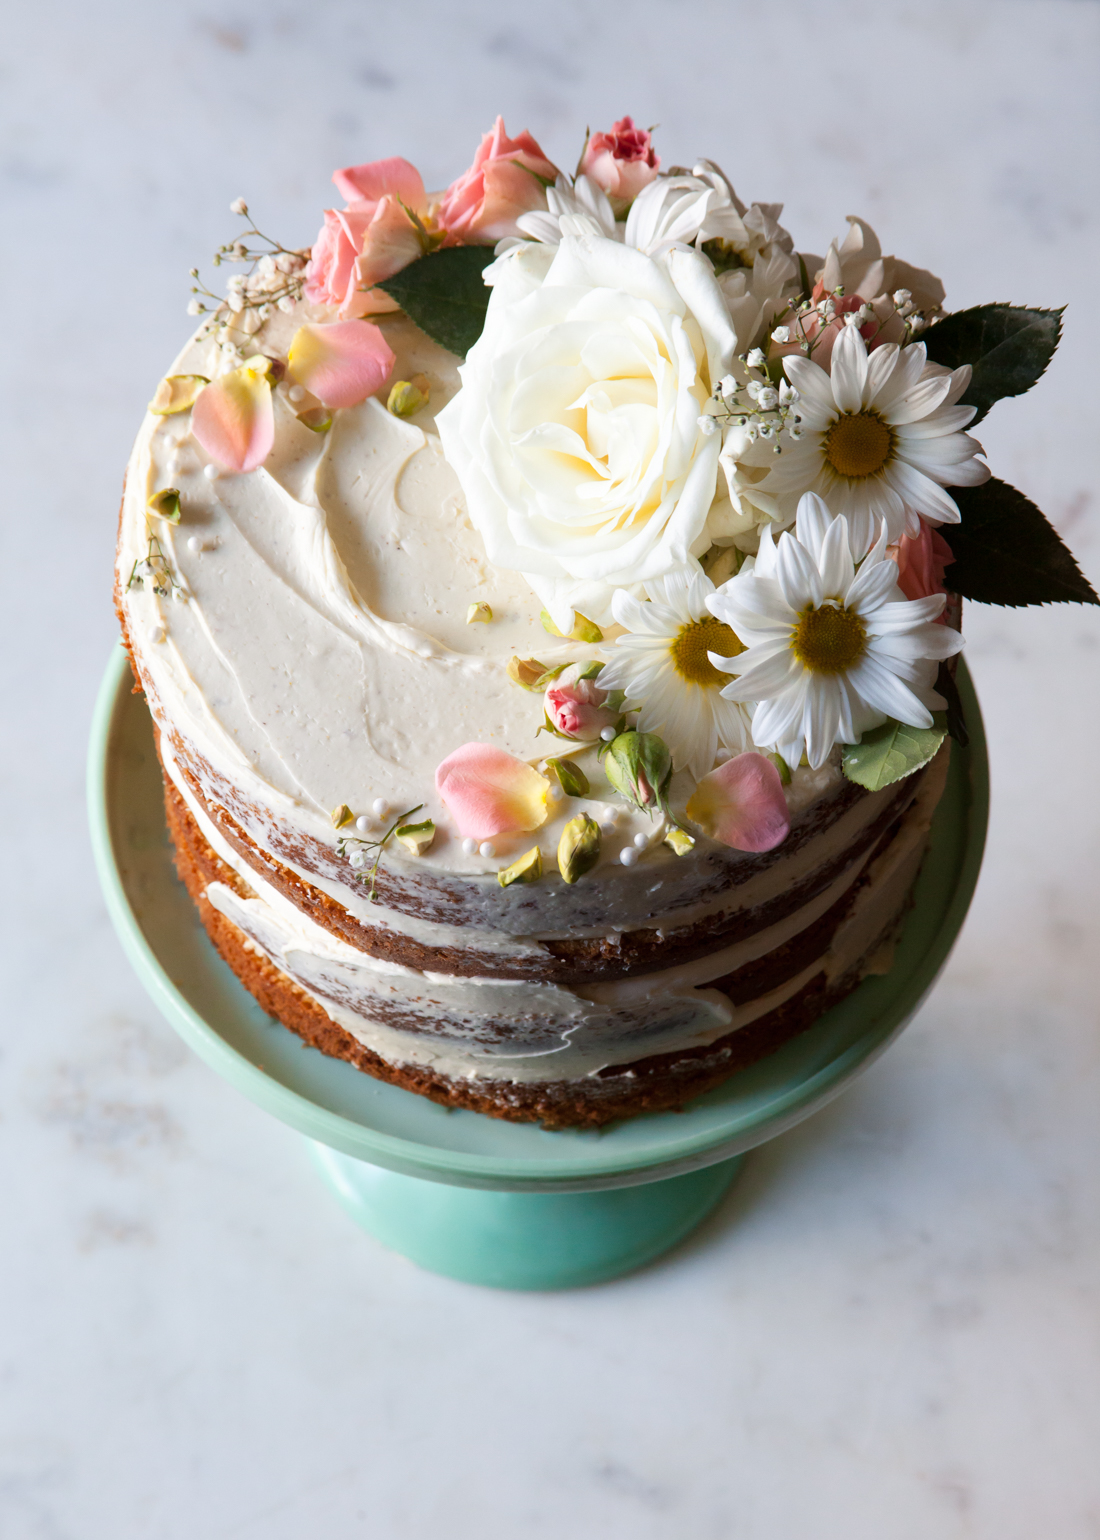
Decoration
Dressing up a naked cake is by far my favorite part. It's a time to get creative and let your inner artist out. I like to have various options for decorating at the ready, then just create as I go. I try to give a hint at some of the flavors that are inside the cake, while at other times I just let loose and throw on whatever I think looks pretty and whimsical (that's about as crazy as cake decorating gets sometimes, haha!).
Some of my favorite decorations include:
- fresh flowers and herbs
- sprinkles and sugar pearls
- mini meringue kisses
- nuts and spices
- chocolate (shards, curls and bark)
- candy
- macarons
- candied citrus
Seriously, there are so many options!
Lately, I'm really digging a crescent of adornments - meaning my decorative elements are arranged in a moon-shape around the top of my cake. I like using the smaller elements to help tapper of the design at the ends. Of course your can centralize your decor in the center, around the top edge, or just anywhere!
Storage
Frosting helps to prevent a cake from drying out too quickly, especially in the refrigerator. Without the thick layer of frosting to help seal in the moisture of the cake, naked cakes are more susceptible to drying out too quickly. That being said, a naked cake should be assembled the day it is being served. To save time, the cake and filling may be made and stored separately a couple days in advanced. For leftovers, I typically chill a cake (unwrapped) for about 2o minutes to set, then gently wrap in plastic wrap. Placing a piece of plastic wrap or parchment paper directly on the inside surface of a cut cake helps too.
Prefer your cakes full dressed? Check out my tutorial on
<a href="http://www.bloglovin.com/blog/9675189/?claim=mthmm6v3dyp">Follow my blog with Bloglovin</a>
Jessica Manis
This looks wonderful. I'm wanting to try this, so these tips are so helpful!
Eneida Mason
Hi, I was wondering if you knew, If I needed to box this cake 6 inch, What size would I need?
Thanks
Eneida