Let's get back to basics and down to business here. Smoothly iced and structurally sound cakes are the building blocks of almost all decorative cakes. I am happy to share my years of experience and show how to ice a cake. Using the following tips and tricks, you will be well on your to creating a variety of designs. Today, I will be working with Swiss Meringue Buttercream. The same techniques will apply when using fudge, ganache, cream cheese, and any other meringue-based buttercream. You Will Need:
– Even layer cake rounds – 1 batch buttercream or desired frosting – Filling of your choice – Pastry bag and large piping tip – Turn table – Large and small off-set spatulas – Straight edged icing smoother or bench scraper
1) Prepare your pastry bag and fit it with a large, round piping tip. Fill your bag with your choice of frosting- not your filling. Prepare cakes and place the bottom of your first cake down on a cake board or turn-table. Pipe a ring of icing around the edge. Try to make the height of the ring match the width of your piping tip (about ½"), letting the icing fall instead of squishing it down. You will be creating an icing dam to hold in your filling.
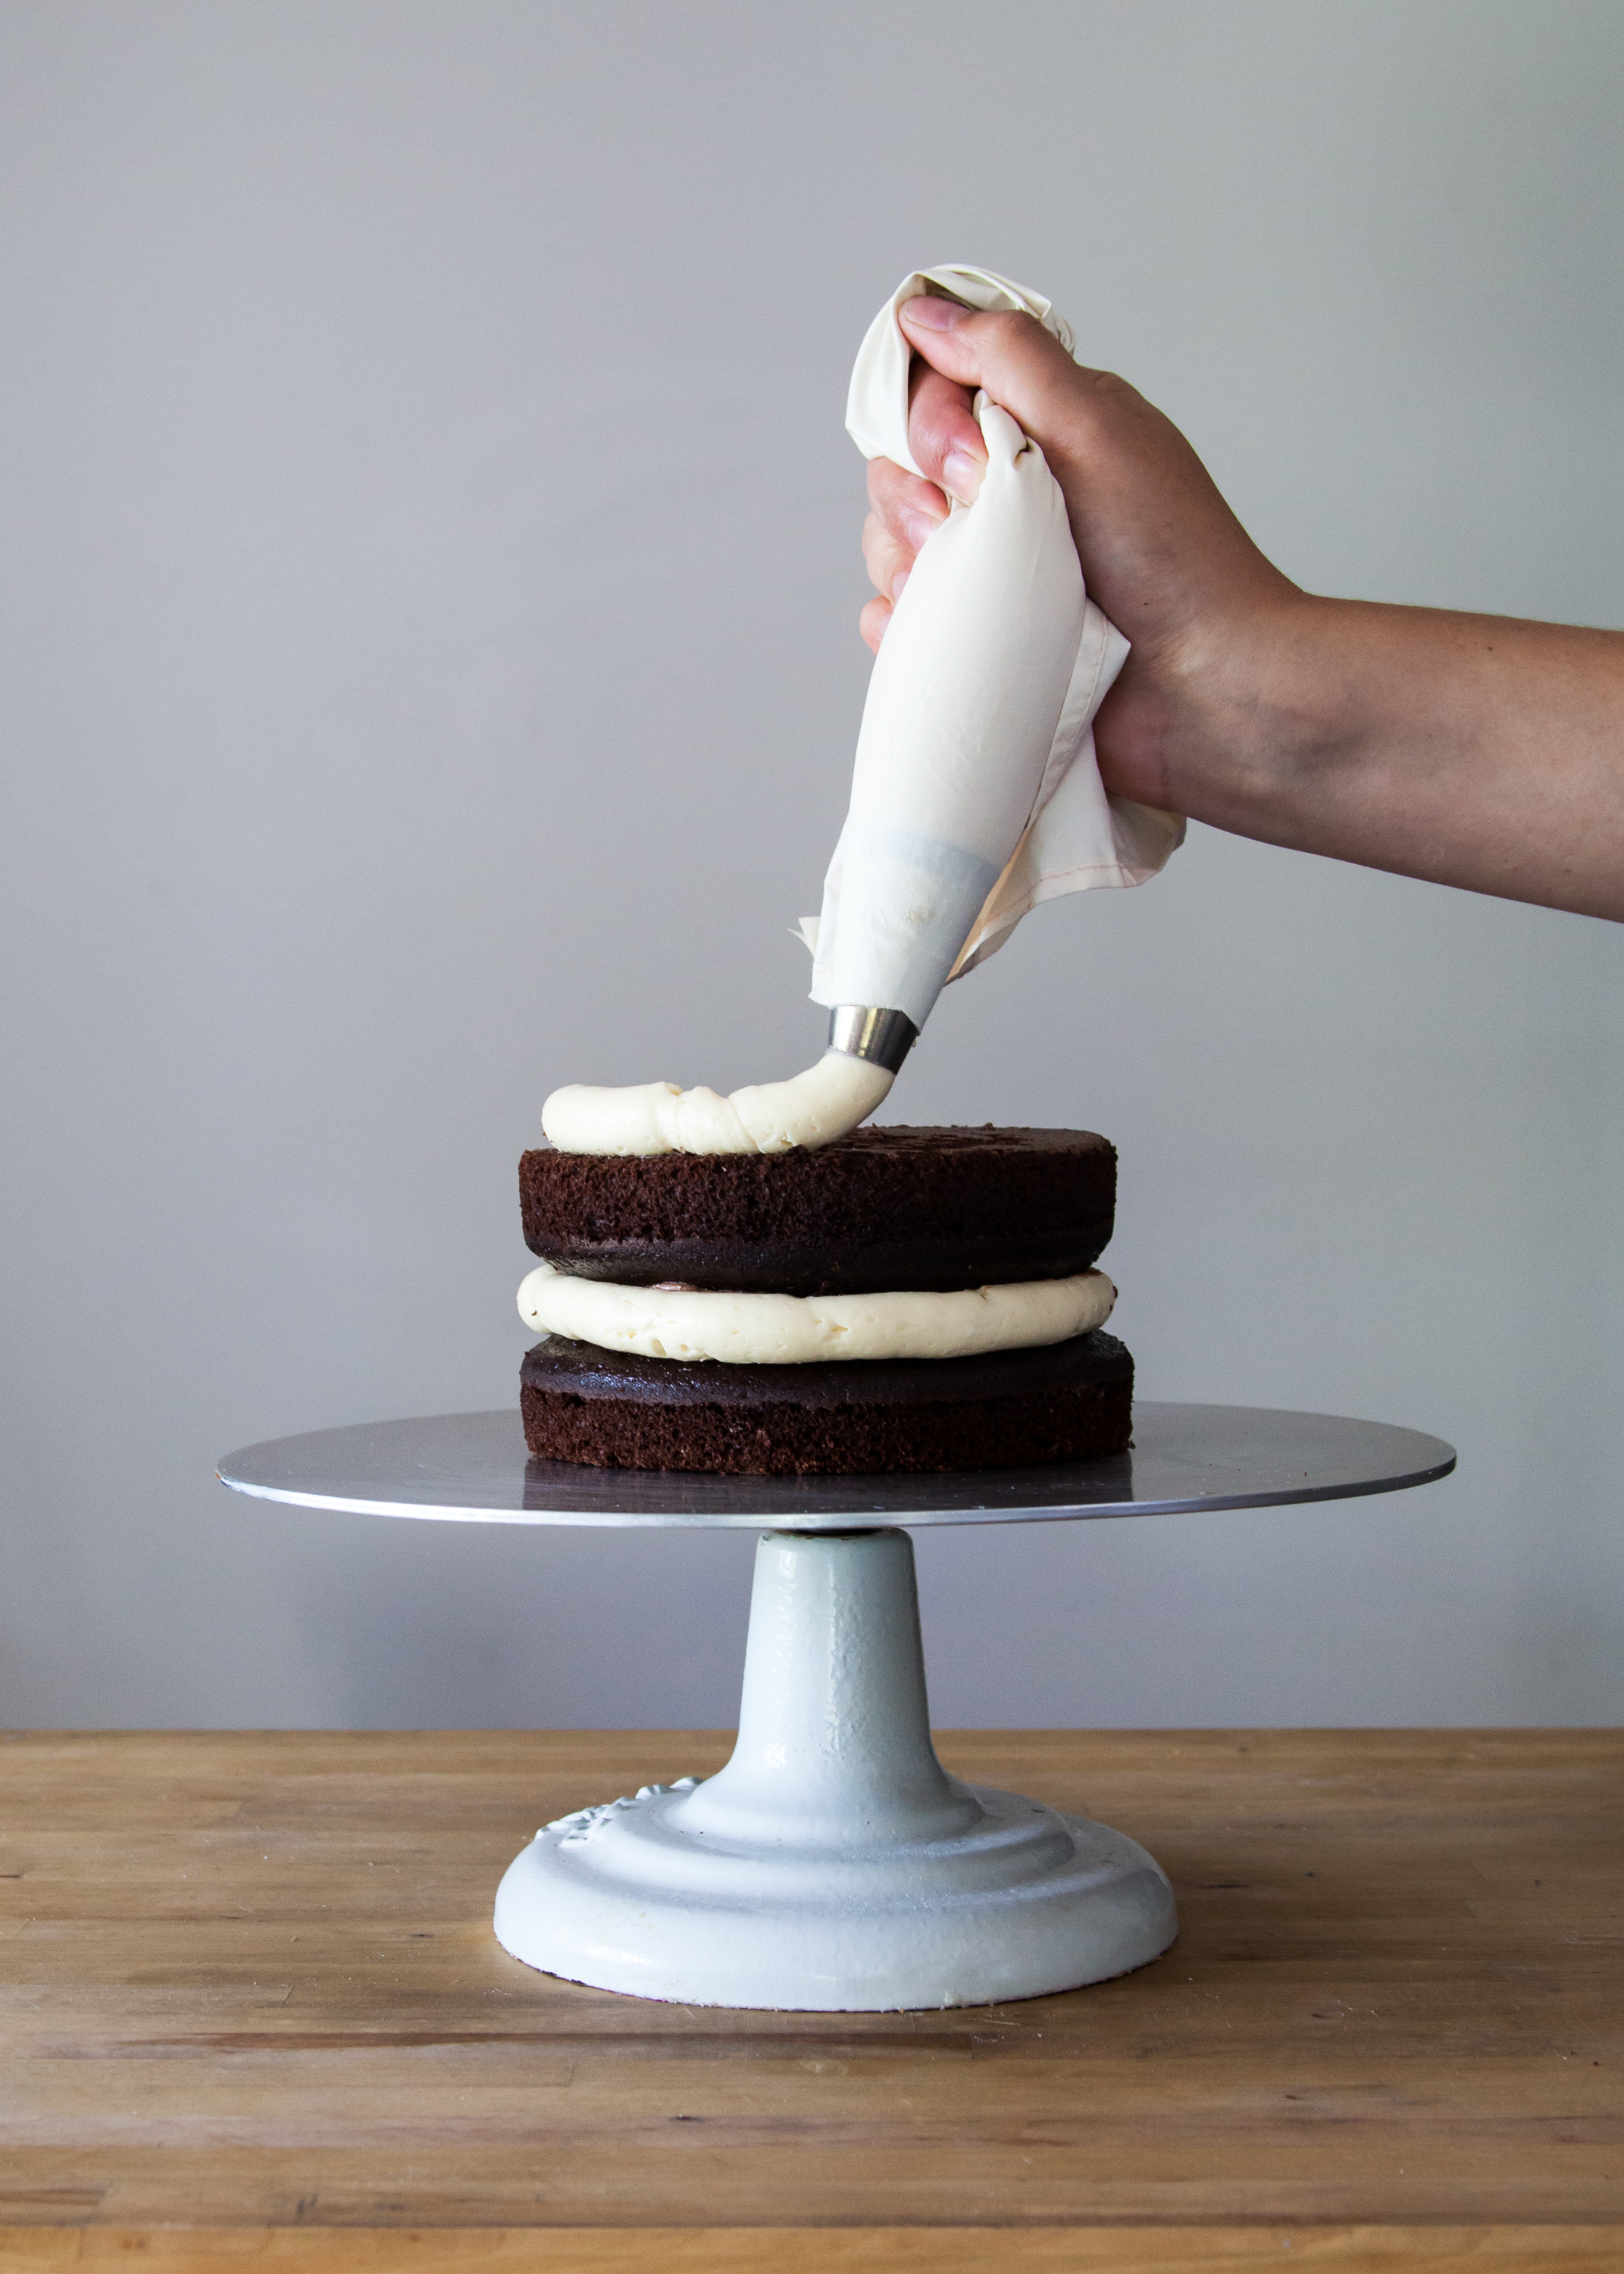
2) Fill your icing dam with your desired filling. The icing dam will keep the filling from escaping out between the layers of cake and interfering with your icing. This way, we are able to use non-buttercream filling like curds and custards.
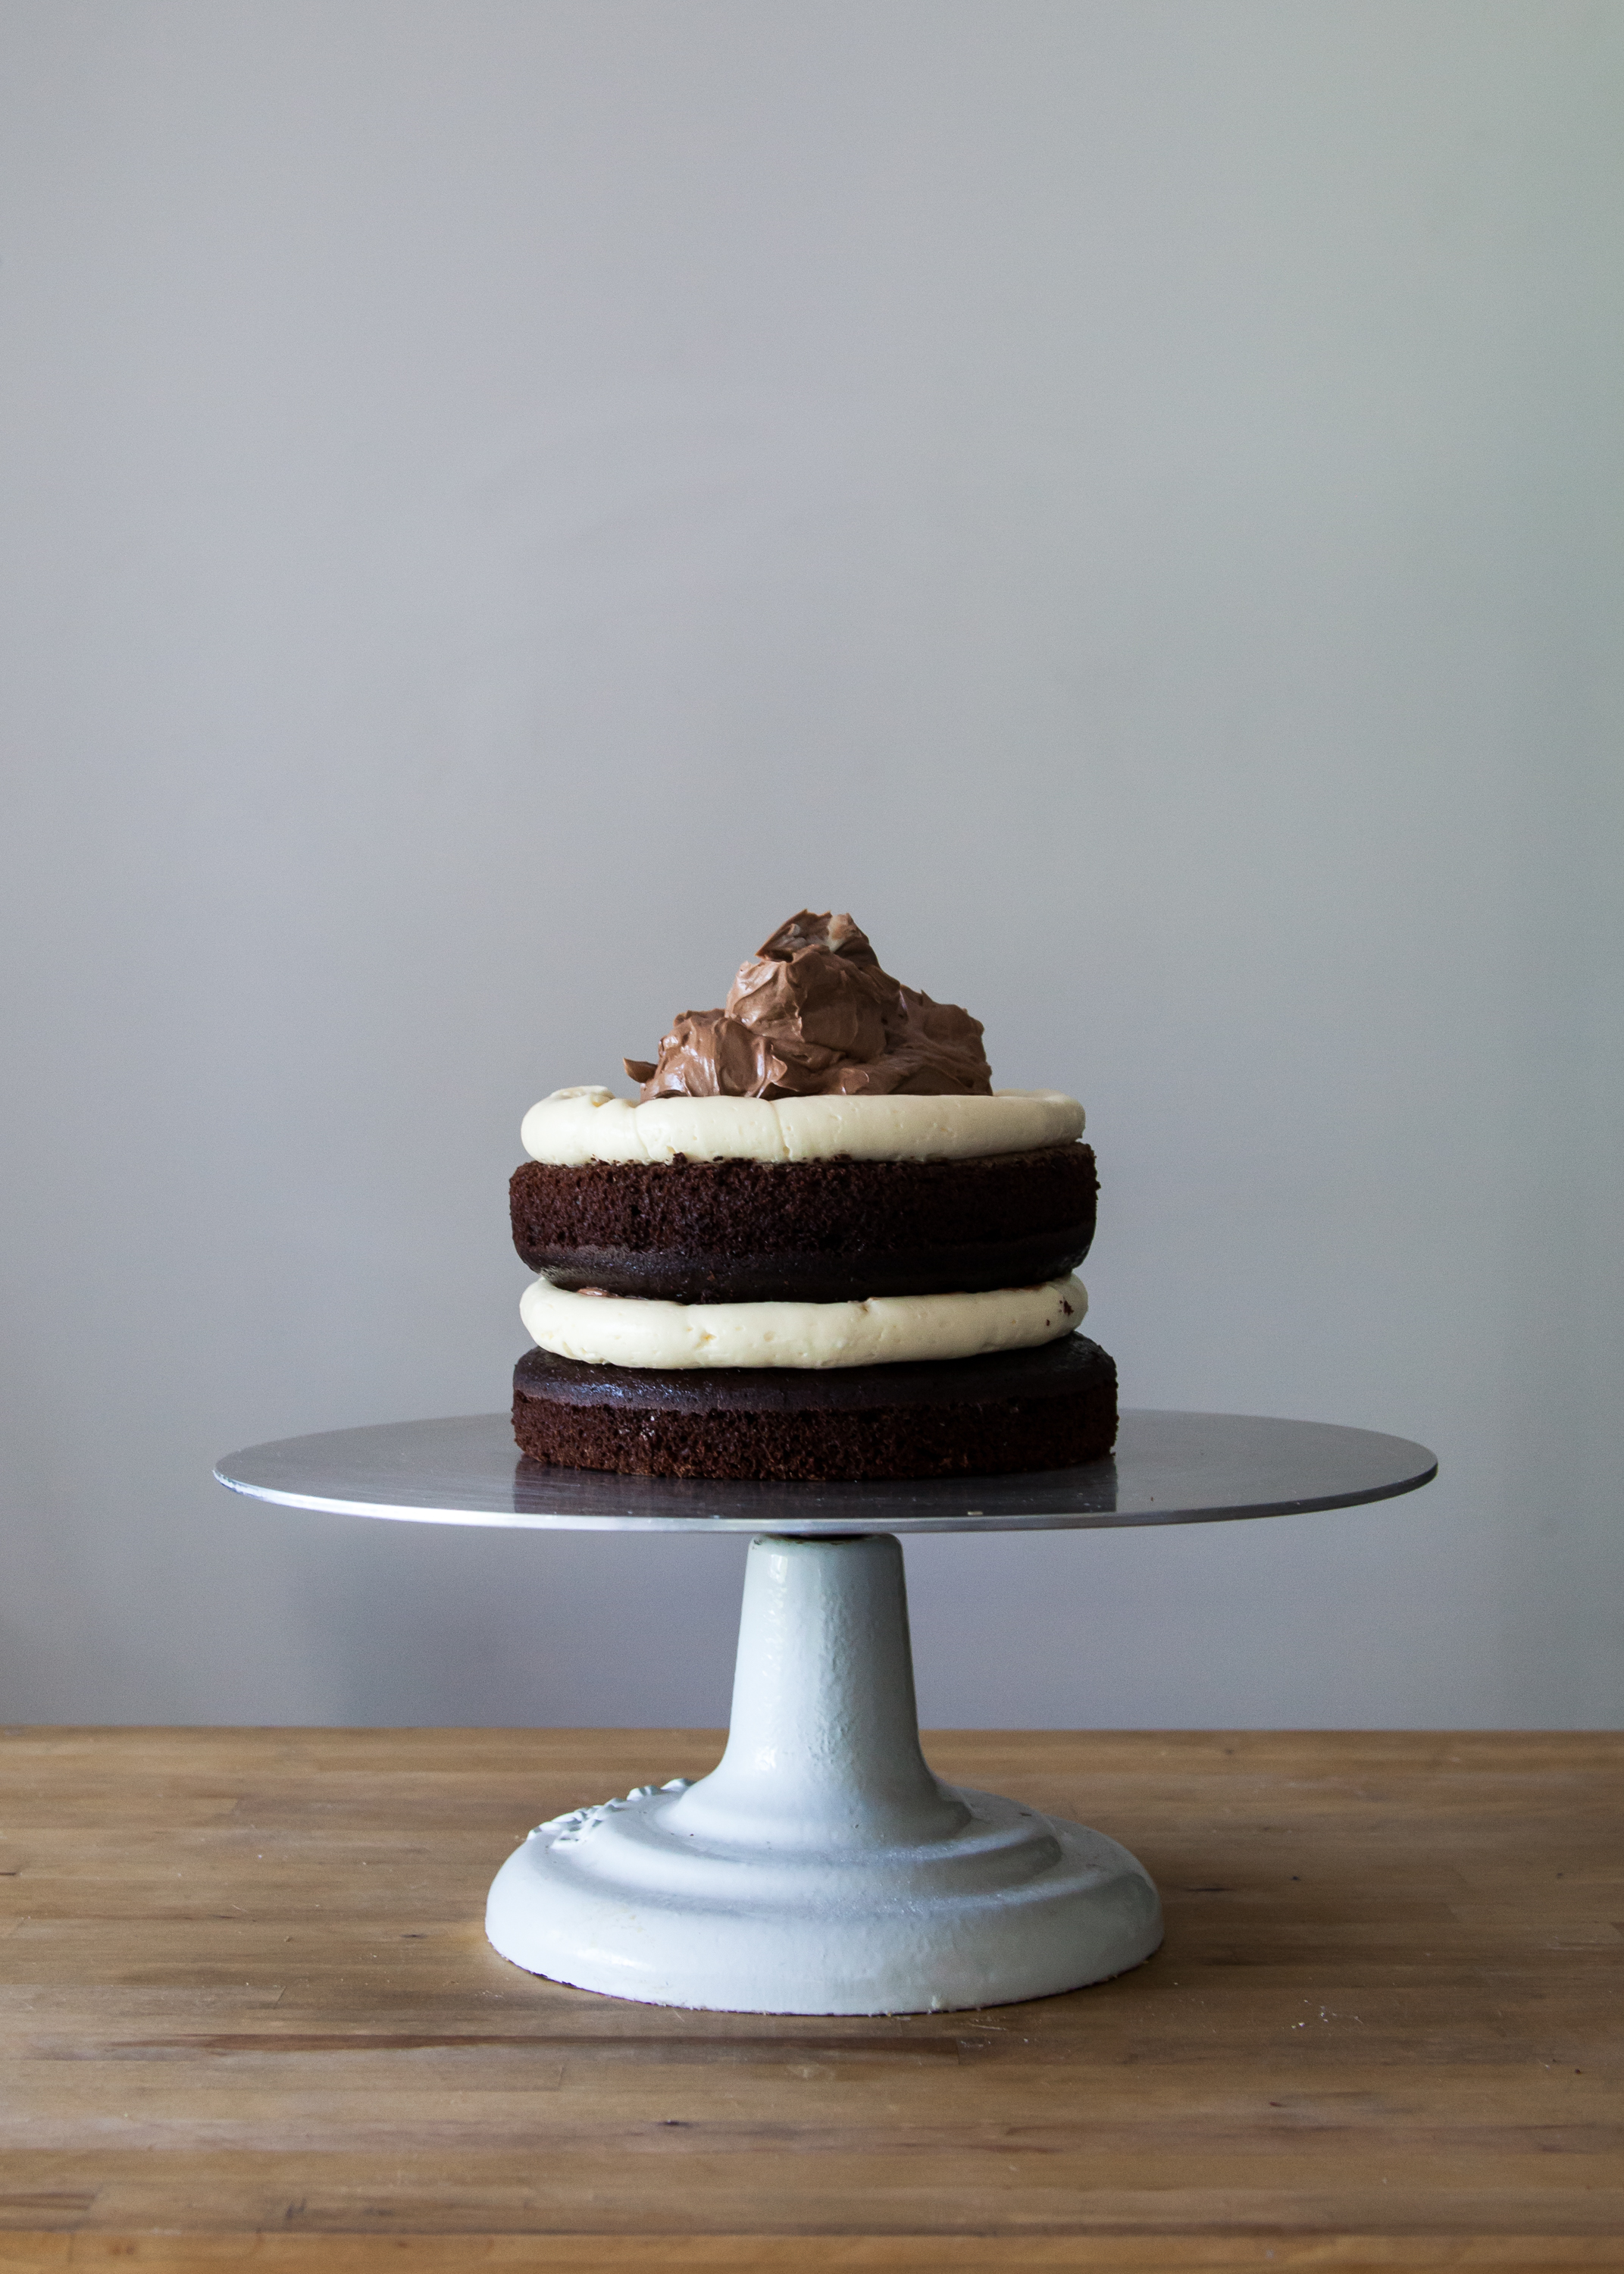
3) Place the top layer upside-down on the last layer of filling. The bottom of the cake should be facing up. Press snuggly, but not hard enough to squish the cake or filling.
4) Using an off-set spatula, start applying icing to the sides of your cake. This cake is only a 6" round, so I found it easier to use a small off-set spatula.
Start by working with only a small amount of icing at a time. It will be easier to control and make for a cleaner, more manageable process.
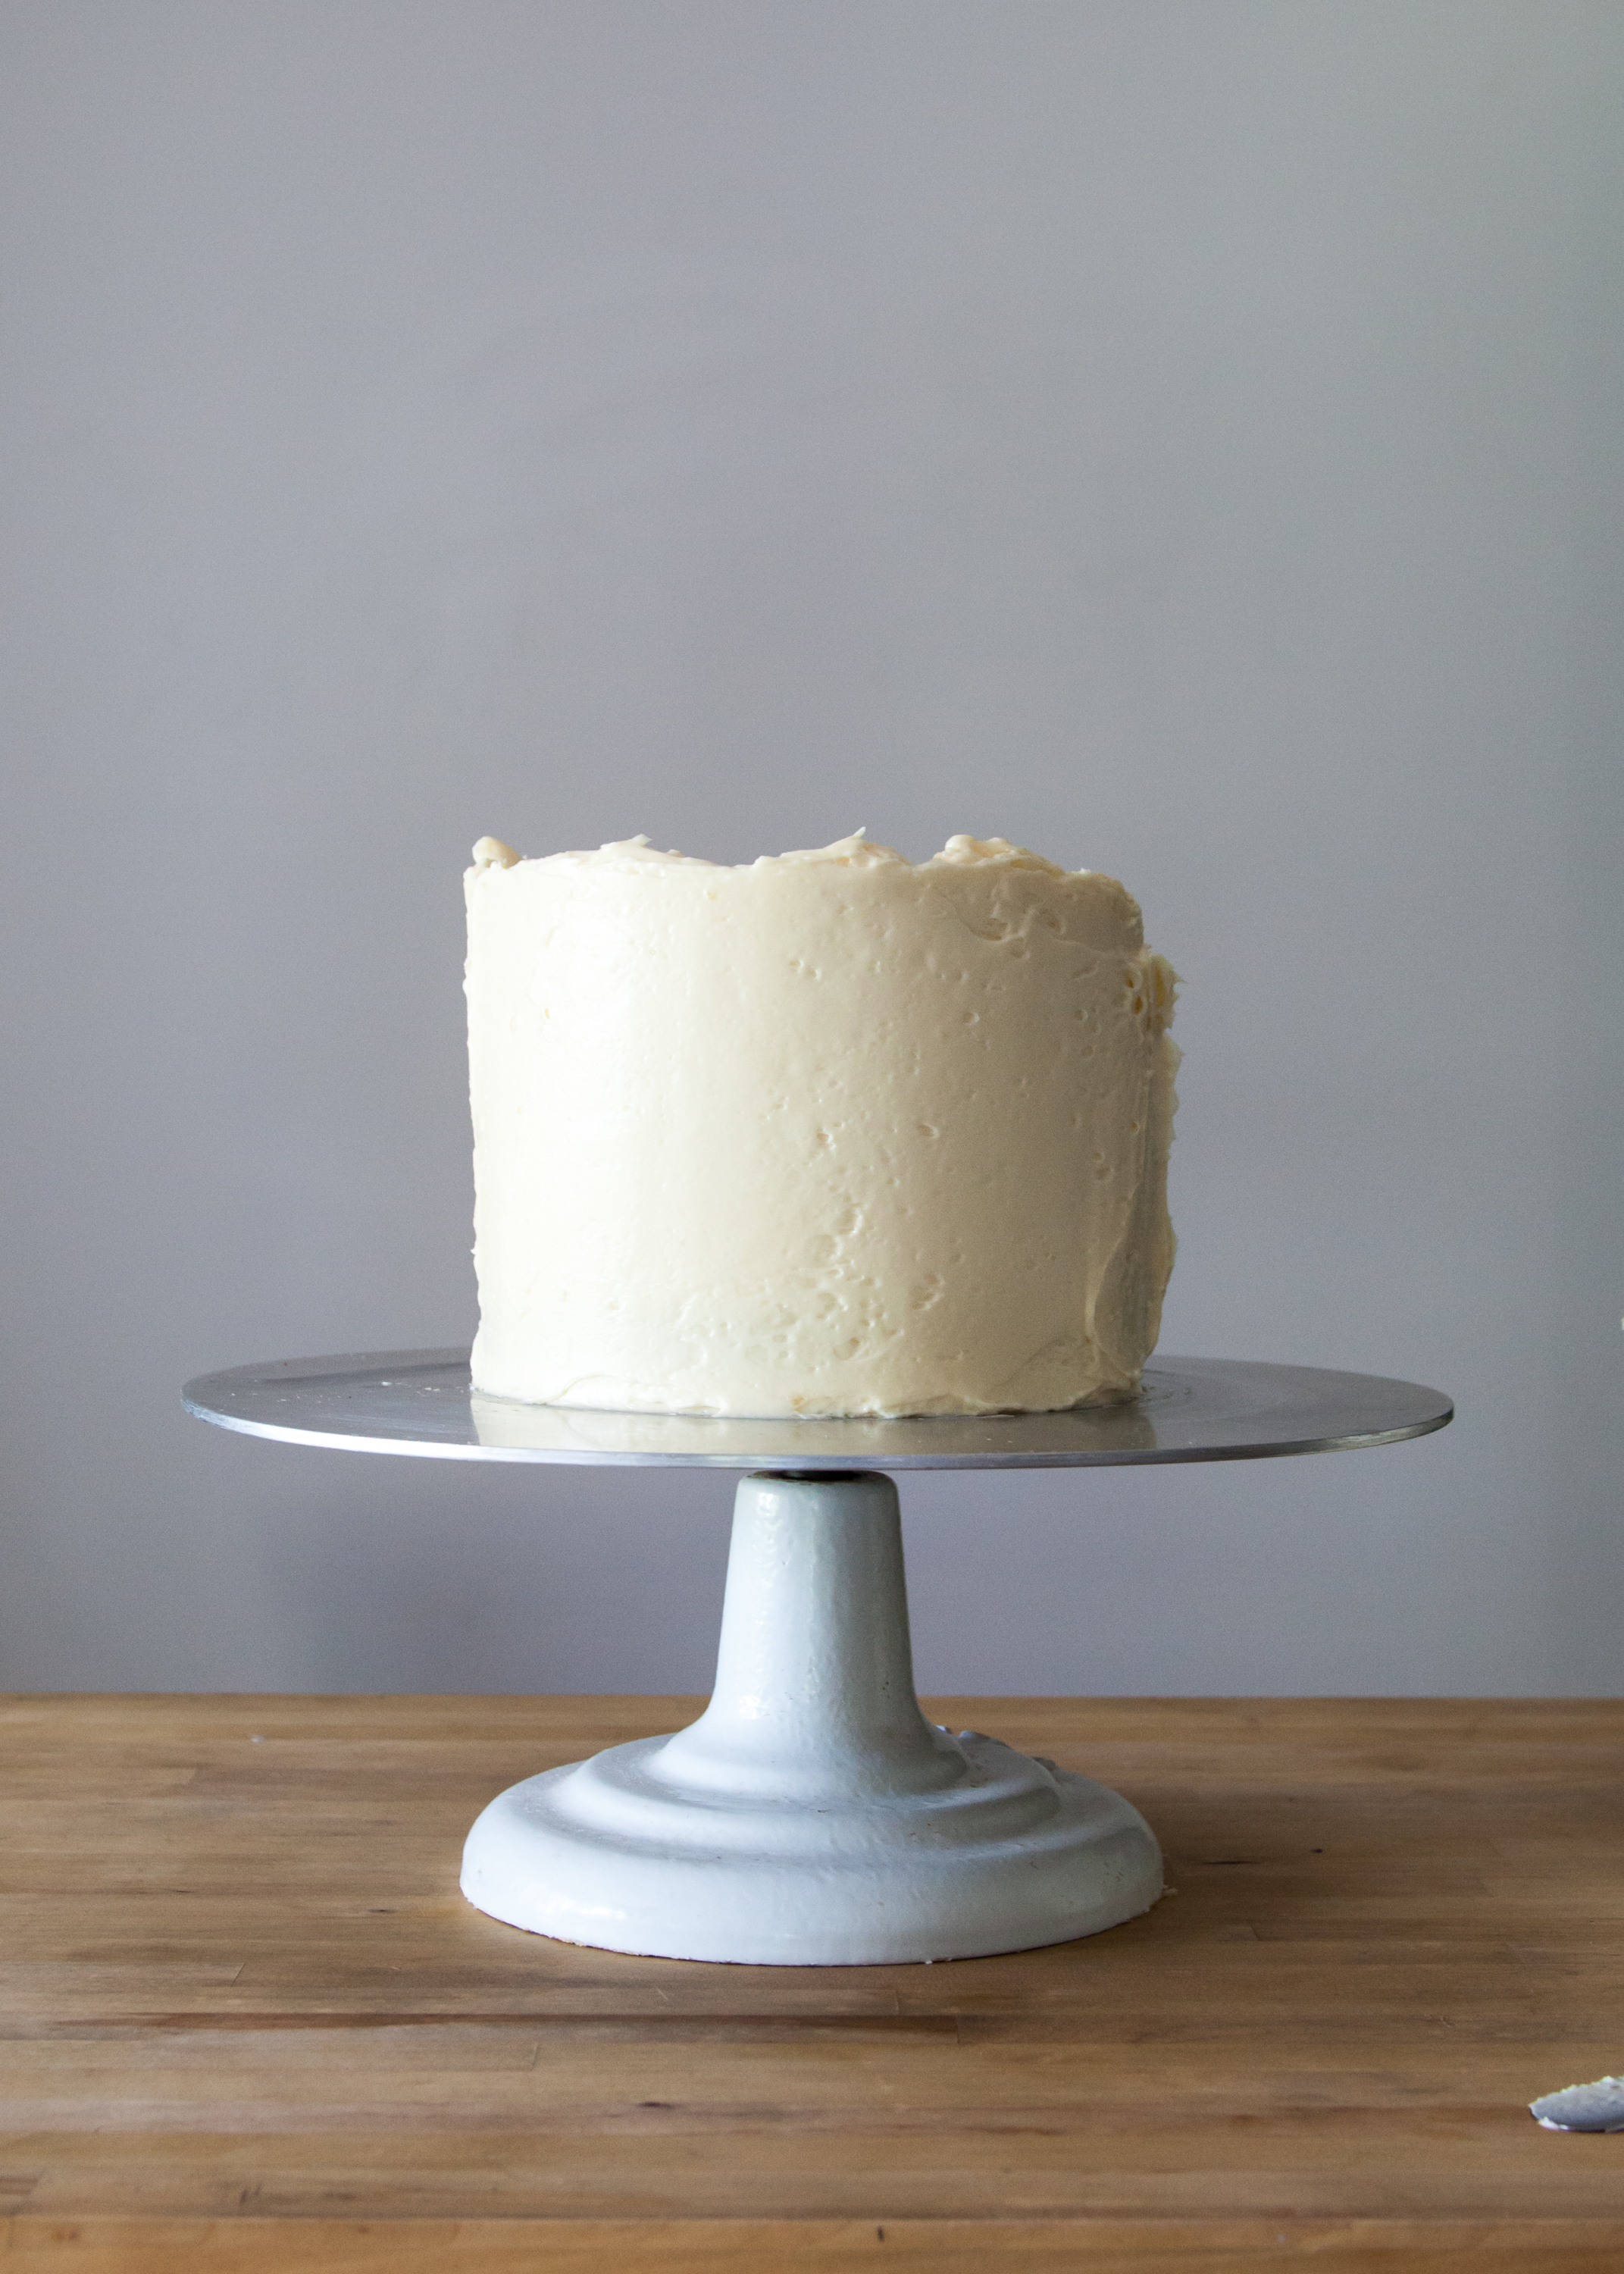
5) Complete your crumb coat, fully covering the sides and top of the cake. The crumb coat is a thin layer of icing that holds in any of the crumbs and keeps them from getting into the outter icing of the cake. Scrape any remaining icing off of your spatula into a separate bowl. This layer does not need to be perfectly smooth.
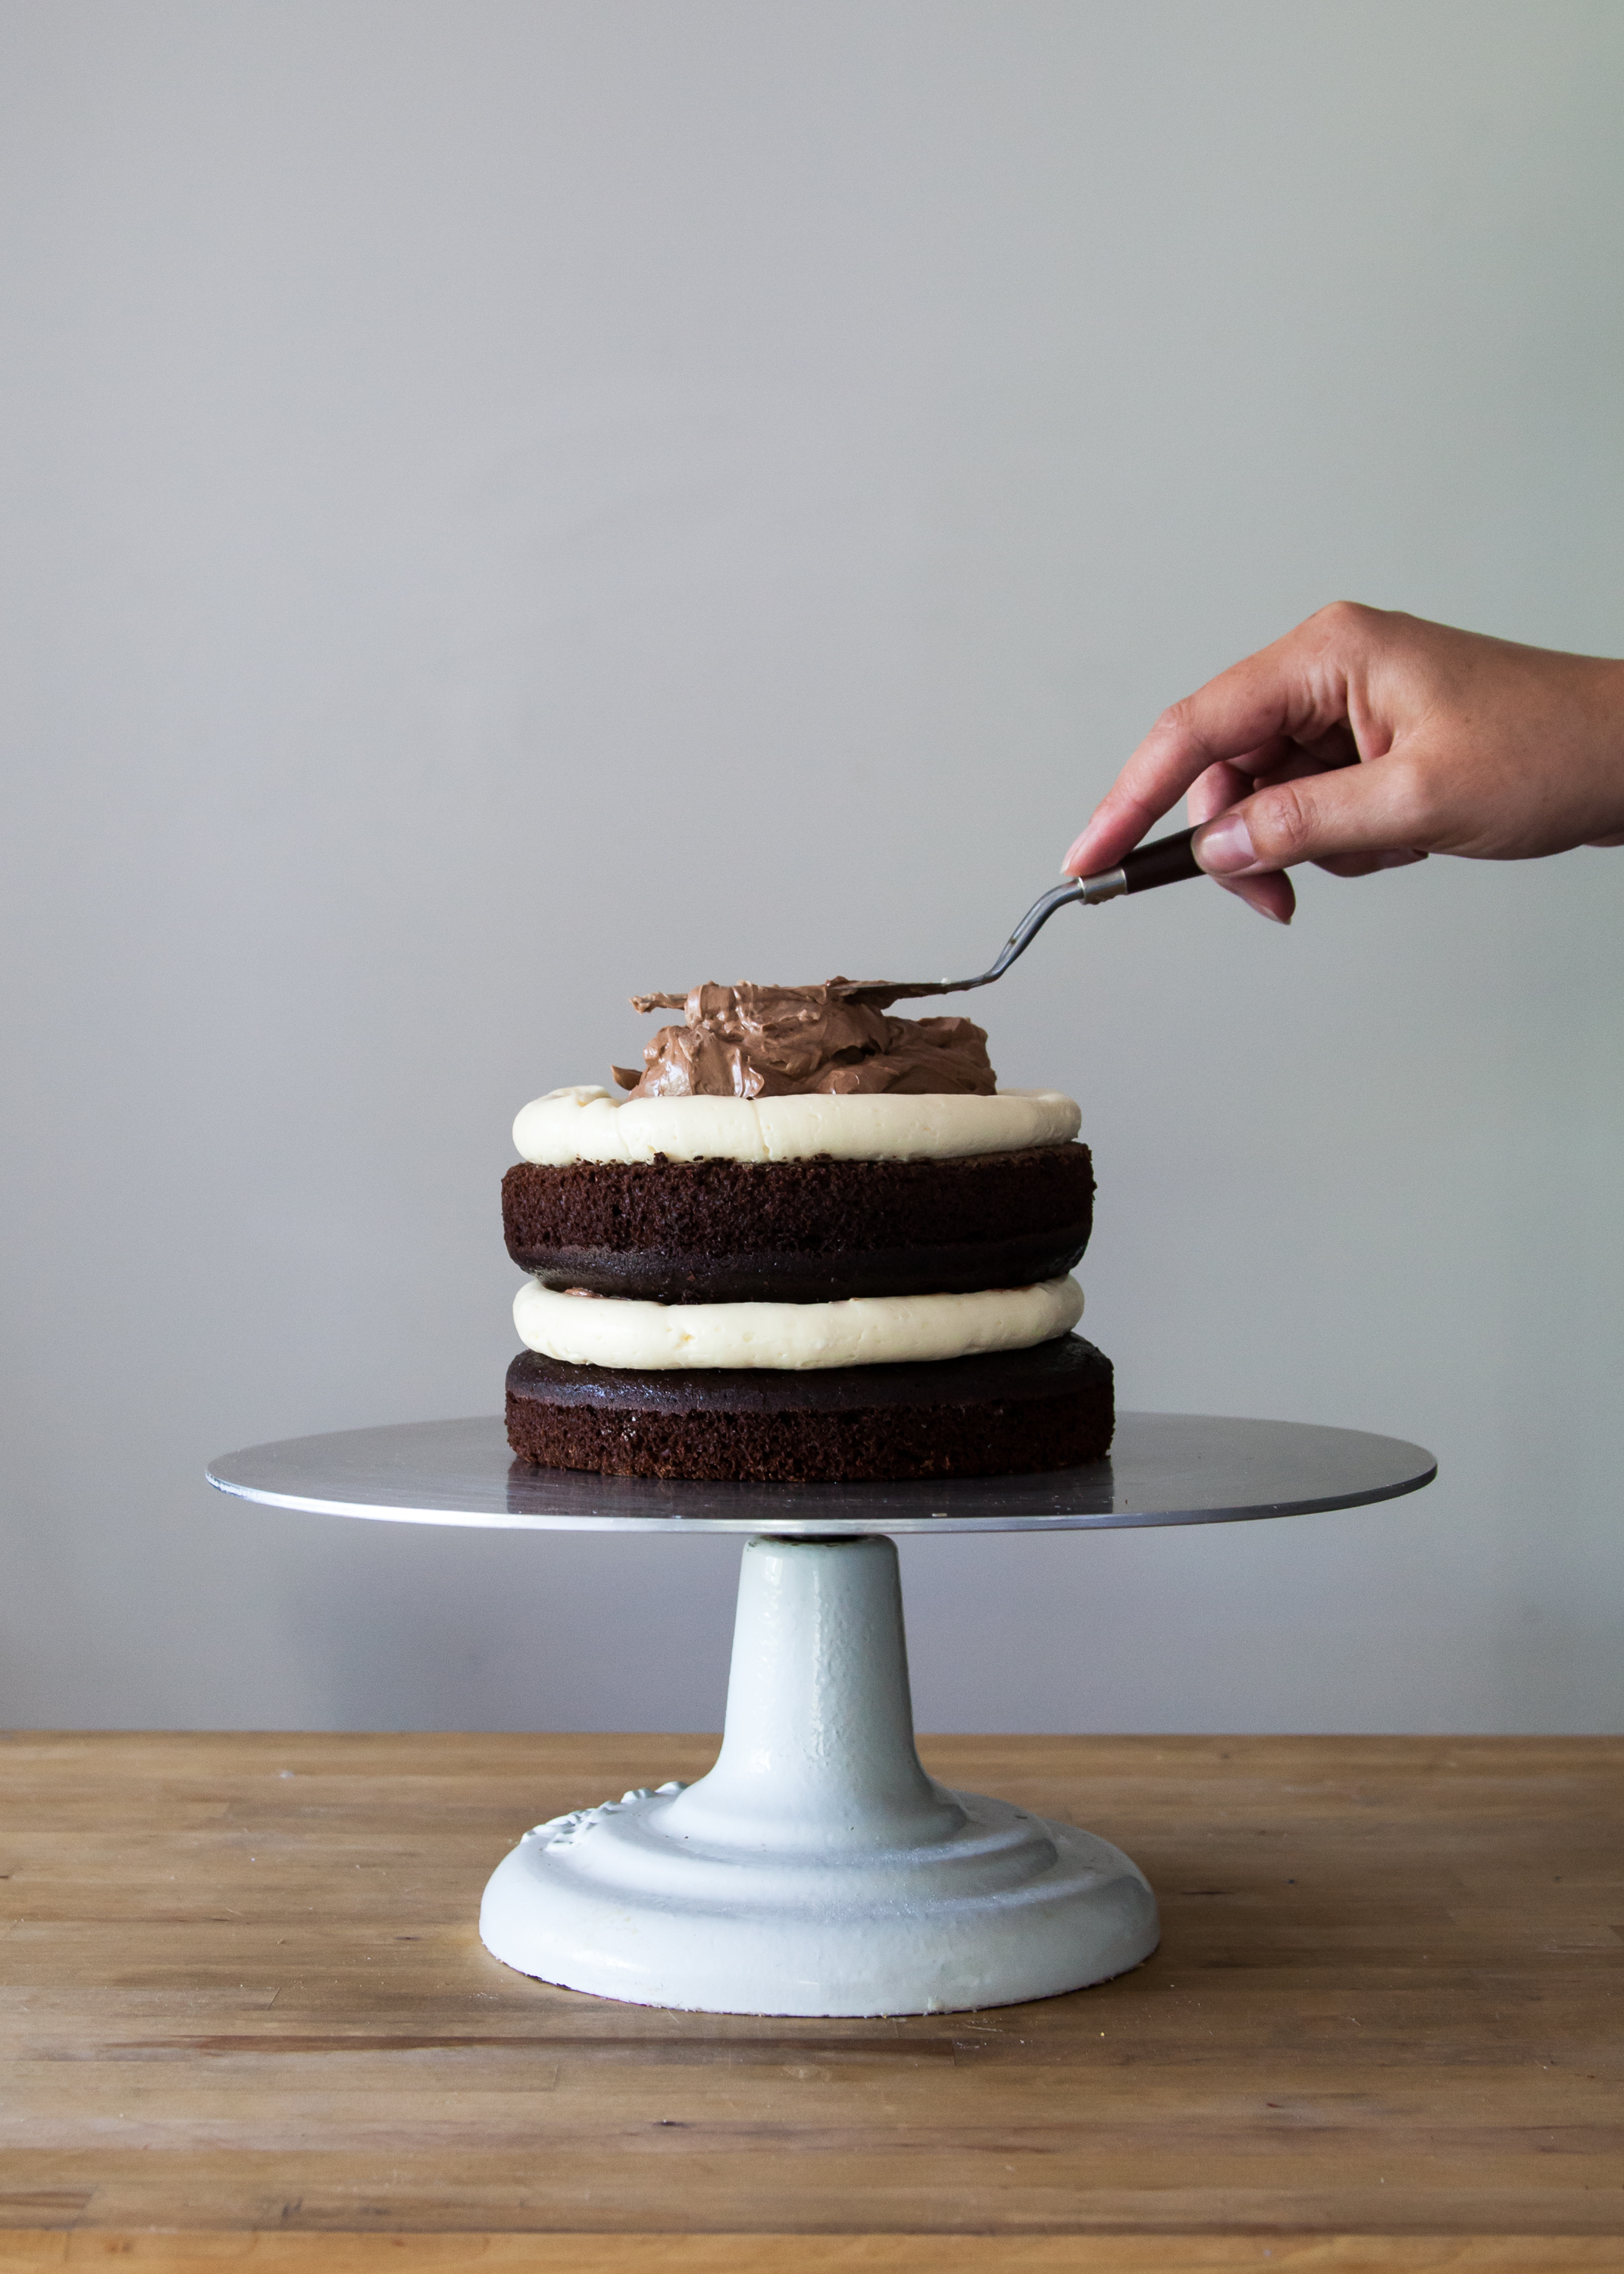
6) Starting with the top of the cake, place a generous portion of icing on top of your crumb coat. Using your off-set spatula (use whatever size feel comfortable), start spreading and flattening the icing on top. Continue by pushing any excess off of the top edge so that it hangs over the sides. Try to use the center of the spatula to direct icing instead of the tip- you will have more control here. Do not focus too much on getting the top perfect, as we will get back to this portion later.
7) Starting with the excess icing from the top, push into the cake and start pulling the icing down the sides of the cake with an off-set spatula.
8) Use the icing that is already on the cakes first, before adding more. You should only use as much icing at a time as you can cleanly handle. Be sure to scrape off your spatula between each addition. Once you finish smoothing the top portion, start on the bottom. You will need to focus on creating an even layer as opposed to a smooth layer first.
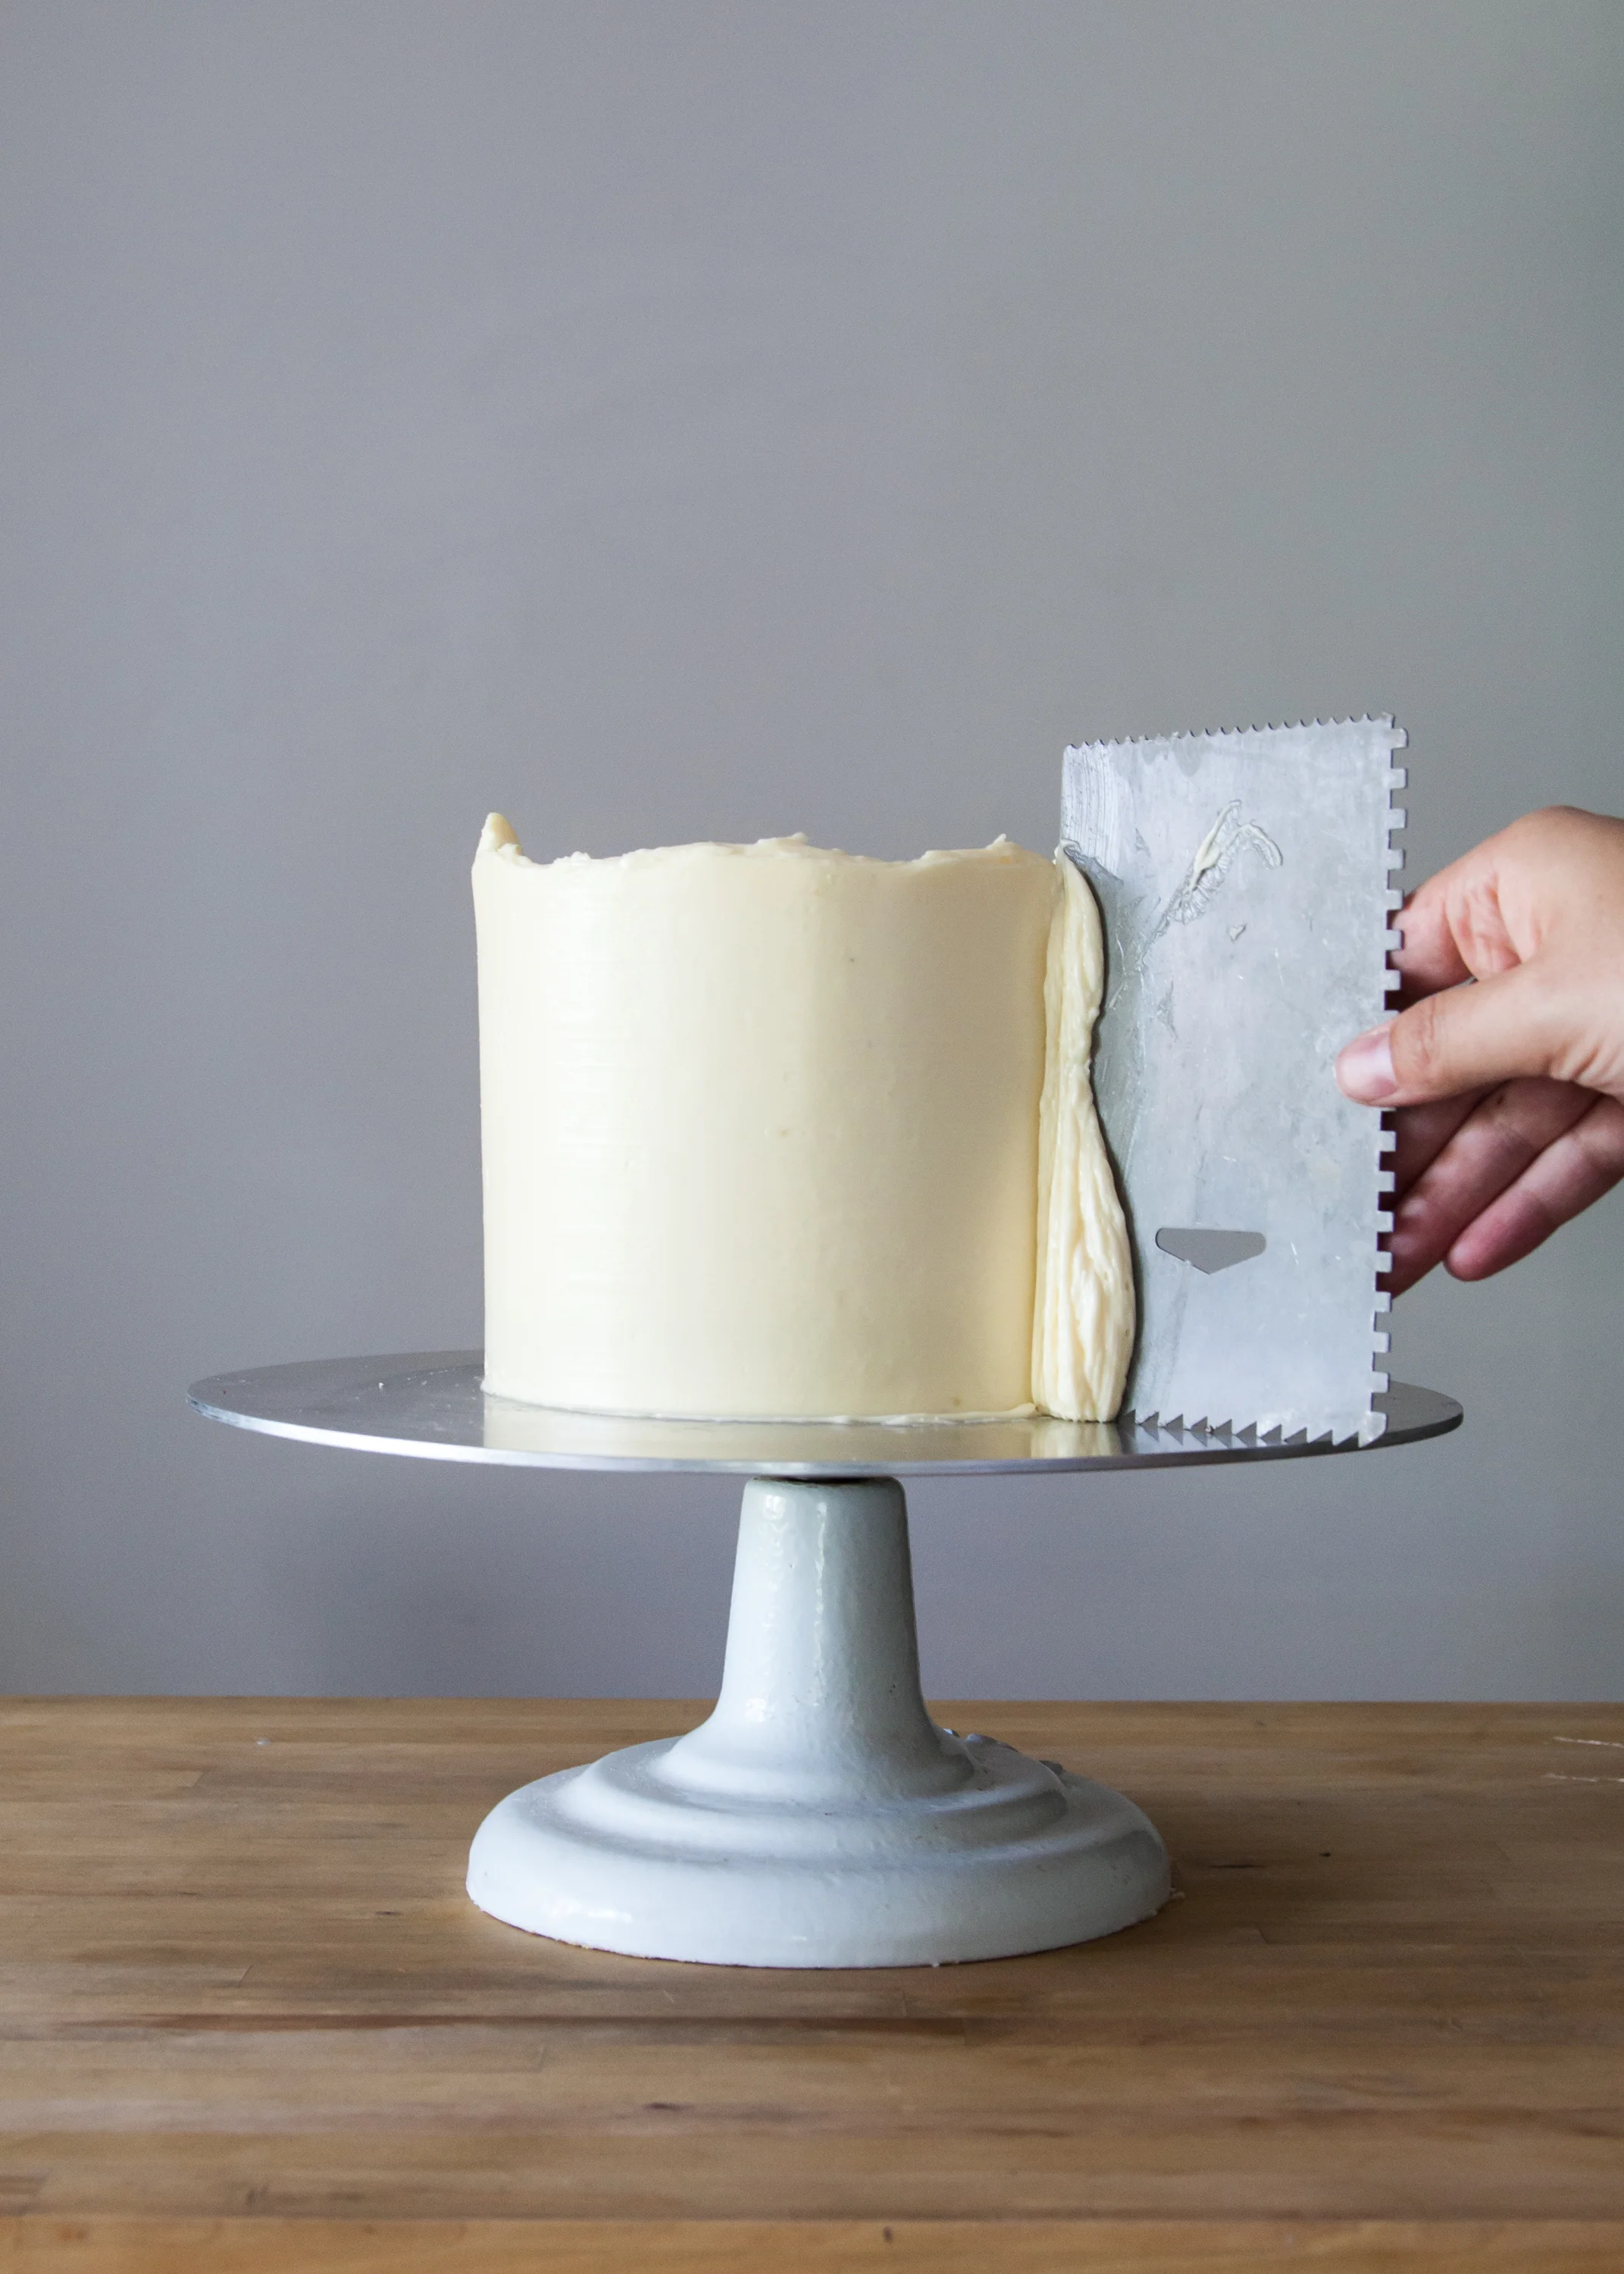
9) After you have applied an even layer of frosting to all of the sides of the cake, take a large spatula to smooth out the icing. Keep the spatula parallel to the cake, and use your turntable to rotate the cake around- taking off and re-applying the icing as you go to create an even more smooth a level surface.
10) Now that we have a clean, even layer of icing, it is time to smooth. Here, we will really put our tools to work. Take your bench scrapper or the smooth side of an icing comb, and place it parallelto the cake. To make sure everything stays level, place one edge on the top of your turntable with the other touching the icing. Adding a little bit of pressure to the scrapper, start to rotate the turntable- not too quick, not too slow. The scrapper will pick up the excess icing and fill in any gaps itself. Add more icing if necessary, and keep smoothing. As you go, be sure to take a step back and see if your sides are even. Adjust icing and scrapper accordingly.
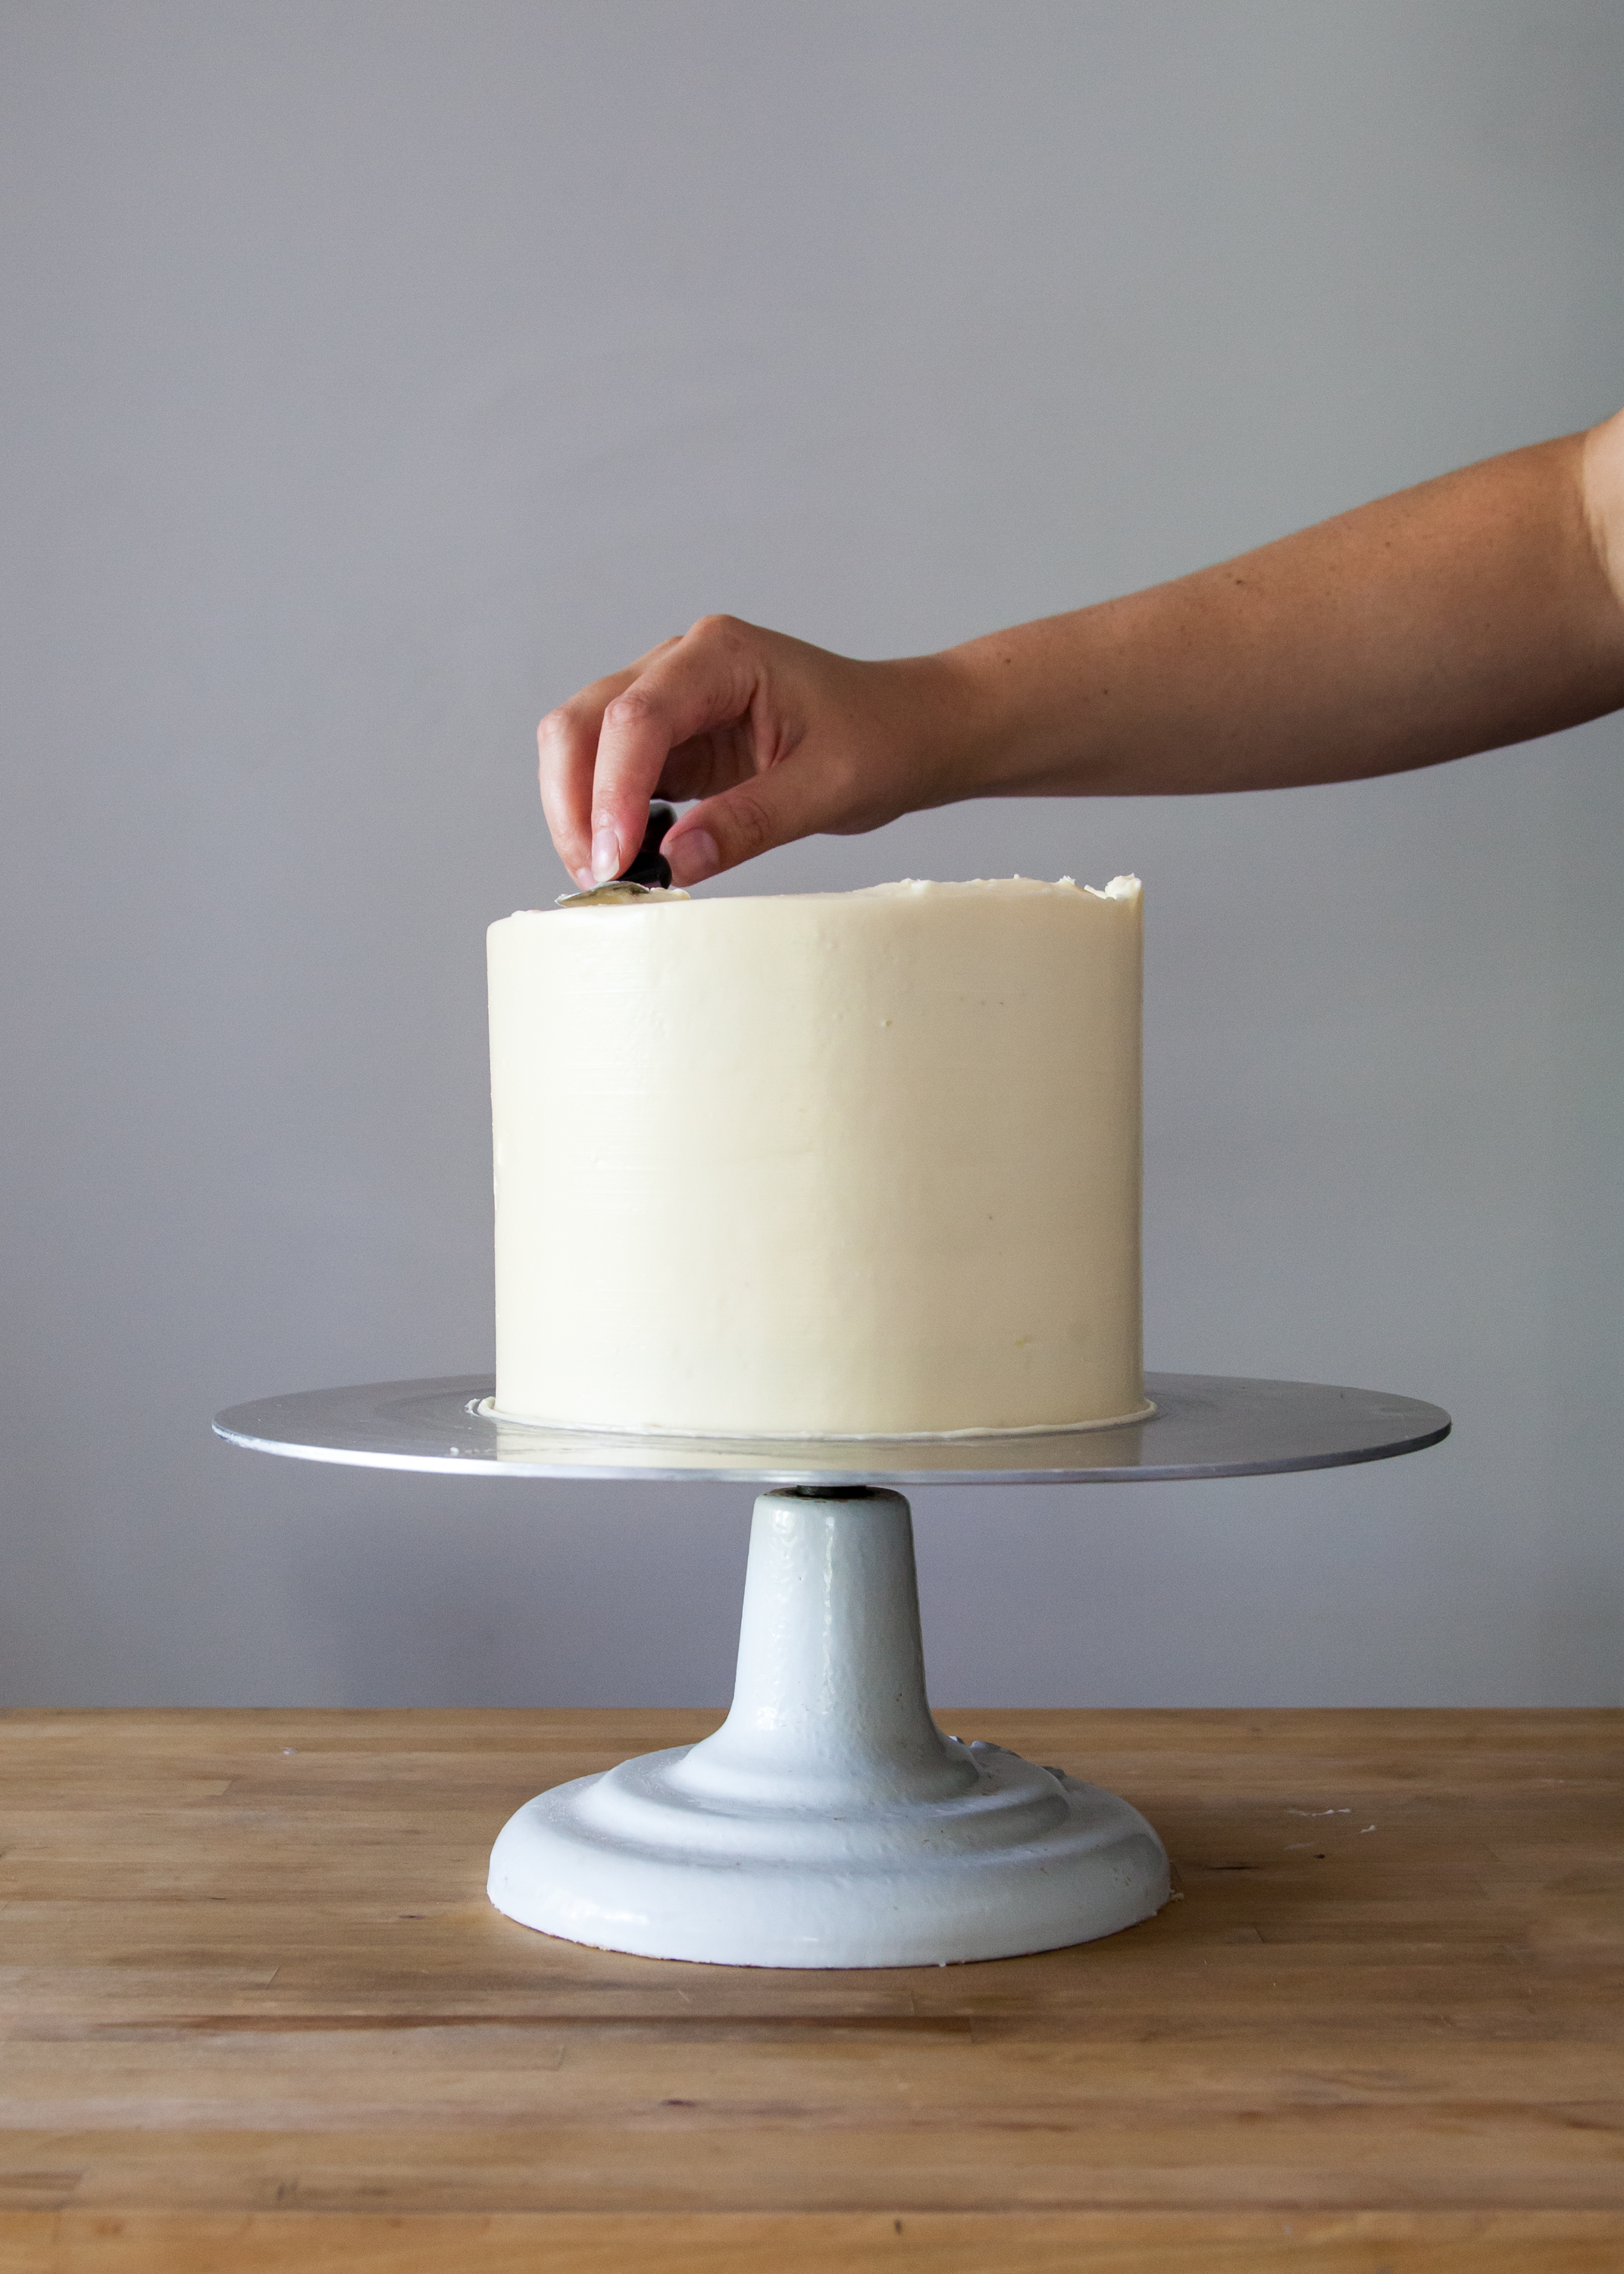
11) Once you have smoothed out the sides, some of the icing will have been pushed up back towards the top of the cake.
12) Using your off-set spatula, carefully pull the icing with the back edge of the spatula towards the center of the cake. Continue around the edges of the cake, cleaning the spatula in between.
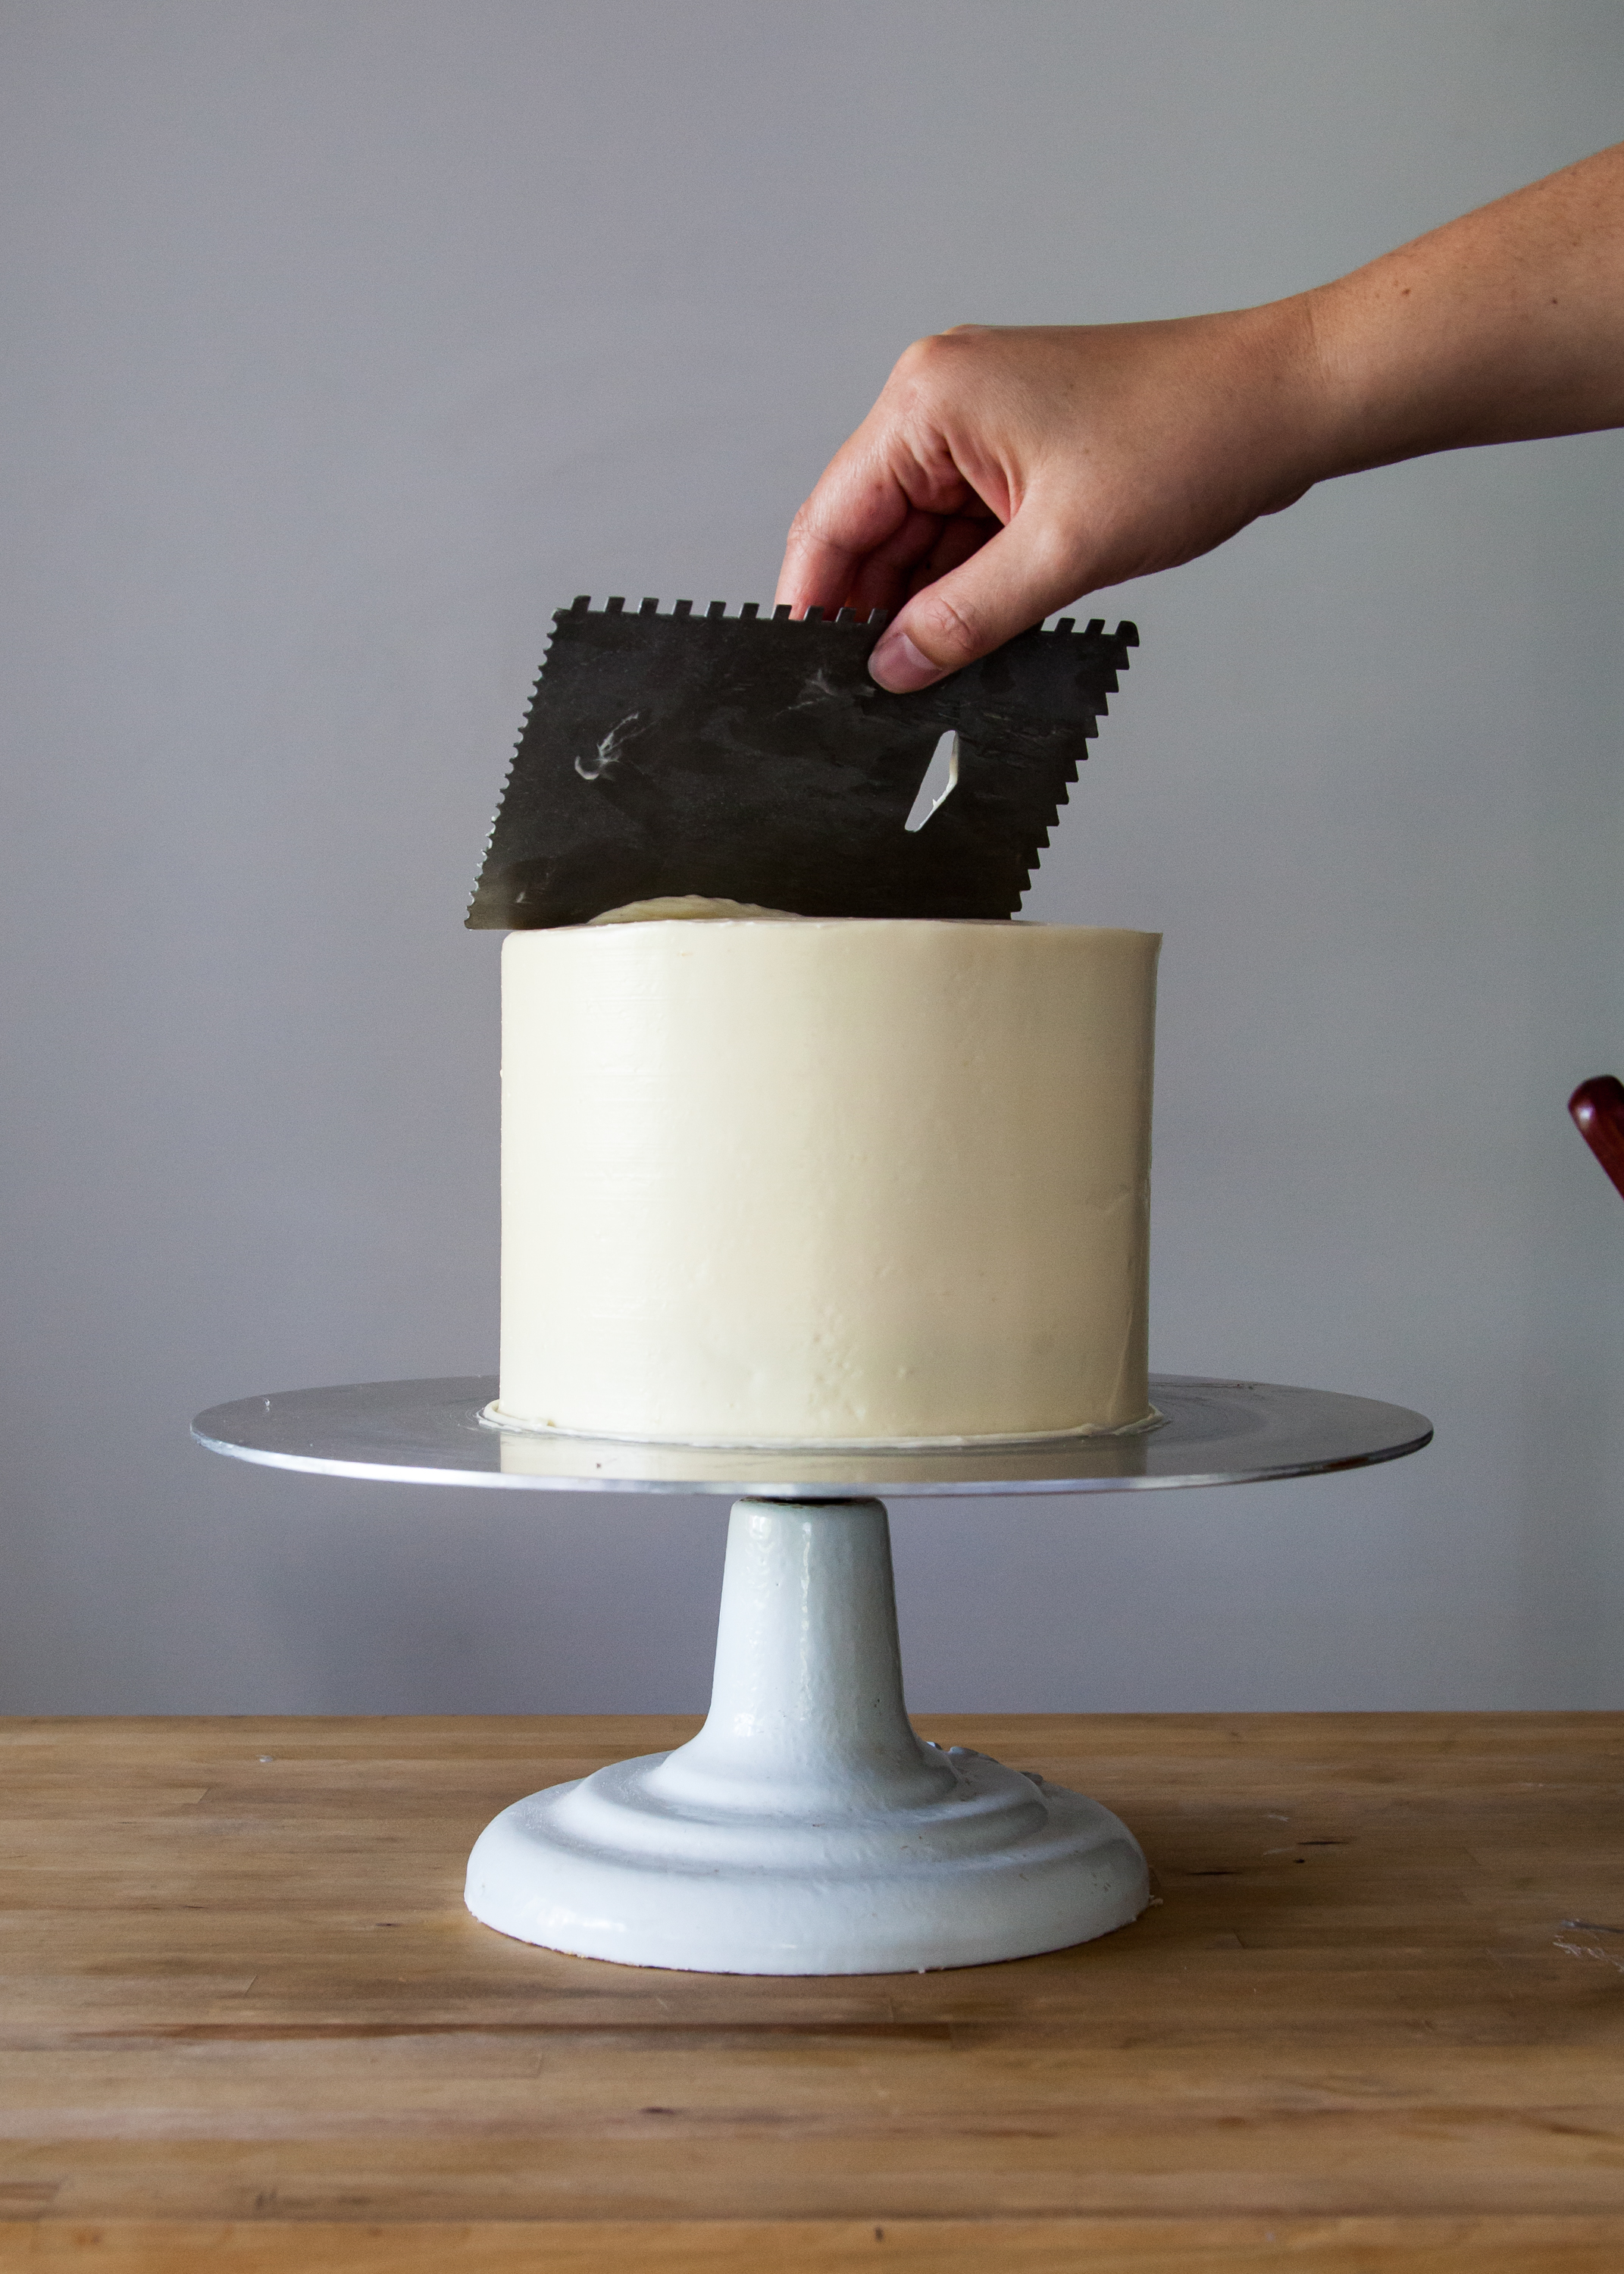
13) Lastly, use your smooth edge to finish off the top. Keeping the scrapper level, give the turntable a couple spins, then carefully turn the scrapper off. Try not to add too much pressure, or you may disrupt the icing on the sides of the cake.
If need be, run your smooth edge around the sides one last time and touch up the top as you see fit.
TIPS: To get extra smooth icing, run your spatulas and scrapper under hot water, dry, and then smooth. You may start this technique in step 9 and thereafter. The warmed metal will help smooth and slightly melt the icing. If you find that your icing is too warm for this technique or feel that it is starting to get "melty" at any point, pop your cake into the refrigerator for about 10 minutes. Repeat the refrigeration and hot spatula process at the very end to create a perfectly smooth iced cake.
lyndsay
great tutorial! going to share it in one of my own posts! ^__^
Tessa
Thanks again for sharing, Lyndsay!
Carmen Quinquilla
thanks for sharing this wonderful tutorial...!
rachel
Wow, awesome tutorial! I've always wondered how 'they' get such perfect-looking cakes. Now maybe I stand a chance. Of particular interest was the crumb coat, and the icing dam. Learned alot here! Thanks 🙂
Carmen Quinquilla
Very helpful...thanks!
Jessica Joseph
I can't view your beautiful pictures for this post. 🙁
Tessa
Oh no! Yes, there seems to be an error with several posts in the archive. I will surely work on fixing the problem. Thank you for bringing it to my attention!
Robyn
Great tutorial! Do you know what the piping tip brand and # is?
Sarah
What a fantastic tutorial! Thanks so much for sharing -- I will absolutely be referring back to this post the next time I make a cake!
Kelly Ward
Wow, perfection! Great instructions; I feel confident I could do a fair job! 🙂
Buttercream Iced Cake | IMG Recipes| Share Your Favorite Recipes, Cooking Tips & Food Images
[…] Buttercream Iced Cake How to ice a perfectly smooth buttercream cake. Vanilla butter cake, apricot filling, with vanilla frostingFor full “Buttercream Iced Cake” recipe click here […]
Keri
What a great, super clear tutorial! Thank you!
Cake Jargon Demystified » Lexi's Crumbs
[…] http://stylesweetca.com/2013/03/24/cake-it-pretty-how-to-ice-a-cake/ […]
keka
Greta recibe Thanks for sharing!!! I love tour blog
georgina
Thank you . Your tutorials are amazing.
Lisa
i'm really looking forward to trying this out (and probably coming back with questions) and i had no idea icing on cake could look so fine!
Natalie
Do you have a link to a recipe of yours for icing like this? I find it hard to get the right consistency for making icing.
Great tutorial too.
Thanks!
Tessa
Natalie,If you search buttercream, then there should be plenty of recipes that pop up. I definitely prefer a Swiss Meringue Buttercream for a smooth finish =)
Lindsey
Where did you get your turntable and scraper. i love the metal version so much more than the plastic?
Tessa
I am not sure where I got the turntable. I think Sur la Table? It is Ateco brand. The scraper is from Michaels crafts =)
spencer
What size icing tip do you use to make the dam?
Tessa
You can use a plain round tip that is about 1/2 - 3/4 inches in diameter =)
Funfetti ‘hot air balloon’ layer cake | The Fakery Bakery
[…] top of one cake, then cover with mini marshmallows and sprinkles. 6. Place second cake on top. 7. Crumb coat cake. Place in fridge for 15 minutes to firm up slightly. 8. Ice top of the cake with plain buttercream […]
Biskv?ta un maskarpones kr?ma k?ka | Cepam.lv
[…] Kad biskv?ts piln?b? atdzisis, to sagriež tr?s da??s. Uz katras biskv?ta ripas malas ar konditorejas šprici (vai t?jkaroti) veido ri??i no balt? kr?ma, tam vid? liek pusi no iev?r?juma pild?juma. Virs? kl?j n?kamo biskv?ta ripu, kuram atkal izveido maskarpones mali?u, bet vid? kl?j atlikušo iev?r?jumu. Uzliekam trešo biskv?ta ripu. Visu p?rkl?jam ar balto kr?mu. (Šeit izsme?oša pam?c?ba k? rot?t un pild?t k?kas.) […]
Monique Boyden-Munroe
what is the recipe for that cake? I have been using duncan and hines mix for my cakes and it is too soft and hollow for me to layer and ice without it falling apart. Is there any way I can get a recipe?